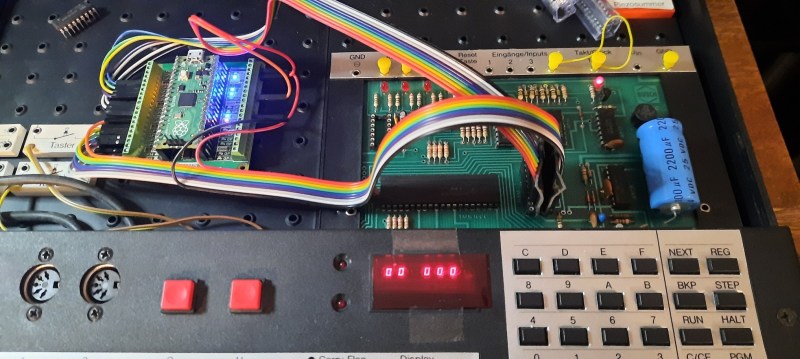
Ever since the Raspberry Pi Pico was introduced in early 2021 we’ve seen the tiny Pi being used for an astonishing variety of applications. It has powered countless clocks, gadgets, games, and accessories for all kinds of computers old and new. [Michael Wessel] has recently added an interesting new application in the “old computer” category, by turning a Pico into a 2114 SRAM emulator for his Busch 2090, an educational computer system from 1981.
The pinout of the classic 2114 SRAM chip is quite simple: ten address lines, four data lines, Write Enable and Chip Select. Since the 3.3 V Pico is more or less 5V tolerant, you could directly connect these signals to its GPIO ports, but [Michael] considered it more reliable to use level shifters between the two voltage domains. He experimented with a few standard level shifter circuits, but quickly realized he had to take the 33 kΩ pulldown resistors on the Busch 2090’s address bus into account. By just adding a couple of resistors to the Pico’s ports he could make completely passive level shifters, which worked just fine since the system’s clock frequency is only 500 kHz.
[Michael] demonstrates his RAM replacement in the video below, with a neat set of blinkenlights showing the data being shuttled around in real time. He has plans to make a proper PCB for his project, as well as to enable all kinds of neat features by modifying the system’s RAM in real time. This is of course not limited to the Busch 2090: the 2114 chip was widely used in the 1980s, so the PicoRAM can probably be used in many other systems of the era. Code for the Pi is available on GitHub if you’re interested in trying this for yourself. If you’d like to find out what programming a Busch 2090 feels like, you can emulate one using an Arduino.


Odd to think that this Busch 2090 was launched _after_ the ZX80 and any number of other actually-useful computers.
Maybe the designers consumed too many Busch lagers during the design phase, slowing down productivity?
B^)
Some models of the construction kit were also known as ELOtronic (blue ELO logo on package). ELO was an electronic amagazine, I vaguely remember. Busch and ELO had apparently worked together at some point. In later years, the Busch construction kits were re-released, with slight cosmetic updates and other numbers. The manuals seemed to have stayed same, mostly, which is a good thing. The drawings I know of the original releases were quite charming, I think.
One could actually argue that the Microtronic is more practical than the ZX80 :D (Just kidding)
Not odd at all. There was a ZX80 for the people who liked this product
– and there was the this Bush product – they could not have sold the ZX80 but their own product.
There are obviously the people who love it even now after many years.
Raspberry PI Pico? Can I be the first to say you could have done it with 4096 555 timers. :-)
unfortunately you did not post the circuit diagram nor the PCB of the 555 implementation..
Why not implement it in LED Logic, then you could immediately see the memory contents …
Once again I wish small, cheap fpgas are more of a thing, it just feels wrong to do this kind of thing with a microcontroller but I see people do it all the time.
I kind of agree, but please keep in mind that the long-term goal of this project is to create a multi-purpose expansion board for the Microtronic: RAM-imaging from and to SDcard, a display that the Microtronic can control, and sound and speech.
They kind of are. For sub £20 you can buy an FPGA module with 52K of BRAM, 8MB of PSRAM, 4MB of flash storage and a built in programmer.
You still have the issue of level shifting though (FPGAs don’t like 5V IO, though you can get 16 bit single directional 5V tolerant buffers for about 50p and 8 bit bi directional transceivers for about 35p).
I just wonder, why the 2114 Emulation was not done using an Arduino nano.
Many people own one and would have the opportunity to replicate it.
Yeah, well the old-style AVR-based Nano is usually not fast enough to do both address decoding and data bus handling in software. I once tried that with the Amstrad CPC… no way without extra-hardware (address-bus latches etc.) Nano BLE is a different story of course! The Microtronic SRAM accesses are actually quite slow, but I wasn’t sure how fast they needed to be when I started that project. The 2114 specs mention a ~60 to 100 uS timeframe for between address is stable, and data needs to be read presented. In that time, I have to decode the address, switch the direction of the data IOs, and fetch the data from the array and present it to the ports. I’ll have my doubts that the old 16 Mhz AVR Nano would be able to do that. So the Pico is a better bet if you want to do all of this in software, like here.
The (old) Teensy 3.5 was 5V tolerant, and ran at 120MHz.
512K Flash, 256K RAM.
A bit more oomph than an Arduino, surely a decent contender for an Emulator?
On my old (Australian) Micro Bee, the memory chips were:
Qty 4 2764 (8K x8 EPROM), and Qty 4 6264 (8K x8 static RAM).
Later mods simplified this to a single 27256 and 62256 (32K x8).
You can get all that (and more) in a microcontroller today. The biggest issue is the 5V tolerance.
I just had a look at Mouser’s offers.
Why not just by a $1 5V SRAM chip and wire just 10 address lines and 4 data lines straight to the board?
Did I miss something here?
You can even buy genuine 2114s still (£2 on eBay), so it does seem an odd choice.
I actually got a good supply of NOS 2114 from Jameco. Please keep in mind that serving as SRAM is only one requirement for this project. The goal is to save and load SRAM images from SDcard. And implement a few more hardware expansions as well (speech, sound, display). The article also mentions this. IMHO the Pico is a very rational and good choice for that.
WoW, another >memulator< using the RP2040.
The programmeable IO of the rp2040 is really good for connecting it to 8bit busses.
For example on the V2-analog card. Here it emulates the firmware rom and sniffs the bus to work as VGA output but can be programmed for other purposes, one is a Z80card emulation.
It can emulate a lot of peripherals on an Apple2 slotcard.