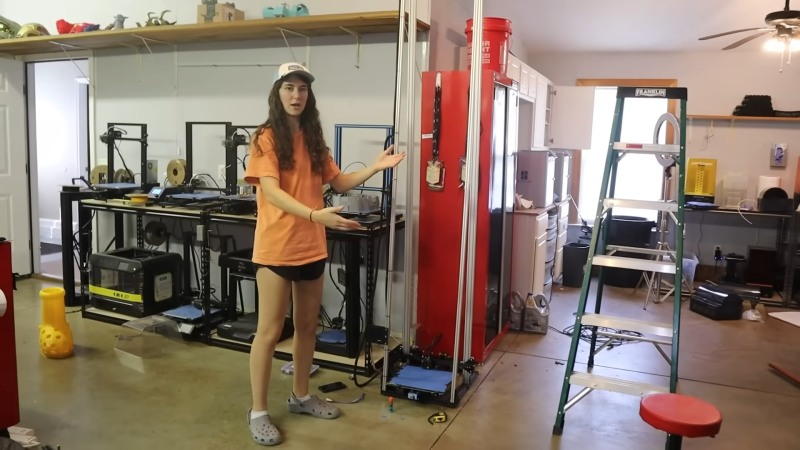
There are two main ways to 3D print large things. You can either make lots of small 3D prints and stick them together, or you can use a larger 3D printer. [Emily the Engineer] went the latter route by making her Ender 3 a full 10 feet tall.

The Ender 3’s modular construction made this feat straightforward in the early steps. The printer was simply disassembled, with longer aluminium extrusions bolted in their place. New wheels were resin printed via Onshape to to run along the new extrusions, which were of a slightly different profile to the original parts. Wiring was also a hurdle, with the 10-foot printer requiring a lot longer cables than the basic Ender 3.
An early attempt to make the Z-axis work with a very long threaded rod failed. Instead, a belt-driven setup was subbed in, based on existing work to convert Ender 3s to belt drive. With a firmware mod and some wiring snarls fixed, the printer was ready to try its first high print. Amazingly, the printer managed to complete a print at full height, albeit the shaking of the tall narrow print lead to some print quality issues. The frame and base were then expanded and some struts installed to add stability, so that the printer could create taller parts with decent quality.
While few of us would need a 10-foot high Ender 3, it’s easy to see the value in expanding your printer’s build volume with some easy mods. [Emily] just took it to the extreme, and that’s to be applauded. Video after the break.


Although this is a great showpiece project, the more interesting aspects are (1.) the printers are enormously scalable with a relative minimum of fuss (and a bit of integrated stabilization for very large prints), and (2.) “you can do it, but should you, and at what layer thickness so you can finish the print before the heat death of the universe?”. With some luck, there might be a similitude analysis that helps define the utility boundary for larger scaled printers.
We’ve been contemplating something like this to print dashboards for old cars/trucks. Nice to see a working on in action!
Make a giant SLS printer
Would be hilarious to use one of the giant full-width LCDs used in new luxury cars as the base of a SLS printer making dashboards
Er, SLA, not SLS.
I have thought about doing this with a big screen TV. Imagine a 55 inch print bed.
If this would have been a corexy design or other static bed system expanded in the Z axis, I would think it would actually have potential for more detailed large items but the bedslinger concept is just not optimized towards taller designs. In the video, its mentioned the hat/tube gets better “quality” as it gets taller but I bet they never actually measure the dimensions and eccentricity of the tube. I’d almost grantee you it starts loosing its true circular path as the whole tube starts flexing/tilting on the build plate as the bed goes back and forth with the print “following the nozzle” for the reduced banding. The circular shape helps mitigate that movement but you can see when they print the sword that it starts showing significant deflection the taller it is. in a bed slinger, both the momentum of the entire system/print and the counteracting force of the nozzle sum up to significant force applied and likely larger deflection unless sufficient supporting structures are in place. In a corexy or other static bed system, you’d remove the momentum from the equation and only end up with only forces from the nozzle which would allow for greater stability at taller heights. It’s a pretty cool concept overall and I think it would be cooler to see someone try it with a static bed system to compare the differences.
Core XY is exactly what we’ve been looking at for our build.
if you ever get around to ’54 F100s, I might eventually end up sourcing something from you if it’s out on the interwebs, although it’s been about 5+ yrs since I’ve made any real progress. Mine had a branch fall across the front and damage the hood, window, and dash.
Totally agree, excellent concept , Totally wrong printer style to do it on. I own an ener3pro (2020) and an ultimaker s3 the ender couldn’t even print a simple straw on the ender due to bedsling 8″(yea I know it’s not food safe, it was just a bedsling test) but the ultimaker nearly hid the layer lines it was so spot on, once you go core xy you never go back unless you already own an ender and over 12million are already on ebay. Great idea to print larger, but how many hats do you need at that height?
That’s a really cool idea. That would would have been great for the Knight Rider dashboard I put in my Austin 1100 in 1987!
We think there is a market specifically for 1940-1970 American trucks…
There is a specific market for general motors dashes of the 2000-2014. They were horrible and cracked and made awful noise down the road, death rattle.
My 1942 Ford truck dashboard is made of steel,
it’s about the only thing that doesn’t need replacing.
Padded dashes became standard in 1966. Those were still metal dashes with padding over them.
There is no doubt a small market for replacement dashboards and covers. But I doubt there is any market for 3d printed dashboards. At that price, modders can afford something good.
You can’t possibly make a dash cooler than the one in my 1960 Chrysler Saratoga. It’s Jetson’s art.
In the 80s and later, dashboards are designed to last 7 years. But someone somewhere owns the tooling to make new ones.
To me that sounds like a job that would be better suited to a normal bench style CNC machine with a print head, or if you can deal with the pain of working around the available belt widths (or commission a belt) a belt ‘infinite’ printer. This make it taller approach seems to me like it would force the printing orientation to be entirely the opposite of what you would really want for a dashboard.
I’d also suggest you would probably get quicker and better results CNC carving a buck and vacuum forming a plastic sheet over it for the skin. Though that does of course need more storage space if you intend to use that Buck again.
Now make it 10 wide and 10 foot long and I’ll be happy.
“We” know you live on the Isle of Man, so “we” know you’ll also want a life time supply of free filament for it too!
B^)
P.s. Will your first project with it bee a beehive?
B^)
Oh, about 3 meter high. I thought that was a typo.
You thought what was a typo? The units of measure? Thank goodness you cleared that up for us plebes who can’t convert units.
History seems to repeat in the 3D print world.
https://www.rooiejoris.nl/z-unlimited/
Nice but sometimes a Delta is fun to scale up too.
https://lh5.googleusercontent.com/-5EocO8RiPYo/VAU5CGqf26I/AAAAAAAAbTI/YJJk6sUb3kY/s1600/0901141537c.jpg
Just the thing for printing large scale model aircraft wings in a single piece. Slide a carbon fiber spar through to reinforce against breaking at a layer line and done. With the layer lines on the surface aligned with the airflow they won’t be as much of a problem. Cover the wing with MonoKote and they’ll be smoothed over. Could reduce the amount of 3D printed wing by reducing it to a framework like traditional balsa construction and cover with MonoKote. Or use silkspan for that real oldschool style.
On the downside, it will be heavy.
But on the downside, it will also be brittle.
Finally, on the downside, it will be expensive, slow to make and prone to restarts.
https://youtu.be/L0zOuqq8RE8?si=hZ7WfC9FqY8OaIxk
This guy did it 7 months ago!
The hat gag was worth the build alone
I would like to visit regarding building a printer for simple 8-10-12 ft. support poles – to support light/mid weight structure. Please advise. TKS G>