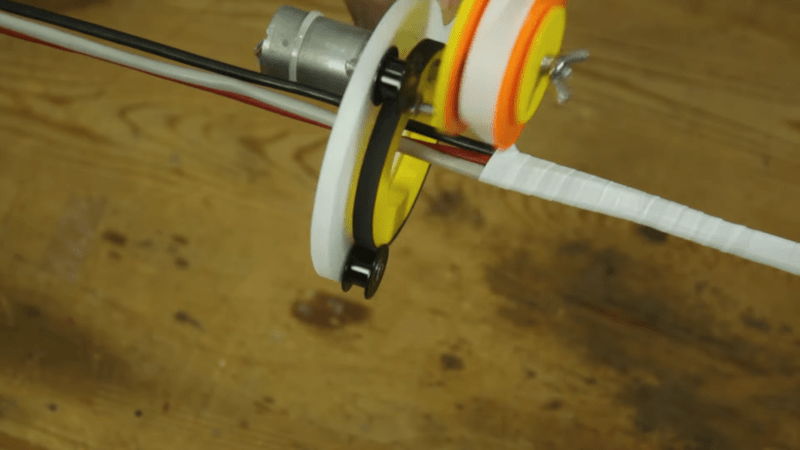
[Mr Innovative] likes to keep his wire harnesses tidy, but it is a pain to neatly wrap cables. So, he automated the process using a combination of milled acrylic and 3D printing. We hope the design files will be up on his website soon, although the mechanism is similar to another wrapping machine he made a few years ago. However, it can still be a source of inspiration if you want to do a unique take on it.
To use the machine, you feed the wires through the center hole and mount tape on the spool. A motor spins the spool and you only need to slowly advance the tool to get a nice close wrap. Naturally, you can wrap tape around wires by hand, so this is a bit of a luxury item. However, we could see modifying it to move the cable through at a constant rate with another motor, which might do a better job than you can do by hand.
We couldn’t help but wonder if you could start with a ping pong paddle instead of cutting the frame out of acrylic.


There is one old technique I find aesthetically pleasing, but had no opportunity to use it yet, called cable lacing. It’s quite a bit of work, but it looks great. I once saw a wire loom done that way inside soviet synth organs – 88 identical wires laced together with each group of 11 wires separating from main loom to connect a single octave. Wires were white or cream, thread was dark green.
I have made wiring harnesses for autos, machine guns and seats on aircraft, but I have NO experience in wrapping the wires/harnii after the testing as in , we mail/deliver the parts, with the testing data on sheets and a paper tag w/assembly dates and, of course, your outfits badge number/initials for who inspected them. I was unaware of any large corp. or entity that would wrap the wires.
This wrapping and ID of the set wraps would have made our (harness makers) jobs and docs MUCH easier to read AND document. Thank you !!
It’s pretty easy to do and is better than cable ties for permanent harnesses. The NASA cabling manual has instructions on it, you can buy heavy waxed braided thread meant for sewing leather harness etc which works alright.
I use cable lacing fairly often if I have some stuff that will probably be working together for a while, like paired ethernet cables on a server or the wire bundles in my 3D printer (lacing is really light even compared to braided cable loom). I use some waxed thread that is usually used for leatherwork, real cable lacing cord is a lot bigger than I typically need.
Lacing was common in the old circuit-switched telephone central offices. The cabling in those racks were always laced together and to their framing so that they could make it through an earthquake unscathed.
I’m afraid it’s mostly a lost art now that everything is packet-switched.
Yeah, it was something we were taught when I was doing my HND in the uk back in the 70s. Very satisfying, and I still have a spool of the waxed twine we used in the field. It’s actually a great way of bundling cables, it’s flexible and you can see the wires as well, and it lasts for decades unlike the PVC tape which goes gummy and brittle.
IMSAI Guy to the rescue: https://www.youtube.com/watch?v=EN8dDR4ipBU
Thank you Gamma Raymond, after almost four years i finally found how this cables are binded together. Best comment and link of hackaday of 2024 for me.
https://hackaday.com/2020/01/29/soviet-soyuz-clock-teardown/
I was totally fascinated by the binding tecnique and wanted to try this on my PC cables for better air flow. If is save enough for space than it should be totally fine on earth.
It’s done in aircraft because the constant heat / cold cycles would just snap zip ties.
You have to admire this chap’s skill and ability. He always comes up with interesting little projects to automate the mundane. I recommend his channel as a source of his mechanical knowledge.
Is that a Flex-O-Lite Ping Pong Paddle? Asking for a friend.
Early in my career, we laced wiring harnesses. That was mostly replaced by tie-wraps. In some fields no wiring is forever, we were always adding/moving/deleting wires so it’s easier to cut and replace tie-wraps than to re-lace.
These days I’m only ever working on one-off or custom-wired projects, and troubleshooting other projects, and in these a loose harness aids repair and modification. So, alas, I doubt I will ever do pretty laced or wrapped harnesses. I will use Panduit, split loom, spiral wrap, or some sort of tubing to organize and protect wiring where needed.
On my vintage german car, the harnesses are wrapped with a black fabric tape rather than plastic, and the edges are not overlapped, leaving a gap about half as wide as the tape.
Uggh. My old Volkswagen used this nasty, loosely-woven fabric tape that was impregnated with… I’m gonna say some kind of tar.
It left this nasty black, smeary, sticky, un-cleanable goop on the wires every time you had to go in there.
There were some wiring problems I never fixed, specifically because I hated going into the harnesses so much.
Tesa tape.
Tesa makes a lot of stuff, but the fuzzy cloth tape and the high-heat cloth tape are easiest to find if you just search for their name.
Tesa tape rocks! It offers protection even Super 88 can’t.
My first job was taping wiring harness for Ford Pinto rear wiring that ran past the backseat barbecue. Many tapers worked on the rotary. The roll of tape had no stickum but its stretchy grip on the roll and when done held well, a piece of regular tape was put on the end. The first thing you learned is to hold the roll backwards so the outside of the roll faces the wires, only then do you get a tight wrap.
There has to be friction on the roll or you get a loose wrap. This drag will pull on the straight wiring path. This makes me wonder how well this rig works. I suppose if it’s loose but sticky it will do till that goo starts seeping out, yuck.
I often braid a few wires that run a short length. I’ll have a helper at the other end of the room and orbit 2 or braid 3 for audio cables for temporary setups so no tape gunk ever gets around. Even gaffers tape as well as electrical tape seems to be coated with a chemical time bomb now.
At 5:30 in the video is when the wrapping (serving) happens, but this is some truly old school wrapping techniques that mechanically could translate to electronics https://www.youtube.com/watch?v=Uuh_T648J_8
That was my first thought as well.
For those who don’t want to watch videos, in traditional boat building, ropes are often ‘served’, ie wrapped with a thinner cord, for protection, grip, etc.
To do this, the rope being wrapped is suspended from both ends. The roll of material to be wrapped around it is attached to the bottom of a ‘serving mallet’, which resembles a mallet, with a grove where it meets the rope to be covered. By changing how many times the covering is looped around the ‘handle’ of the mallet you can fine tune the tension it has, and by flicking the main rope, the mallet will spin around it, wrapping it as it goes.
So, after securing the start of the wrapping, and manually doing the first few turns, you can stand there and just keep flicking the main rope to spin the mallet around and around, and it will work it’s way down the rope, wrapping precisely as it goes. No motors needed.
I worked for a traditional butcher years ago.
Lacing a joint of meat with butchers twine is a skill you don’t see very often now.
Get a patent that’s brilliant.
I’ve done a lot of wiring on motorcycles. In my friend group I’m the victim when it comes to making motorcycle wiring looms from scratch for custom bikes (don’t worry, they help me all the time). I always want to become better. Right now, I use a combination of cloth tape and heat shrinks. It’s a process that takes time to master and every motorcycle has better looking wiring. If people have tips, I would appreciate it. Here are some of my tips:
1. Never use silicone wiring in a loom. Although it feels amazing to the touch, it can handle high temperatures and is super flexible, the silicone wears through rather quickly, if the loom has the ability to move, even slightly.
2. Never use those 3M superseal link (or clone) connectors. Seems like a great idea, but moisture buildup inside is a huge hassle and causes many more problems down the road (literally). Those .250 lock connectors and similar, are much better to use.
3. Electrical tape is pure evil. You can use it to connect cables temporarily, to make wrapping easier (and taking it out before wrapping it), but never leave it exposed, as in this video. The glue will leak out, even when using proper 3M electrical tape, like super 88 and temflex, making everything sticky after a while when exposed to the elements and the tape will get loose. My current method is using proper Tesa cloth tape and finishing it with heat shrink on both sides if possible.