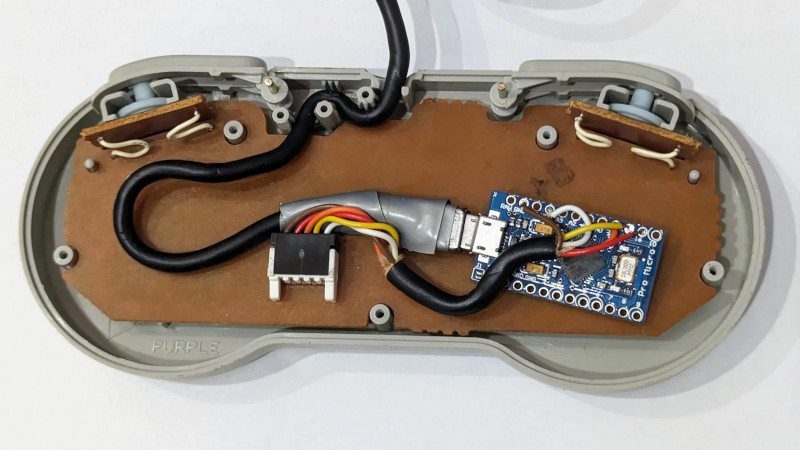
Even for those of us who are fans of retrocomputing, it’s fair to say that not everyone plays their old-school games on real old-school hardware. The originals are now fragile and expensive, and emulators are good enough that if the gaming experience is all you’re after there’s little point in spending all that cash.
There’s one place in which the originals sometimes have the edge though, the classic controllers are the personal interface with the game. So when [Dome] found a SNES controller in an Akibahara shop, of course he picked it up. How to make it talk to a PC? Tuck an Arduino Pro Micro inside it, of course!
What we like about this project is that instead of ripping out the original electronics it instead hooks the Arduino board onto the original serial interface. We might have made a Nintendo socket to USB box to keep the original cable, but either way, the SNES (technically Super Famicom, because it’s a Japanese market unit) original stays true to its roots. The Arduino polls the clock line at the speed of the console, reads the result, and translates it to a USB interface for the computer. There’s a full run-down of the code and how it was made, should you wish to try.
Of course, if you don’t always have a PC handy, you could also put the whole computer in the controller.


Just a thought: I’ve seen NRF52840 microcontroller modules that also have an onboard LIPO charging circuit (e.g. Seeeduino XIAO BLE). Using the NRF5280 instead of a ATMEGA32U4 would allow to have both a wireless mode and a wired mode, and with the charging circuit would also charge the battery when plugged in.
The nice!nano is even in the same footprint as the pro micro, I believe.
“Waaaah. I’m mad they’re doing something I don’t like.”
I’ll go throw an original NES into my wood chipper now, because I can.
Cool, feel free to climb in after it.
You know you can buy an 8bitdo right?
Right?! 😃
https://media.giantpachinkomachineofdoom.com/blog/2023/11/FuW4l79WcAUccqC.jpg
This is Hackaday, not Buy Something Off the Shelf a day.
One thing that always seems left out of write ups of NES and SNES contollers which could really help anyone looking to start tinkering themselves
They’re just parallel to serial shift registers with buttons attached!
8 bit for NES and 16 bit for SNES.
I’m not sure why this seems to be a dirty little secret, the information is all out there but never said like that. Maybe it’s because after reading up, wiring and programming (which is still a lot of work) when it comes to the write up nobody wants to admit that in the end the old controller hardware really was that simple. I don’t mean to belittle Dome who did a great write up. I failed to do any kind of write up when I tinkered with an old SNES controller a while ago, but that simple piece of information would have helped my understanding so much at the start.
It’s a remarkably simple and elegant solution on Nintendos part, just latch off the V sync and read in the results.
Once I realised that reading the controller was just dealing with an old shift register chip and some noisy old buttons it changed the game a bit. The timings listed have more do with the console and the tv system than with the controller. You can read it at whatever rate you want limited only by the specs of the chip or more likely how crappy the buttons are in your controller. They’re old 5V only so something like the CD4021 is probably a good datasheet to look at and level shifters would be a must with a 3.3v micro. I can’t remember what I ended up with, I defintley didn’t push it, but there was no need to get hung up on the exact timings Nintendo used.
Glad I got my SNES and NES a couple years ago b4 the price exploded. Emulators are fine and all, but nothing beats OG hardware and a CRT. Especially when playing something like Mike Tyson’s Punchout. I tried that on Emulator and thought I forgot how to even play the game! Timing was so much more import in those retro games since alot of the mechanics of the games required it.
Lol, the last 3 RP2040 I got were $3 EA and Pro Micro sized. And you can play a port/version of Doom or a NES emu
https://learn.adafruit.com/nes-emulator-for-rp2040-dvi-boards
https://hackaday.com/2022/03/15/doom-comes-to-the-rp2040/
“Serial interface” is legit just a 74xxxx series shift register. Every time it gets polled it just reads the 8 buttons right out one per clock cycle.
That’s cool.
USB controllers that have the same shape, buttons and feel as an SNES controller though… a dime a dozen on the internet these days. I think I’d rather give the original hardware to a collector than mod it for USB.
Do you actually use cheap Chinese USB controllers?..I do..they’re not that good..8bitdo are wireless and cost a lot..they’re good..also if you can get hold of the American Buffalo branded SFC/SNES clones..I read they’re quite good too..not available in Europe as far as I’ve researched..I bought the best I could find..one branded with Cirka..slightly better than the no-name 2 dollar clones..but never gonna compete with Original pads as they have a quality feel to them..
Dang, maybe I should do a write up and post the hack I did on my L-TEK DDR pad. I bought it before the seller switched from using TinyUSB boards, so I swapped that with a Pro Micro and added a SNES controller port so I can have almost a full XInput controller. I even baked in some button combos to switch what the DDR arrows, D-Pad, and face buttons map to on an Xbox controller as well as retaining the current layout between power cycles.