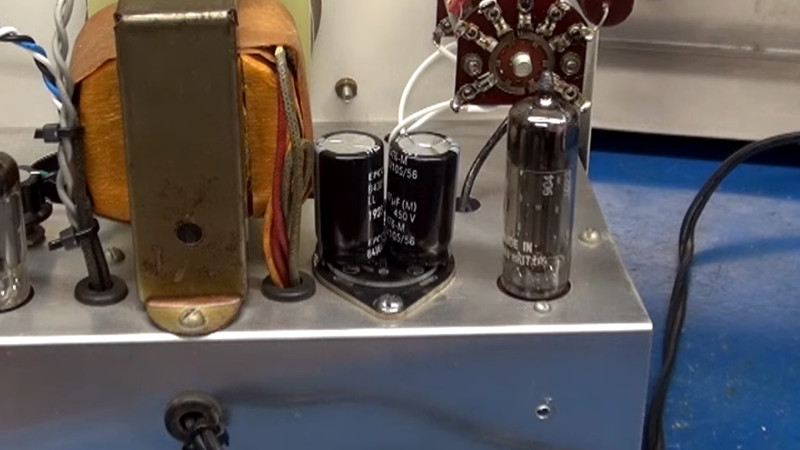
Anyone who’s worked with older tube-based equipment will be familiar with the type of vintage electrolytic capacitor which integrated several capacitors into one can. Long obsolete, they can be bought as reproduction, but unfortunately at an eye-watering price. [D-Lab Electronics] introduces us to a solution using a very useful kit, that it’s worth sharing.
The piece of equipment in the video below the break is a rather lovely Heathkit oscillator, following the familiar phase shift model with a light bulb in its feedback loop. It’s a piece of test equipment that produces a low-distortion sine wave output, and would still be of use to an audio engineer today. He replaces the capacitor with two modern ones on a multi-cap board from [W8AOR], who sells a variety of these kits for different configurations.
We’ve done this very repair more than once, and it has usually involved wiring, heatshrink sleeving, hot glue, and cable ties, looking very messy indeed. It’s not that often that a kit catches our eye as this one has, but we know we’ll be finding it useful here some time in the future. Meanwhile if you’d like to know why this oscillator has a light bulb, take a look at our piece on distortion.


My favorite way is to simply leave the old can on top, clip off the leads underneath so they are only connected to ground, and solder in replacement axial caps. There’s usually plenty of space for the modern ones below deck, and it leaves the nice looking metal can on display. Hit it with a little polish.
Eew. I wouldn’t like to have a corpse in an instrument. Isn’t there a clean way?
Neither solution seems to be elegant. The one in the article is simply cheap, while this one tries to preserve authenticity, at least.
But that fix looks to me akin to keep a leaky barrel battery installed on a 386 motherboard, with just one pin being disconnected and a new battery being installed in parallel.
What about rebuilding the original capacitor from scratch?
Paper/aluminium foil caps can be build easily, but aren’t secure by today’s standard.
Or how about refurbishing? Wouldn’t it be possible to install an expensive, but small form factor capacitor inside the original metal can, which has the correct specifications?
I’m just asking. I know a bit about old radio restoration and remember how much effort some vintage radio people spend to restore old anode batteries.
They keep the chassis with the original label, but install 10x 9v batteries inside.
Moreover, some people do re-print the original labels and build the anode battery chassis from scratch.
Compared to this, the approach in the article is just plain lazy. Not that it doesn’t work or that it isn’t useful.
No, of course, that’s not the issue. It’s more about elegance and showing respect to a museum’s piece.
No offense, though. Anx fix is better than none, it’s just.. Oh, well.
Have you made paper & foil caps from scratch? That might be a profitable business opportunity for you.
I did, yes, on a kitchen table. But not for this purpose.
It was 300 to 500 pf model that’s variable, for a crystal radio set.
Building one with several dozen μF surely requires much more precision, much more finesse.
So I don’t think it’s the right business model for me. Thanks for the idea, though! 🙂
Leaving the old cap on top is done so the equipment looks original at a glance. Some people just fix them, others try to make the top side look original, and others put new parts in the original capacitor casing so it looks completely original.
Yes, I understand. But the restorian or perfectionist in me wouldn’t accept this approach, I’d suffer from feelings of guilt.
I mean, would the original manufacturers of back in the day -which constructed the device- approve such a “fix”?
If they were here, what would they tell me?
Personally, I’d be ashamed looking in their eyes.
That’s the point. I’d rather do it right straight away, if I can. Economic considerations/profits would be rather irrelevant to me. It’s about art and culture.
Btw, this situation here reminds me a bit of the first Bean movie, in which the painting had been destroyed. The solution was similar one to here (install a facsimile). ;)
“I mean, would the original manufacturers of back in the day -which constructed the device- approve such a fix?”
Yes, they would if the replacement was adequate. Repairing means getting a set working again and nobody cared if a component hidden inside the box didn’t look like the original one as long as it did it’s job.
Leaving the original can capacitors disconnected on the chassis is absolutely a valid repair method.
There isn’t always room inside the can, and mounting modern capacitors above the chassis is absolutely a worse solution.
It would be different in my eyes if there was a significant risk of corrosion from chemical leakage after disconnecting, but in my experience this dosen’t happen to electrolytic capacitors from the vacuum tube age.
“and others put new parts in the original capacitor casing so it looks completely original.”
That’s the solution I’d personally select, I think. 😃
In case of a passive part, like capacitor or resistor, I mean.
If it was about a light bulb or an electron tube, I’d still hesitate a bit.
Because that reminds me of an acquaintance.
He “repaired” a tube radio by bypassing a broken rectifier tube (for power, not demodulation) with a random silicon rectifier diode.
I wouldn’t have done it that same way, personally. I would have tried to either find a proper replacement or
build a fine looking replacement.
For example, by gutting the old rectifier tube and installing the diode in an esthetically looking way.
Maybe adding some miniature incandescent lamp (not cold blooded LED!) to simulate the heating.
It would double function as a visual indicator that the “tube” is properly plugged-in into the socket. 🙂
I used to take the old caps out of the metal cans, then install modern caps inside the can, then put it back into the radio. You can’t do that will all of them, but it works for many because modern caps are so much smaller than the old ones.
So easy: https://hayseedhamfest.com/
Replacement can and tubular capacitors, built new. (I have no affiliation.)
Hayseed Hamfest, that’s the name I was trying to remember and post here :)
Beloved of Bill Meara and Pete Juliano of the Soldersmoke Podcast and boat anchor repairers all over.
I’ve always carefully opened up the crimp on the bottom of the can, pulled out the old innards and disposed of them, leaving the paxolin sheet and the legs that connected to the foils in the old capacitors. Then solder new capacitors to the legs and insert back into the can. If you’re careful with the crimp, the result is indistinguishable from the original. 1930s wax potted cardboard box type capacitors take a bit of digging with a warm knife to get the content out, but again can be repacked with new capacitors and look original.
On the past I have used a pipe cutter to open the old can, 3D printed a sabot to hold a newer smaller cap inside and taped it shut with some burnished aluminium tape.
It looks pretty good when done and is dead easy to implement.
I remember when you could still buy them for dirt cheap. Even into the 1980’s-ish.
take two caps, solder them together. add wire to create new terminals, then heat shrink the whole kitten caboodle. thats usually what i do when i need to combine capacitance in lieu of the proper part.
I don’t think a boodle of kittens will like being heat shrinked, better stick to the kith.
It’s so funny watching people discuss the merit of leaving ancient capacitors in otherwise working test equipment. I can understand historical preservationism for something that will have its internals displayed, like at a museum, but ultimately these are tools. They were designed to be used, to serve a purpose, to have a function. If the handle on your old axe rots, most people wouldn’t try to carefully preserve and replicate the storied patina of the old, now disintegrating wood, they’d replace the handle!
Personally I’m all for these little adapter boards.
Why are those old capacitors inside a can? Is it not to offer shielding from noise? Would you not need to add new shielding around the new capacitors?
There is a point at which perfectionism fails to serve a purpose. I’m all for making it look original, but being safely repaired.