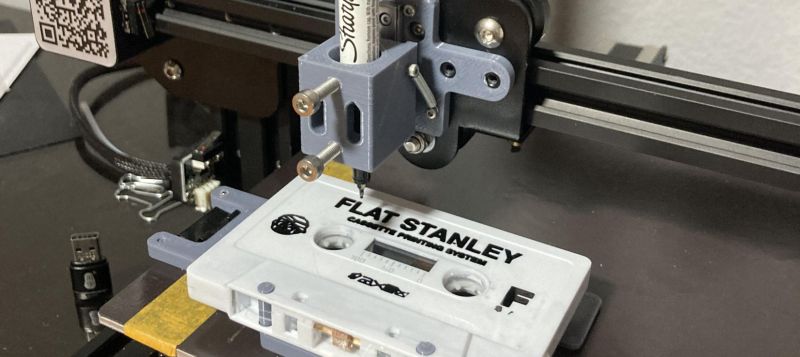
One way to look at FDM 3D printers is as machines that turn filament into three-dimensional objects, but at their core they are much more versatile than that. Since they can move just about any tool around in 3D space, you can also use them for plotter tasks, a fact that [Geoffrey Gao] made use of when he had to write labels for a stack of music tapes. The resulting FS-Plotter project is based around a Creality Ender 3 FDM printer. Standard g-code from PrusaSlicer is used to move a pen around, after the latter has been fitted into a (3D-printed) spring-loaded fixture.
The cassette tape is fitted into its own fixture that is attached to the printer bed to hold it in place, while the writing utensil can move in its spring-loaded fixture to account for some unevenness on the surface it’s writing on. In the linked GitHub project a PrusaSlicer profile is provided that can generate 2D plotter Gcode. Where [Geoffrey] says that this project is very useful to him as a musician is that it enables him to make small runs of tapes with professional printing, without running into extra expenses.
Beyond putting a writing utensil into the holder, it could also be used for light engraving and similar tasks, while still making it possible to switch between the FDM hotend and this plotter attachment as needed. For about $30 in parts, it doesn’t seem like a bad deal to get a small-ish plotter and maybe give that old Ender 3 a second life.


I was researching means of turning a 3D printer into a plotter a few years ago when I needed to do some printing of stuff and didn’t have a 2D printer. At the time I’d found someone else’s pen holder design and a smattering of random stuff that could kinda-sorta convert a DXF into gcode (badly), but nothing that worked well enough for me to want to spend any more time on the project and I ended up just buying a laser printer instead.
It’s really cool to see a comprehensive, working project come about, and I’d be tempted to see if I can get this working with my Artillery Genius.
I built this one https://www.thingiverse.com/thing:910550 a few years back. No, I’m not the author of it, I just downloaded and printed it.
I tried some inkscape plugins if I remember right but never really got that working. That I think would be the “right” way to do the software.
What did work for me was pretty simple. I was starting with svg not dxf but I think the process would be pretty much the same. I Googled and found web hosted apps where you can just upload the svg, tell it the height you want and it converts it into an stl extruded to that height. Later I just started using OpenSCAD to do the same thing so I wouldn’t have to upload my stuff to the internet.
linear_extrude(0.2) import(“thingamabob.svg”);
The trick is to make the extrude height come out to only one layer if it were to be 3d printed.
Then you load that stl into your favorite slicer. Make a copy of your normal profile. In this one set your hotend and heated bed both to 0. Also, and this might take a little more searching in the advanced settings… there should be a setting to make the printer raise the nozzle by some number of mm whenever it travels from one spot to another without extruding. I don’t remember what that was called and back then I was still using Slic3r and switched to Prusa Slicer since so.. could be named differently now anyway. But find that setting and make sure to give it at least a few mm to account for any irregular surfaces you want to print on.
With that gcode the printer will happily trace out the motions it would have made printing the 1-layer shape, raising wherever there wouldn’t have been plastic. With a pen attached that will draw your picture.
Anyway, that’s the easy way as I know it.
The bad side of this is all that raising and lowering. Most printers are not optimized for fast vertical moves! It really slows things down. Probably would be undue wear if you did this often too although it should be fine for occasional use.
I have thought about designing a pen holder with a solenoid or a servo to move the pen up and down so the carriage could stay at one z-level. I thought maybe that could plug in where the part cooling fan would normally go. Then I could do a string-replace to replace the extrude commands in the g-code with fan on/off commands.
I never got motivated enough to actually try this though. I’d love to see someone else do it!
Oh, yah, there is also tweaking you can do with line width, I think there are slicer settings equivalent to that. I didn’t bother much because I was only attempting a rough job with a sharpie but if you wanted to use a finer pen and get the best result you would probably need to tweak that.
Maybe nozzle diameter…
Would hot pla stick to these tapes?
Even if it did then it could cause problems with inserting it since you are then changing it’s physical dimensions. Raised text is also likely to get stuck on stuff.
Was wondering about that too. The raised trim around the edge does not seem to be there for no reasonm on the other end…it leaves some indented space in the middle surface for some..hacking?
Also rewinds the cassette.
That’s what Bsides for.
Oh what the 80’s-no the entire cassette age could have been like. Imagine not causing a bad swerve whilst reading writing on mix tapes at the wheel!
What? Are you suggesting people used to make and label mixed tapes while driving? Listen to them yes… make them… nobody I knew!! LMAO
Have to admit I rewired a stereo while driving on a very long drive…
…although it was a VW bus, so the rate of travel was perhaps a bit below the norm…
This might be a good use for my Ender 3 after I bought a Bambu Lab printer. The Ender 3 now feels so outdated as a 3D printed, it might be better as a 2D one!
I just found a use for my self igniting voxel Aquila printer… Thank you
I made something similar… Takes vinyl cutter blades or pens, and no need to remove the hot-end so I can still 3D print too. https://hackaday.io/project/186784-vinyl-cutter-for-ender-3-v2