2D Plotter attachment for 3D printer.

Ender 3 Plotter Attachment For Printing Onto Cassettes

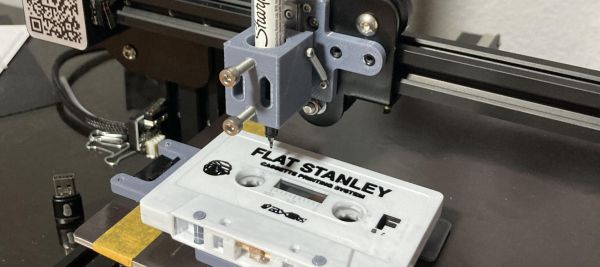
One way to look at FDM 3D printers is as machines that turn filament into three-dimensional objects, but at their core they are much more versatile than that. Since they can move just about any tool around in 3D space, you can also use them for plotter tasks, a fact that [Geoffrey Gao] made use of when he had to write labels for a stack of music tapes. The resulting FS-Plotter project is based around a Creality Ender 3 FDM printer. Standard g-code from PrusaSlicer is used to move a pen around, after the latter has been fitted into a (3D-printed) spring-loaded fixture.

The cassette tape is fitted into its own fixture that is attached to the printer bed to hold it in place, while the writing utensil can move in its spring-loaded fixture to account for some unevenness on the surface it’s writing on. In the linked GitHub project a PrusaSlicer profile is provided that can generate 2D plotter Gcode. Where [Geoffrey] says that this project is very useful to him as a musician is that it enables him to make small runs of tapes with professional printing, without running into extra expenses.

Beyond putting a writing utensil into the holder, it could also be used for light engraving and similar tasks, while still making it possible to switch between the FDM hotend and this plotter attachment as needed. For about $30 in parts, it doesn’t seem like a bad deal to get a small-ish plotter and maybe give that old Ender 3 a second life.

The Insurance Buys The Wheelchair, But Not The App To Run It

The writer Cory Doctorow coined the term enshittification to describe the way that services decline in quality as their users become the product. He was talking about online services when he came up with the word, but the same is very much true when it comes to hardware. Items which once just worked now need apps and online services, with marginal benefit to the user if any. It’s one thing when it’s your soundbar or your washing machine, but thanks to Lemmy user [@win95] from the Netherlands we’ve seen a far more egregious example. People with disabilities are being provided with new powered wheelchairs through their medical insurance, but are then discovering that unaffordable in-app purchases are needed to use their features. Continue reading “The Insurance Buys The Wheelchair, But Not The App To Run It”

Upgrading PC Cooling With Software

As computing power increases with each new iteration of processors, actual power consumption tends to increase as well. All that waste heat has to go somewhere, and while plenty of us are content to add fans and heat sinks for a passable air-cooled system there are others who prefer a liquid cooling solution of some sort. [Cal] uses a liquid cooler on his system, but when he upgraded his AMD chip to one with double the number of cores he noticed the cooling fans on the radiator were ramping quickly and often. To solve this problem he turned to Python instead of building a new cooling system.

The reason for the rapid and frequent fan cycling was that the only trigger for the cooling fans available on his particular motherboard is CPU temperature. For an air cooled system this might be fine, but a water cooled system with much more thermal mass should be better able to absorb these quick changes in CPU temperature without constantly adjusting fan speed. Using a python script set up to run as a systemd service, the control loop monitors not only the CPU temperature but also the case temperature and the temperature of the coolant, and then preferentially tries to dump heat from the CPU into the thermal mass of the water cooler before much ramping of cooling fans happens.

An additional improvement here is that the fans can run at a much lower speed, reducing dust in the computer case and also reducing noise compared to before the optimizations. The computer now reportedly runs almost silently unless it has been under load for several minutes. The script is specific to this setup but easily could be modified for other computers using liquid cooling, and using Grafana to monitor the changes can easily be done as [Cal] also demonstrates when calibrating and testing the system. On the other hand, if you prefer a more flashy cooling system as a living room centerpiece, we have you covered there as well.

A vanadium based flow battery made with 3D printed parts

A Vanadium Redox Flow Battery You Can Build

Vanadium flow batteries are an interesting project, with the materials easily obtainable by the DIY hacker. To that effect [Cayrex2] over on YouTube presents their take on a small, self-contained flow battery created with off the shelf parts and a few 3D prints. The video (embedded below) is part 5 of the series, detailing the final construction, charging and discharging processes. The first four parts of the series are part 1, part 2, part 3, and part 4.

The concept of a flow battery is this: rather than storing energy as a chemical change on the electrodes of a cell or in some localised chemical change in an electrolyte layer, flow batteries store energy due to the chemical changediagram of a vanadium flow battery 
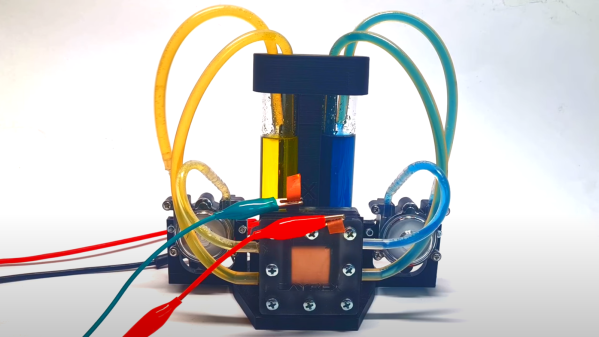
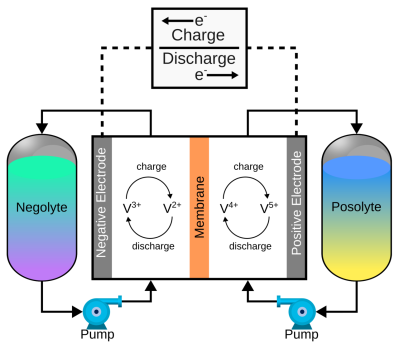
of a pair of electrolytes. These are held externally to the cell and connected with a pair of pumps. The capacity of a flow battery depends not upon the electrodes but instead the volume and concentration of the electrolyte, which means, for stationary installations, to increase storage, you need a bigger pair of tanks. There are even 4 MWh containerised flow batteries installed in various locations where the storage of renewable-derived energy needs a buffer to smooth out the power flow. The neat thing about vanadium flow batteries is centred around the versatility of vanadium itself. It can exist in four stable oxidation states so that a flow battery can utilise it for both sides of the reaction cell.

Continue reading “A Vanadium Redox Flow Battery You Can Build”

Rosie The Robot Runs For Real

On the recent 256th episode of the Hackaday podcast, [Kristina] mentioned her favorite fictional robot was Rosie from The Jetsons. [Robert Zollna] must agree since he built a reimagined Rosie and it even caught the notice of mainstream outlet People magazine.

We didn’t find much information outside of the TikTok video (see below; you can use the Guest button if you don’t have an account). However, there were a few clever ideas here. First, the robot mechanism is actually Rosie’s vacuum cleaner. Like a tail wagging a dog, an off-the-shelf floor vac tows the robot body.

Rosie herself is clearly an office chair base with an artistic body. The head rotates, and the mouth appears to open and close, so there’s apparently a little more electronics inside, but that’s nothing you couldn’t throw together with some RC servos and an ESP32.

Some videos cover the build so you might be able to glean more details, but the bite-sized videos aren’t very descriptive even though they are fun to watch. If you thought folks documenting their projects on YouTube was bad, you’re really gonna love the TikTok generation.

We like the look of Rosie, but as a practical matter, we need our robot vac to be smaller, not larger. However, using these off-the-shelf robots as a quick start for a robotics project is reasonable. Especially if you can pick up one cheap. Not that that’s a new idea. They even make stripped-down units with the intent that you don’t want to use them as cleaners.

Continue reading “Rosie The Robot Runs For Real”

Hacking And Working On The Go

I’m off visiting my parents for a while, and have managed to bring nearly everything along with me that I need to get work done, and it all fit in a small backpack! This includes a portable audio interface to run my podcast mic, two (count them) two Linux computers, and all manner of simple hacking tools. Microcontrollers with USB/serial adapters built in are a godsend.

But putting together the minimal setup was no easy task! Alone the USB cable assortment I had to bring was astounding. And in the end, it looks like I forgot a USB-B mini, and good luck finding that at the local drug store. (I know! But the Zoom recorder wants mini. Don’t ask me why.)

And then there’s the power adapters — brick for the laptop, USB-C fast charger for the Steam Deck, another wall-plug USB for recharging the power banks. And of course, this silly custom keyboard which I’m so used to typing on, and which embodies so much muscle memory in its macros that I’m practically helpless without it.

So fundamentally, I’m astounded by the amount of functionality I could cram into my pack, but I’m also aghast at all the little things that add up around the edges. And I’m sure that I’ll find stuff that I’m missing in the next few weeks.

Do you need to travel for work with your full kit? What’s your approach? Minimal? Maximal? Leave us your hacker travel kit tips in the comments.

Infotainment system playing back from USB. (Folkert van Heusden)

Create Virtual USB Sticks With A Raspberry Pi Zero

Playing back music files from USB sticks is a common feature these days, and is built-into the infotainment system in [Folkert van Heusden]’s Opel Astra. Unfortunately such USB playback features often come with a range of limitations on things like audio codecs, and in the case of [Folkert]’s car, a 1000 file limit. This had him looking at an alternative to lugging a lot of USB sticks around to avoid the horror of hearing the same songs within a week while commuting. The solution? Make a Raspberry Pi Zero into a virtual USB mass storage device using the Mass Storage Gadget (MSG) driver in the Linux kernel.

Picking USB storage as the ideal option here comes mostly from the age of the infotainment system, which lacks Bluetooth, and the audio input jack is rather crackly. Of course, having the Raspberry Pi Zero pretend to be a storage device via the MSG driver wouldn’t solve the file limit, but to get around this two Python scripts were written: one which creates images from a folder of music files, and another which randomly picks one of the available images from the Zero’s SD card and configures the MSG driver to use it.

As for the list of future improvements, there is mounting the RPi Zero’s SD card as read-only to deal with the power-off when the car is shut down, and the creating of images requires to be run as root due to the use of loopback devices. As a Proof-of-Concept it does seem to be on the right track.

It’s not just the older infotainment systems that get to have all the fun. If you’re lucky enough to have Linux running in the dashboard, you might be little more than a Bash script away from bending the system to your will.