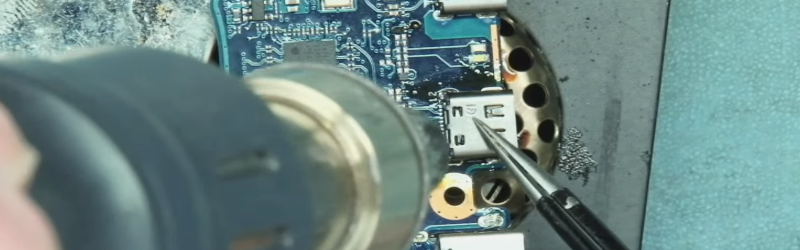
Many SMD components, including some USB C ports, have their terminals under the component. When installed, the pins are totally hidden. So, how do you solder or unsolder them? That’s the problem [Learn Electronics Repair] encountered when fixing a Lenovo Yoga, and he shows us his solution in the video below.
He showed the removal in a previous video, but removal is a bit easier since you can just heat up the area, yank the connector, and then clean up the resulting mess at your leisure. Installation is harder because once the socket is down, you no longer have access to the pads.
Unsurprisingly, the process starts out with plenty of flux and some hot air to preheat the pads. he then tins the pads with a conventional soldering iron. The penultimate step is to align the connector and preheat it almost to the melting point. Then hot air reflows the solder beneath the connector.
We were worried he might disturb the adjacent components, but he has a steady hand. We might have masked the area off with Kapton tape.
The result looked good. We’d encourage you to test for shorts or opens electrically where possible. High-end techs can inspect with X-ray, but most of us don’t have that kind of gear.
If you need some SMD practice, there are plenty of kits to try. Just remember that when doing SMD sometimes less is more.


That’s one of those areas of electrical/electronics that has a lot of room for implementation of different techniques; what I like to do is from time to time watch videos of people working (looking at you, TronicsFix). Well done sir.
the best method I’ve found is to tin the pads, and the teeth of the port itself, then heat the pads with a hot air gun until they’re well past melting, then to drop the component into place, and continue applying heat for a few seconds after to ensure the solder on the port teeth melts and forms a good connection between pads and teeth.
Alternate approach I use: put the part in before everything is melted, with pads on both sides tinned, and when you feel it drop all the way down, you know the solder has reflowed.
I’ve already done this for a Nintendo Switch. It is such a pain in the ass compared to Micro USB. It is the only reason I use a galaxy Xcover phone with separate charger contact points that don’t wear out from plugging / unplugging. Well that, and the replaceable battery.
From my humble experience i can say that removing is far more messy – many usb-c ports are soldered _and glued_ in place … :-/
I had to hand assemble some 20 boards with USB-C connectors last year. I had the luxury of testing each pin end-to-end, through test points on the board and a breakout board on the cable side, but I still hated every minute of it.
I once bought some micro-USB SMT connectors and left a few in my jacket pocket. It so happened I was flying back from Delhi. For some reason, while going through security, these little blighters were spotted, and I then had a job to convince the security guard what they were, and why I had them on my person!
Now I think back on it, maybe he was fishing for “export duty”.
>We might have masked the area off with Kapton tape.
Things I’ve learned in replacing a USB-C on a phone: you have to be careful with the kapton because if you reflow the area around the connector and all those little 0201 parts LIFT UP because there was a tiny bit of tension on the kapton tape, you now have a new horrible problem to fix after you get the connector fixed. So figure out how to apply tape so it doesn’t have any residual strain.
Thanks!
Success! Last night I tried extracting a damaged USB-C connector with concealed pins from a laptop motherboard by employing a hot air soldering station. I utilized a Hakko FR-810 hot air rework station with the temperature set to 850 degrees Fahrenheit. It was my first time trying to remove the USB-C port and I decided to film the whole process to document my success (or failure). When a new connector arrives, I’ll be soldering it back in place but I don’t think the process will be much different, same steps just in reverse order and using lots of flux. Here’s how I did it: https://youtu.be/c22SM97upG8