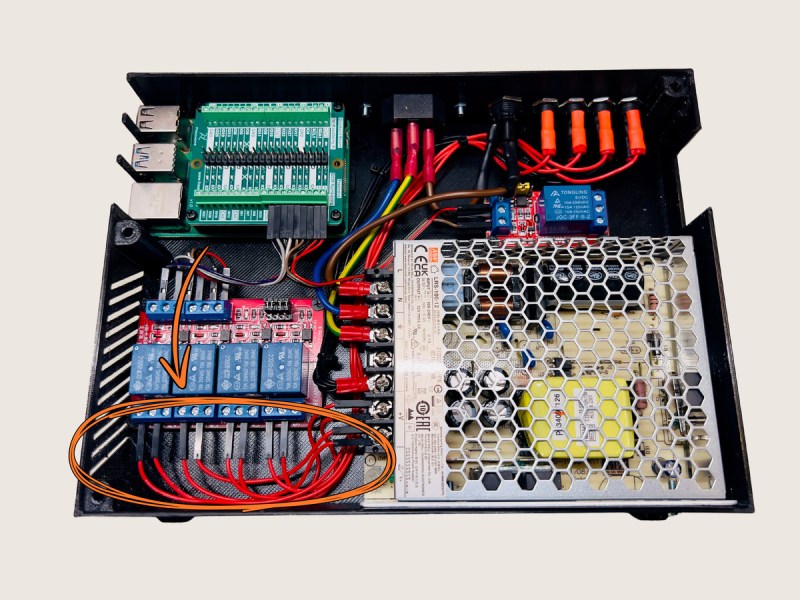
While 3D printers have evolved over the past two decades from novelties to powerful prototyping tools, the amount of support systems have advanced tremendously as well. From rudimentary software that required extensive manual input and offered limited design capabilities, there’s now user-friendly interfaces with more features than you could shake a stick at. Hardware support has become refined as well with plenty of options including lighting, ventilation, filament recycling, and tool changers. It’s possible to automate some of these subsystems as well like [Caelestis Workshop] has done with this relay control box.
This build specifically focuses on automating or remotely controlling the power, enclosure lighting, and the ventilation system of [Caelestis Workshop]’s 3D printer but was specifically designed to be scalable and support adding other features quickly. A large power supply is housed inside of a 3D printed enclosure along with a Raspberry Pi. The Pi controls four relays which are used to control these various pieces hardware along with the 3D printer. That’s not the only thing the Pi is responsible for, though. It’s also configured to run Octoprint, a piece of open-source software that adds web interfaces for 3D printers and allows their operation to be monitored and controlled remotely too.
With this setup properly configured, [Caelestis Workshop] can access their printer from essentially any PC, monitor their prints, and ensure that ventilation is running. Streamlining the print process is key to reducing the frustration of any 3D printer setup, and this build will go a long way to achieving a more stress-free environment. In case you missed it, we recently hosed a FLOSS Weekly episode talking about Octoprint itself which is worth a listen especially if you haven’t tried this piece of software out yet.


Don’t know why people even bother upgrading anymore since Bambu labs crushes everything else out there.
Not a fan of printers that cost a fortune, have DRM and proprietary parts and software, and have a habit of randomly starting prints overnight because the company’s always-on DRM depends on a buggy MQTT server.
Absolutely this. I got a Voron and want to build one more. It can print the same quality but i have the freedom to easily add features that are not available on the Bambu Labs. Big props for it also being open source.
The previous comments starts with “Not a fan of printers that cost a fortune” and you and you bring in the Voron?
I can build a Voron mostly from parts I already have, and print the rest.
I’m just waiting to find a good deal on linear rails and I’ll have a Voron for the cost of rails and the ~$20 in filament it will take to print the rest.
I have 3 printers, all self built, including a Voron 2.4, I love tinkering with them, but they weren’t cheaper than a Bambu
I have an Ender 3. It’s great.
This is Hackaday… why would I buy a Bambu printer that represents the antithesis of hackability ?
Because Bambu Labs mostly crushes competition and open source innovation, using dubiously ethical shortcuts to boost themselves at the expense of the health of the community?
I mean, Makerworld was caught grabbing models and creating ghost profiles without regard for the licenses or permission from original authors, as well as openly using an import method that grabbed them from Printables rather than having the authors upload them manually, which could have been considered an accidental DDOS on Printables.
Plus the issues with their cloud infrastructure having highlighted that their vaunted crash protection doesn’t keep them from trying to print to an occupied bed as well as the dangers of a network control printer without a local go/no go, which is of course, even worse when it’s cloud infrastructure you don’t control and don’t have clear status of.
Or the A1 issues where they released printers that were fire hazards, and despite having referred to it openly as a recall, haven’t updated the CPSC as to them needing to perform the recall.
Bambu is a bad company that makes good printers, as far as I’m concerned.
LOL “crushes” in terms of shear amount of wasted filament?
Does bamboo make a 4 foot cube volume printer? I did.
Nice idea.
I would would to add a smoke detector (there are models that expose a serial port to external integration) and logic to shut everything down if smoke is detected. (Given the remote operation viewpoint this is promoting.)
I always say there are two types of 3D printer users. Those who do not believe their 3D printer will catch fire, and those who have experienced a 3D printer fire….
You can also just get smoke alarms made for alarm systems. Many run on 12v DC with a simple contact
My Prusa Mendel A-frame, built 11 years ago, running a TB6560 stepper controller and Mach 3 still smokes the quality I’ve seen from any other printer. Higher quality surface finish than ABS prints from Shapeways.
Haha. Sure it does buddy.
Huh, funny that I’m in the middle of making something similar to “upgrade my Ender 5 right now:
– Pi with Mainsail/Klipper + HDMI touchscreen
– seperate 5V/5A supply: MeanWell RS-25-5, for the Pi and screen
– switchable 24V Supply
– “ATX Style” powerbutton/control
– off -> short press -> on, boot pi ( => 24V Supply controlled by Klipper)
– on -> short press -> check state, 24V off, shutdown Pi, 5V off
– on -> long press -> force complete power off
Maybe I should add some fan control?
I don’t really see the use case of turning ON a printer remotely….
I run the power supplies for the enclosure lights and main power through a relay on top of my Pi (running Klipper, naturally). It’s very nice to be able to switch the whole thing off after a print to save power, noise, whatever. Also, it’s not very close to my main workstation where I design and slice the objects, so I can just hit a little toggle in Mainsail to turn the whole thing on and get it going.
I also wired in a panic button as a pseudo-Estop. I’ve never had to hit it but I like that it’s there.
My old printer has a Duet wifi in it, and that board was designed with the ability to control an ATX PSU, it was always powered by the 5v standby and it turned the PSU on when it started the printer. It’s such a nice feature that I’m missing in my newer Klipper printers, I have worked around it with smart plugs and automations in Home Assistant, but it doesn’t feel as good.
One of my main “design goals” is the complete power off. So no standby power usage. Although the ATX power supply idea, using the 5Vsb is a good one, too.
I found a nice way to use a two contact pushbutton on the AC side to initialy power the 5V supply and also detect further button presses. Theres a really cool optocoupler designed for this purpose that only needs two resistors on the AC side.
I used this approach so I don’t have to mix high voltage AC and low voltage DC on the same switch, or two switches. I first copied a 555 implementation for the latching 5V controlling relay, but then I decided to use a RP2040. Totally overkill, but it’s cheap and I can use either GPIOs to control the power via Klipper, or over serial commands. I also added a totally unnecesary 64×32 OLED for a bit of status display… like ON => BOOT =>READY=>SHUTDOWN or something…
I use the Bambu slicer on an Ender CR6 SE and the print quality is phenomenal over any other slicer
Try OrcaSlicer if you like Bambu Studio. It’s based on it but has the newest features found in other slicers that takes a while to get implemented in BS.
I’ve been impressed with scarf seams so far. You can see where the light reflects a little different but can’t feel the seam at all. If there isn’t a corner to hide the seam it’s much better than a regular aligned seam.
Plenty of other new features I’m still messing with in the newest release of Orca…
Have you tried Orca Slicer?