[3DJake] likes putting textures on 3D prints using things like patterned build plates and fuzzy skin. However, both of those techniques have limitations. The build plate only lets you texture the bottom, and the fuzzy skin texture isn’t easy to control. So he shows how to use Blender to create specific textures to produce things like wood-like or leather-like surfaces, for example. You can see how it works in the video below.
As [Jake] points out, you might be able to use other artistic programs to do this, but the kind of things we use like FreeCAD of Fusion360 aren’t going to cut it.
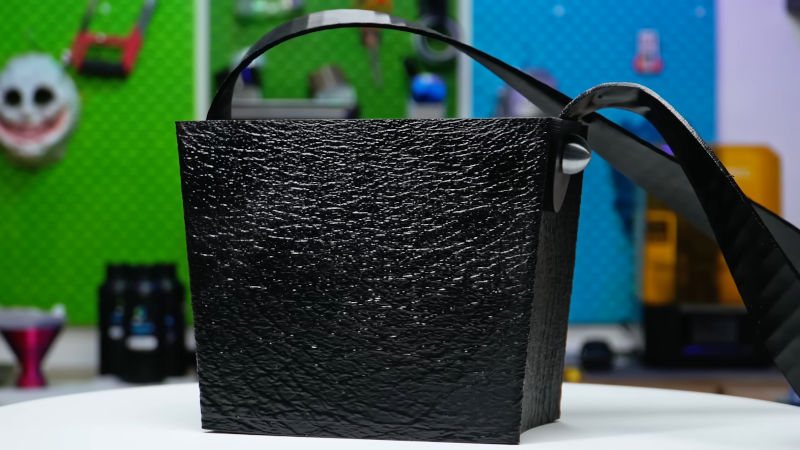
He uses a bag with a leather texture as an example. The resulting model is too detailed and contains around 1.4 million triangles. Your printer isn’t that detailed, and your slicer will probably choke on a model with that many triangles. Decimating the model makes it more manageable.
The resulting bags, when printed using TPU and painted, hardly look like 3D prints. Well, other than the strap, perhaps. The textures were just pulled from the Internet, so there are, potentially, many to choose from as long as they are seamless.
One interesting build plate texture is a diffraction grating. You can also add special textures manually. Textures are good at hiding layer lines, even just the fuzzy skin textures you find in many slicers.


I wonder if you could build a fabric texture like denim that intentionally used the layer lines as one axis of the weave.
Reasonably easily, as long as you had some control over per layer deposition. Some weaves would be harder than others of course, but a thick one should be reasonable for most printers.
One thing I like to do is use sculpting to simulate wear and damage in a model I designed with CAD.
This kind of texturing looks amazing, I hope it makes it’s way into slicers directly, seems like that would be the ideal place to implement it.
Speaking of textured build plates, the holographic ones are neat and all, but the texture I’d actually use on a daily basis would be a simple 0.3mm line pattern, so the bottom of my prints has the same texture as the other sides.
I hear bare FR4 boards make a good build aurface, so I guess I could buy some of that and CNC mill the texture
FR4/Garolite/G10 print surfaces are great for the lower build plate temperature filaments like PLA/PETG, pretty cheap too if you buy it to cut yourself. Makers muse has got a great video on youtube explaining how to use and which filaments to avoid.
Yes, that’s where I heard it! I couldn’t remember the brand name he mentioned…
He didn’t mention a brand, he just bought from a G10/Garolite supplier from his favourite online retailer :-) If you buy a branded G10 build plate, expect to pay significantly more for it than sourcing and cutting your own to size :-)
Garolite ® is a registered trademark of McMaster-Carr…
“As [Jake] points out”
3DJake is not the name of a user, but the company name.
> You can see how it works in the video below.
Great article!
Theres even a online tool https://formlabs.com/meshy/ but I haven’t tried it yet
I find that you need to remesh models exported from CAD before this took works so it has evenly sized small triangles to deform. Otherwise low poly areas look terrible. You can do this in blender with the remesh modifier.
I get a great wood grain look in vase prints just by using a dual drive extruder. It isn’t controllable…
https://1.bp.blogspot.com/-kLWsRAX7f3A/YO9lGBLyv7I/AAAAAAABU8Q/KZXl4P-l8AMZPgkTnT7677zal41tgmyaQCPcBGAYYCw/s6480/07130006.jpg
Funny… I think I first became aware of ‘Fuzzy Skin’ via one of the many articles saying ‘Stop Using Fuzzy Skin… do this instead’.
Now they just keep coming.
I really want the ability to “paint” on texture in the slicer like I can do with color selection. Brining a model into Blender (and learning Blender) is just too much work.
Whaaaat, you mean we can just model a 3D model and use s 3D printer to print that…!
Sorry, I could not help myself. But I will say that there are many ways to create a textured model, and it’s probably less work than you might think.
(I did this some ~10 years ago, using rhinoceros 3d. Would not recommend as a first step.. blender should be fine. Or Google some and pick a tool that looks easy to use!)
Did this 8 years ago…
https://www.youtube.com/watch?v=Xm0Uqiyb5UM
Awesome!
Applying bump maps / surface maps to 3DP models seems very obvious in retrospect, but even 8 years later, I’d never seen it. :)
I’d fogotten all about this and I don’t know if it’s a common feature but Flashprint for the Flashforge printers will import a jpg or other image file and convert to STL, you can then layer it on top of your panel.
I used it *years* ago to create an ink stamp but didn’t have much success with PLA, I reckon it’d be a lot better with one of the modern flexible filaments and could make a really decent front panel
I had a project where i wanted to 3D print parts that get made from wood later on, so i used this technique to have five sides of wood grain texture.
Because i needed to subdivide the mesh my critical dimensions where off and the parts were useless…
does anyone by chance know what to do to prevent this? Not selecting the critical faces for subdivision leaves me with two “unmarried” objects or one exported STL that isn’t watertight.