[Slant 3D] knows a lot about optimizing 3D prints so that they can be cranked out reliably with minimal need for post-processing, and in this short video he uses a cube as a simple example of how a few design changes can not only optimize for production, but can even hide layer lines pretty effectively.
Just to be perfectly clear, layer lines cannot be eliminated entirely without some kind of post-processing. But [Slant 3D]’s tips sure goes a long way toward making a part lose that obvious 3D-printed “look”. They also dovetail nicely with advice on how to optimize cranking out high numbers of parts in a print farm.
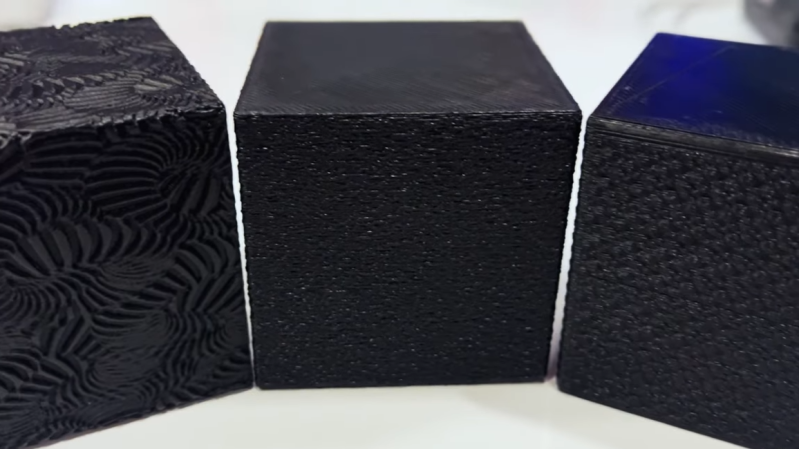
One simple way to avoid visible layer lines is to put some kind of texture onto the part. This can be modeled into the part’s surface, or the slicer software can be used to modify the exterior of the print to add a texture such as a geometric pattern or by applying a fuzzy skin modifier.
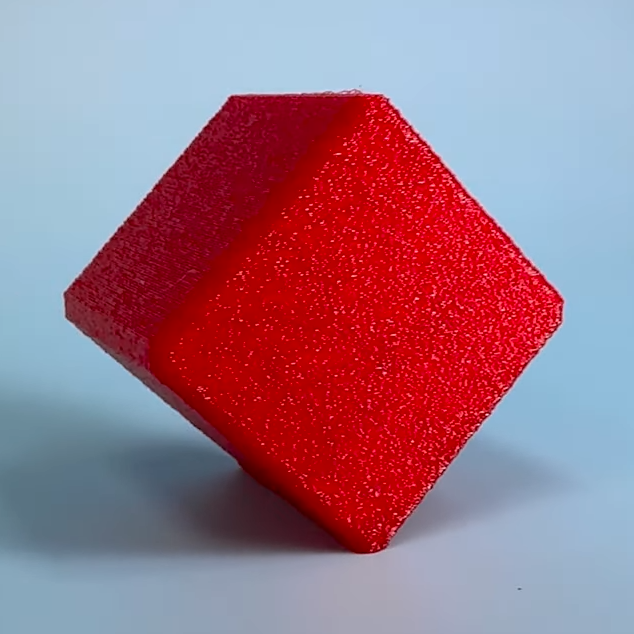
Printing a texture onto the exterior is great, but the outcome can be even further improved by also printing the object in a non-traditional orientation.
Using a cube as an example, printing the cube on a corner has the advantage of putting the layer lines in a different orientation as well as minimizing the contact area on the print bed. This applies the texture across more of the part, and looks less obviously 3D printed in the process. Minimizing bed adhesion also makes parts much easier to remove, which has obvious benefits for production. [Slant 3D] points out that performing these operations on a 3D-printed part is essentially free.
A few other optimizations for production involve rounding sharp corners to optimize tool travel paths, and putting a slight chamfer on the bottom of parts to avoid any elephant foot distortion (Elephant’s foot can be compensated for, but simply putting a slight chamfer on a part is a design change that helps avoid accounting for machine-to-machine variance.)
Even if one has no need to optimize for high production volume, the tips on hiding layer lines with design changes is great advice. Watch it all in action in the short video, embedded below.


I like slant3d videos but I wish this was a little more in depth, showing things like fuzzy skin or applying the height maps to get rid of layer lines. Fuzzy skin is a slicer feature, so that would be applied to the whole model, would be nice to see how to do that to a particular face on a model.
Good news! Fuzzy skin in Prusaslicer obeys modifiers, so it’s possible to use another 3D model to essentially say “only apply fuzzy skin where these overlap” (bottom of page here: https://help.prusa3d.com/article/fuzzy-skin_246186)
Also: Ideamaker (slicer by Raise3D) has texture mapping built in, basically Fuzzy Skin but using an image as the pattern source. https://www.raise3d.com/academy/how-to-apply-texture-in-ideamaker/ — it’s part of the g-code generation and so the result can’t be exported as an STL (the texture isn’t technically part of the model) but ideamaker supports a variety of printer models, so it’s an option.
Thanks Donald, appreciated :-) I expect modifiers work in orca slicer as well if prusa does it. I’m about to switch slicers, so I’ll check if both have it. Also wondering how to do it directly in the 3d design stage too.
Looks like you can do the same in cura too: https://www.youtube.com/watch?v=DmdbB7FXJMY
The sight of conventional 3D printed plastic reminds me of looking at raw laser-cut plywood. It’s not pretty, but it’s too easy and cheap to ignore that it ends up in everyday objects anyways, and has become “normal”.
But we’ve been here before. Back in the day when Bauhaus style introduced bent plywood furniture, people were like, “Ugh, this looks so cheap.” It still does, though.
That’s a fair observation, but in this case it’s worth remembering that 3D printing enables designs and features that aren’t possible in prior methods of manufacturing. Slant 3D makes this point in several of his videos. So the ugliness you’re referring brings more to the table than expedience and low cost.
>designs and features that aren’t possible in prior methods of manufacturing
I very much doubt that. It makes some things easier on a smaller scale, but I don’t think it introduces anything fundamentally new that couldn’t possibly have been made before.
You really don’t know much about 3D printing, do you?
It is a well known advantage of 3D printing that it lets you make things that would be impossible or very difficult in other methods, like injection moulding or machining. You can make internal geometry like tubes that would be impossible to machine or injection mould for example. Yes it may have been possible to find a way to do it with other methods but it would have been much more complicated, involving multiple parts and being expensive to produce, complexity doesn’t really add cost in 3D printing though.
An example I saw was making dies for injection moulding, they printed them out of metal and were able to optimise them thermally. The middle of the die was just a lattice so little heat transfer and just under the surface of the die was built in cooling channels. The die could be printed as a single piece, sintered, and then the outside could be polished and then it could just be connected up and used with water cooling right under the surface of the die. This would have been much more complicated and expensive if you tried to do it with machining and definitely wouldn’t be possible to make it as a single piece. The same advantages exist for plastic 3D printing.
A good example is anything to do with aerodynamics or airflow which can often have difficulty geometry, especially internal geometry.
You also seem to have the common opinion that 3D prints are only good for cosmetic parts, which just isn’t true at all, there are plenty of examples of functional 3D printed parts and in case you hadn’t noticed most of what is around you probably contains plastic parts. Strength and usability comes from your design and what material you use. PLA (the most commonly used 3D printer plastic) is mainly only good for cosmetic parts but you can print nylons and polycarbonates too or plenty of other material, IGUS (the plastic bearing manufacturer) even makes a filament containing solid lubricant specifically for bushings or bearings.
3D printing has a lot more advantages than you seem to realise and you absolutely can make things that were impossible or unfeasible to make with other manufacturing methods.
When talking of everyday objects, these “impossible” geometries are few and far between.
>most of what is around you probably contains plastic parts
Which are commonly injection molded or machined, so they enjoy better tolerances, better surface quality, a wider range of materials and properties more fit for the task, and not having weaknesses and porosity along layer lines. 3D printing introduces compromises that you then have to design around.
With the cosmetic parts comment, I was referring to the fact that the limitations of 3D printing often make the objects inferior to their traditionally manufactured counterparts. For example, I had to design a container with a screw-on lid, which I 3D printed for a mock-up, but had it machined for the actual functional prototype because the 3D printed version would leak. Sealing it up would have been completely pointless extra work, since the real deal has to come out not leaking right out of the factory.
And, the quirks of 3D printing can be frustrating when you’re designing parts that should be exact. Am I getting the same 0.1 mm over-extrusion today that I had yesterday, or am I getting 0.15 mm because the machine was bumped or the filament is slightly different?
Working around limitations like poor tolerances and rough surfaces can mean you have to produce objects that look and feel like they were banged together by an 18th century blacksmith who never saw vernier calipers in his life.
That sort of clunkyness just spells “cheap”.
The kind of “impossible” tricks that 3D printing enables, like printing functional gears in place inside a closed box is just that – a trick – since the plastic printed mechanism as a whole isn’t suitable for real use, and why would you want to design a gearbox that cannot be serviced anyhow?
Purely 3D printed mechanisms in general I find turn out almost useless. They’re great for demonstrating something, but as actual functional objects they rather just break or wear out because of the overall poor fit and finish. To make them work, you need to add “vitamins” like actual steel rods and bearings, aluminum tubes and beams, and relegate the 3D printed parts to a more cosmetic role.
I expect you’re limiting yourself with ideas formed in the world of subtractive manufacturing. I’ve made items for slide preparation which exploit the ability to create complex tubes inside the object to create a specific flow. They don’t need to be fully watertight so it’s fine to use straight PLA. The process they replaced involved lots of complex faffing with syringes and needles, now, it’s just a case of delivering into one of three ports with Tesla valves preventing backflow.
You could technically achieve this by breaking the design down into about a half dozen parts and fusing or casting in resin around a prepared tube but both of these approaches would greatly increase the unit cost and manufacture time.
Yes, but such things are very special applications that require features you wouldn’t find in your kitchen timer for example. With special engineering, the aesthetics of the object are usually secondary to its function, whereas I’m talking about objects that are meant to be seen as well as used – otherwise I wouldn’t be complaining about how ugly it looks.
The problem I’m talking about is the fact that people don’t go the extra distance to finish the exterior of the pieces, to the point that it’s slowly becoming acceptable to have layer lines visible on a product you’re selling, or even having them as a fashion statement to say “this object was 3D printed”.
You’re moving the goalposts here. First you talk about a lack of utility, then you talk about common use and aesthetics. Why not embrace the opportunities afforded to you, rather than deny them?
> Slant 3D
I watched the video where they made a Stanley Cup, and the guy claimed it was “better than anything else that exists out there”, and, “totally new and different”, and, “have capabilities that have never been possible before”, because of 3D printing.
It’s a steel cup with a hollow cellular plastic liner for insulation. What exactly hasn’t been possible here before? Don’t forget that “hype” stands for “hyperbole”, which means “exaggeration or overstatement”.
You’re not wrong, but most people still haven’t seen 3D-printed things and are delighted by them. They don’t tend to pay much attention to artifacts like layer lines. I personally think the easiest way to add value to a 3D-printed design is to personalize it in some way. Print a gift for someone, emboss their name or a personal message into a vertical surface. It can be done in most slicers with little effort, but it immediately makes a part unique in a way that’s hard to do with other types of manufacturing. That’s of course a very different angle to the optimizations for mass production that Slant3D mostly focuses on, but I’m just one person with access to one printer.
Other things that reliably get people excited (in my experience) are (of course) completely custom parts that fill some need, even if they’re very simple, or prints that have moving parts that print in place. I repaired my dad’s music stand with a part that took maybe 10 minutes to design and about that long to print, and he spent a good while showing it off to the whole choir. My mom is a bit nuts about little organizational stuff, and she’s very thrilled about Gridfinity. People like that aren’t looking at layer lines, at least, not yet.
I fully agree. When I knock something unique out for a friend, they have never mentioned layer lines (or seams). They’re just really pleased that I’ve made something for them that has either been completely impossible to find (or ridiculously expensive, I’m looking at you, cooker knobs).
Yeah, this is half my 3d printing: I need to make a bracket for this specific bluetooth shutter button to hook onto this specific bicycle handlebar in the space between this specific brake lever and the grip. It for sure doesn’t exist commercially, but it’s a 30 minute print and works perfectly, and people are all wow that’s really useful I want one! There’s no aesthetic consideration at all. The other half of my printing is for jigs for machining/assembly, and again, all that matters is dimension.
But I know someone who is making decent money (for a thirteen year old) going to craft fairs and selling semi-custom 3d printed stuff that’s entirely aesthetic (dragons, dice towers) and this kinda slicer customization is really useful there.
I think we’re sometimes in between a world where practical vs aesthetic collide. I do my own functional designs for myself, which definitely don’t need to hide layer lines but I also print non-functional designs by other people, not all of them need the lines hidden but knowing how to do it is super useful.
I had a little mess around in cura last night with the fuzzy settings, isolating the fuzz to certain parts of the print without putting it all over the model, that is something that is definitely useful, maybe you want just a little fuzz to give a part some grip but you don’t want it all over the whole print, working out how to do that practically on complex models would be super useful.
>There’s no aesthetic consideration at all.
If there is a choice between no part and ugly part, ugly wins. At least it’s better than duct-taping your phone to your bike’s handlebars.
But coming from a point of view where you know you could make a better looking part, seeing the 3D printed object comes across as “Eh, good enough.”.
Worth pointing out that with Resin printers or lots of patience, the right Nozzle, and calibrated settings even the FDM printers the surface textures can be really really really smooth, with really sharp details. It can be ‘pretty’ or at the very least hold up very well in comparison to the injection mold with all the flashing lines and mold ports…
Also that ‘looks cheap’ is entirely subjective opinion anyway – A well calibrated printer producing a suitable object even if its quite a coarse 3d print just looks fine – very little different to the injection molded textures and structural exoskeleton most things come with – just it is always ribbed instead of the wider variety of surface finish. Plus some folks will even pay extra for furniture that looks like its been through the apocalypse and bodged back together while remaining actually functional…
Personally I quite like the look of laminated wood, and certainly wouldn’t call it cheap. At least when done right it isn’t likely to be, cheaper than all real solid wood maybe, but the man hours and glue setting times required add up. I like it personally as you get an interesting blend of the natural wavy wood grain and more geometrically perfectly boundary between the layers with overall shapes that are much more interesting than you can manage with steam bending normal wood beams. Can be really interesting, very practical, and very durable. Not that the Bauhaus style of it has much tendency to push my buttons, but that has no bearing on the method, just that particular execution of it doesn’t often appeal to me personally.
I don’t see this catching on long-term.
When we first started printing layer lines were a good thing. They were a visible sign that the item was 3d printed rather than bought. It was a non-verbal way to say “I did this”.
But that got old fast. People started polishing, filling and painting to make their items look like they were pooped out of a factory mold. It became a sign of skill, how well can you accomplish shiny and smooth. And that doesn’t age as quickly because it requires that skill.
Now we can select a Slicer option and get fuzzy surfaces. Cool. But fuzzy is the new layer line. Oh wow, you found a way to hide the layer lines without work quickly becomes.. “just like everyone else”.
Don’t get me wrong, if you like it use it. If you like to sand and polish.. do that. If you like layer lines… let those layer lines show with pride. But do it because you like it. Forget trying to keep up with the latest style.
> to make their items look like they were pooped out of a factory mold
I saw a table radio in a store the other day. It was a cheap vintage imitation, encased in wood patterned vinyl. I turned it around and saw the back panel had layer lines and the imprint of a fill pattern, as if they just made the factory mold directly out of the 3D printed prototype – or maybe they even had a factory full of 3D printers, who knows?
One problem with surface texture is that it is basically impossible to post-process parts and have them look good. ie. If you sand them the sanded part will be smooth and not textured like the rest of the part and you can’t make that part textured to blend in.
I think that’s 1/2 of the point, less post processing if you put the fuzzy skin in the right places.
I didn’t watch the video, but, from the article, I got the strong impression that the idea here was to use surface texture as an alternative to, or to obviate the need for, post-processing.
So, instead of a post-processed smooth surface, your end product would have a textured surface instead. Both are ways to hide layer lines to create a more attractive end-product, using a textured surface just potentially saves you a lot of work, especially if you’re creating things in bulk.
Creating a textured surface AND THEN also post-processing it would just be removing the reason for creating the textured surface in the first place, and likely result in more work. Sort of like wearing loose-fitting clothes to try to hide your belly, then still going to a cosmetic surgeon for liposuction. There is really no reason to do both – if you’re going to go through the hassle of post-processing, you have no need for textured surfaces.
Having the surface dithered instead of stepped can make the difference between the deepest grooves and tallest edges smaller, which makes it easier to smooth down – although you then have to work the entire surface instead of just the problem spots.
When my printer lays down a surface looking like twill (carbon fibre or kevlar, for examples), THEN I’ll be interested in surface finish. Until then I’ll either ignore my layer lines or rub with sandpaper.
There’s a Cura plugin to do something similar to this on the top surface. Billie Ruben came up with it about three (?) years ago. It’s really neat looking and relies on structured printing; one version is specifically twill-like.
I must be very fortunate. Probably more than 50% of my prints do not have layer lines or they are very subtle, but I have spent countless hours fiddling and adjusting my slicer settings. In the end, I have discovered that the appearance of layer lines seems to depend a lot on the filament used and the temperature of the nozzle. Compensating for any axis wobble helps a lot as well.
I think it is possible to make some very nice looking 3D prints with minimal post processing (if any at all), but your printer has to be pretty well dialed in. I am not saying that every print I do is perfect. Far from it. But I have a pretty good success rate and I am pleased with the results. It takes a lot of experimentation and adjustments, but decent prints are possible if you are willing to put in the work.
I am going to try some of the techniques in the video. I like the idea of texture on some of my surfaces. I’m not sure if I will be able to print at some of the angles in the video as I have a bit of a bed adhesion problem with small contact items that I haven’t been able to solve quite yet, but that is for another day.