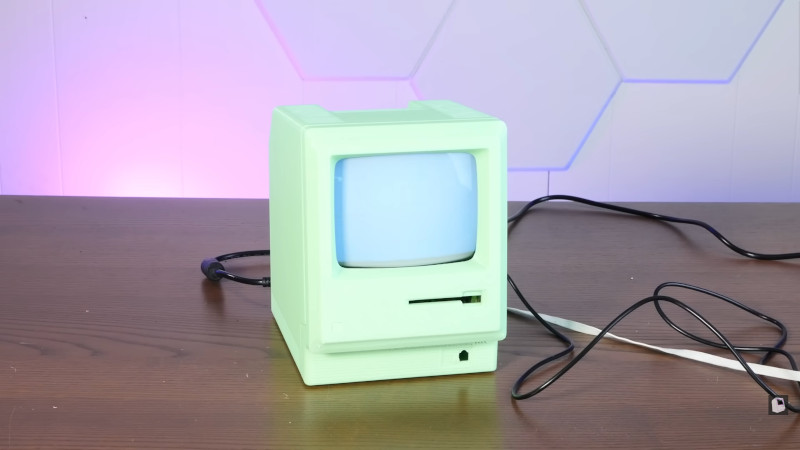
Cathode-ray tube (CRT) televisions may no longer be in production, but its last bastion came in the form of extremely cheap little Chinese portable sets with a black-and-white tube. They’re now useless for broadcast TV, so can often be had for next-to-nothing. [Action Retro] has a video showing a Mac Classic clone using one, and with a built-in Raspberry Pi and a copy of RiscOS it almost makes a usable computer.
The video below the break is a little heavy on the 3D printer sponsor and the Mac case comes from a Thingiverse project, but it’s well executed and we’re grateful for being introduced to that original project. We’d have gone for a period-correct beige filament rather than the glow-in-the-dark green one used here.
We’re guessing that more than one reader will have a few of those TVs around the place, such is their ubiquity. Is it worth making this as a novelty item? It depends upon your viewpoint, but we can’t help liking the result even if perhaps it’s not for us. If RiscOS isn’t quite the thing, there’s an option a little closer to the real thing.


Wow, that is so cool. I have seen many of these old portable TVs at flea markets and thought that they would make a cool retro-pi enclosure. Too bad there wasn’t any way to adjust the CRT yoke better with the resolution to give a full screen. One thing would have been cool would have been to show the entire cabinet glowing with the lights off. Anyway….Nice hack !
Where there’s a will, there’s a way. The nice thing about mono tubes is that there’s no shadow mask, therefore no discreet pixels. If you could harvest or make your own yoke with better focus you could get arbitrarily high resolution and change how many lines of height the image has.
The yoke is not specifically the issue although the deflection of the beam causes the problem; focus is usually implemented by a specialized electrode in the CRT. The edges — and even worse, the corners — are at different distances from the “origin” of the scanning beam than the center of the screen. The only way to get good focus over the entire screen involves some sort of dynamic focus correction. For the modest resolution needed for analog TV signals, that’s not too hard, but to get the sharpness required for a computer display requires a more costly and complex solution; something like an analog computer of some sort.
You’ll need to take another crack at the last link for “an option a little closer to the real thing”, unless you’re going to pass out edit permissions. ;-)
Everyone’s a critic, but… a Mac with RiscOS? Heresy! Something that looks like an A440 with an AKF12 monitor atop wouldn’t have been much harder to model.
Macs of that era had history’s worst OS.
Upgrade it to RiscDOS!
“history’s worst OS” !? Oh my … we’re talking 1984. I was there, and I remember the first Mac to be a revelation.
OK, it had a somewhat bumpy start, as the hardware and software were not what they should have been at the beginning. But he was not alone in this ;-) Those were the 80ies.
“history’s worst OS”? Never ever!
Cool Beans!
I like these ‘miniature’ builds. 3D printing has opened a whole new world for makers. Not to thrilled with the color though :) . Paint it to match a ‘real’ Mac. Bonus with a real crt too. I am about to start soldering up the PiDp-8 kit from Obsolescence Guaranteed to go with the PiDp-11 (Now using a RPI-5 as it is more than a simulator) I put together a couple years back. fun stuff. Have my name in for the PiDp-10 as well when kits are available.
Very nice printing and fit. I remember a MacPlus CRT being way sharper than anything I could do with a scan converter over composite on a TV. This sounds painful to look at.
Next you need to add an Arduino to give you an ADB port.
Pi has native composite out, it works pretty well. Especially on a mono tube. Looks like he should have spent some time hunting down resistors (or hopefully pots) to change out to really optimize the aspect and resolution and readability. And edited the raspi config file to really dial in the overscan settings. but I have driven CRTs with a pi with very sharp results.
Scan converters (and especially RF converters! Ugh!) are typically pretty low quality and inflexible
I’m the original designer of the project. Really cool to see ActionRetro “finish it” on my behalf. I feel bad that I only ever posted the first iteration to Thingiverse. Keen eyes will see it isn’t a perfect replica of the Macintosh Plus. I’m probably on version 4 right now but life and work have been a hurdle.
The reason I started this project is because I bought a B&W CRT and quickly learned about the lack of shadowmask. I happened to get lucky because this first CRT was incredibly sharp. Crisp pixels good enough to browse the web. It did use a Pi Zero W’s composite out. Eventually the set went bad. Swapping the tube to new boards didn’t work and I’ve yet to find one as sharp.
After about 15-20 prototypes of just the front tube interface with 3 CRTs as samples for fitment, my printer needed major repairs. It’s been a slow project. The quality of AR’s print makes me want to get a new printer. I spent days sanding just to never paint it. I did find a nice near-Mac colored primer as an undercoat but I ended us using it all on 3d printed RC car chassis.
The Mac Plus screen looked sharp, but resolution was astonishingly low by modern standards: 512×342. It was 72 dpi, and a neat trick was to print something out on the 72 dpi printer, hold it over the screen, and see it match dot-for-dot.
Mono RS-170 monitors could easily beat that resolution. It’s the color NTSC bandwidth limiting that reduces the horizontal resolution to (much) less than 330 ‘pixels’. Any decent mono monitor of that era could easily display a 640×480 image sharply.
Saying that tube TVs are “useless for broadcast TV” is a little over the top. You can still get ATSC converters that output component video, or even a signal over coax. I’m sure that the equivalent also exists outside the US.
Nice project but you really should adjust at least the vertical height control on that tv