We’re not sure what [Aaron Christophel] calls his automated chip glitching setup built from a 3D printer, but we’re going to go ahead and dub it the “Glitch-o-Matic 9000.” Has a nice ring to it.
Of course, this isn’t a commercial product, or even a rig that’s necessarily intended for repeated use. It’s more of a tactical build, which is still pretty cool if you ask us. It started with a proof-of-concept exploration, summarized in the first video below. That’s where [Aaron] assembled and tested the major pieces, which included a PicoEMP, the bit that actually generates the high-voltage pulses intended to scramble a running microcontroller temporarily, along with a ChipWhisperer and an oscilloscope.
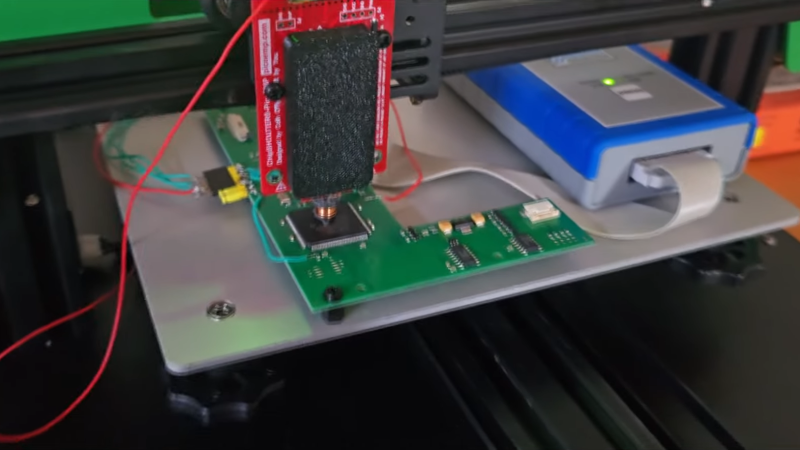
The trouble with the POC setup was that glitching the target chip, an LPC2388 microcontroller, involved manually scanning the business end of the PicoEMP over the package. That’s a tedious and error-prone process, which is perfect for automation. In the second video below, [Aaron] has affixed the PicoEMP to his 3D printer, giving him three-axis control of the tip position. That let him build up a heat map of potential spots to glitch, which eventually led to a successful fault injection attack and a clean firmware dump.
It’s worth noting that the whole reason [Aaron] had to resort to such extreme measures in the first place was the resilience of the target chip against power supply-induced glitching attacks. You might not need to build something like the Glitch-o-Matic, but it’s good to keep in mind in case you run up against such a hard target.


I had no idea you could laser glitch without having to decap the chip’s epoxy.
That’s not a laser. He is using a small inductor and large current impulses to induce current into the silicon.
Oh ok, thanks.
Fascinating the precision results, small head, and use of 3d gantry.
Nearly 20 years ago, someone who isn’t me built a similar device to cause electromagnetic interference in a much less targeted way.
Disposable camera flash circuit, a couple fat electrolytic capacitors from a PC PSU, off the shelf light switch, and a much-too-inductive/no-math-done coil of enameled wire…
Amusingly, this worked “well” enough that the test target had to be physically replaced in an unscheduled service event the next day. (Don’t test on other people’s hardware without permission. T’was a foolish youth that built it).
Again, I’m fascinated by the precision of this approach – as fascinating as the destructive potential may be.
Hahahahaha; what were you TRYING to do?
There should be a Hackaday article called “A Liitle Bit of Knowledge” where the commenters relate the experiences (mishaps) of young and/or inexperienced practitioners of a discipline who definitely are not the commenter. I have a boatload!
kinda similar to what wrongbaud did when recreating the joe grand trezor wallet hack using a picoemp which he also slapped on a 3d printer
if i remember correctly he kept us posted on twitter, there’s an image of the resulting setup at the end of this blog post:
https://voidstarsec.com/blog/replicant-part-1
Hey thanks for sharing! I also did this a while ago and shared the resources and slides here:
https://voidstarsec.com/csw-2024/
of course! big fan of your work!
ah cool, i’ll be sure to check it out
Voltage glitching still possible, just don’t short it to GND, but other voltage.
Also you can inject higher out of spec voltage.