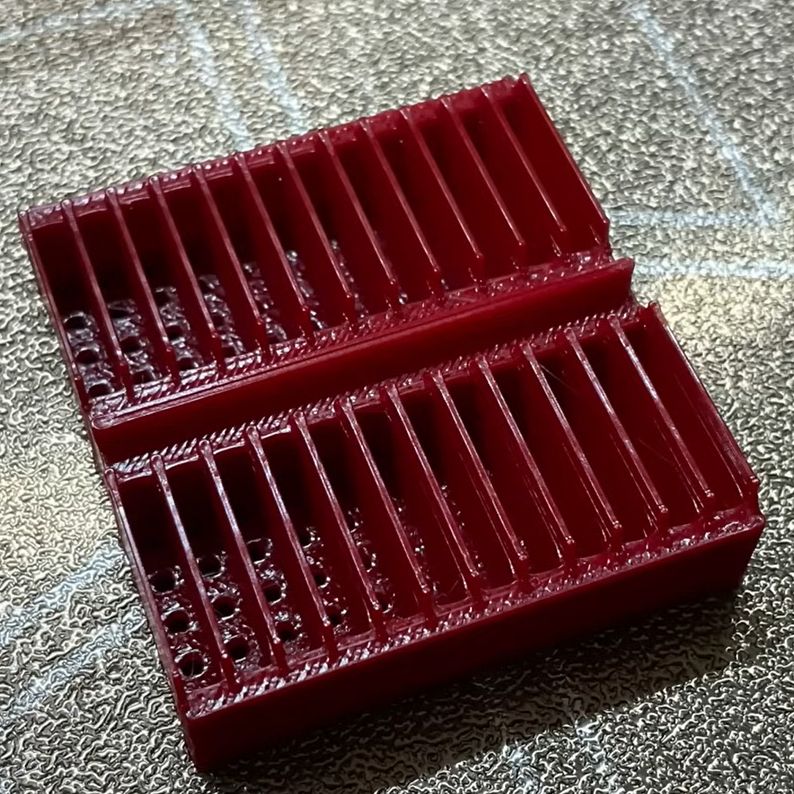
Does it make sense to make your own breadboards rather than purchasing off the shelf ones? As [Chuck Hellebuyck] notes in a recent video on DIY, 3D-printed breadboards, there’s a certain charm to making a breadboard exactly the size you need, which is hard to argue with. The inspiration came after seeing the metal breadboard spring clips on sale by [Kevin Santo Cappuccio], who also has a 3D printable breadboard shell project that they fit into. This means that you can take the CAD model (STEP file) and modify it to fit your specifications before printing it, which is what [Chuck] attempts in the video.
The models were exported from TinkerCAD to Bambu Lab Studio for printing on a Bambu Lab A1 Mini FDM printer. After a failed first print (which the A1 Mini, to its credit, did detect), a model was printed on a Creality K1 Max instead. Ultimately [Chuck] traced this back to the Bambu Lab Studio slicer failing to add the inner grid to the first layer, which the Creality slicer did add, caused by the ‘wall generator’ setting in the Bambu Lab slicer being set to ‘Classic’ rather than ‘Arachne,’ which can vary line width.
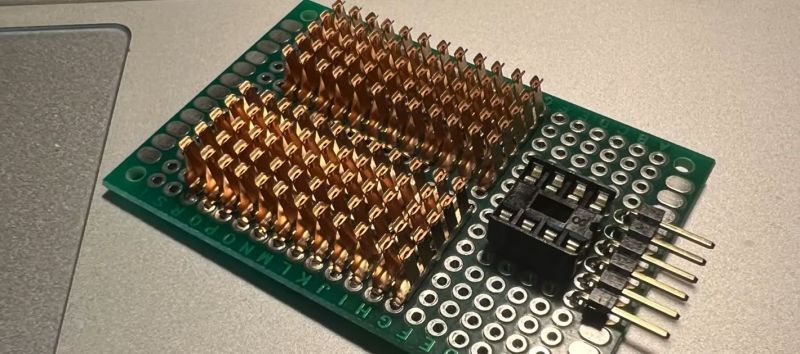
After this, the models printed fine and easily fit onto the spring clips that [Chuck] had soldered down on some prototyping board. A nice feature of these spring clips is that they have a bit of space underneath them where an SMD LED can fit, enabling functional (or just fancy) lighting effects when using a custom PCB underneath the contraption. As for whether it’s worth it depends on your needs. As [Chuck] demonstrates, it can be pretty convenient for a small breadboard on an add-on card (with or without custom lighting) like this, but it’s unlikely to replace generic breadboards for quick prototyping. We can, however, imagine a custom breadboard with mounting points for things like binding posts, switches, or potentiometers.
If we had that kind of custom breadboard, we wouldn’t need these. People were making custom breadboards back in 1974, but they didn’t look like these.


Ben Eater did a cool breakdown of the quality of certain types of breadboard clips here:
https://youtu.be/fCbAafKLqC8?t=74
if you can get quality clips and print custom boards cheaper than off the shelf ones, then more power to ye
I have given up on breadboards for most other than quick tests. A pin through holo protoype board and some AWG wire and solder for the permanent circuit resulted in many projects working suddenly as intended.
The self-made boards have me convinced though! If I order from asia often many different vendors are sourced. If I order 5 and 3 work it’s already a net win for me.
I get what you’re saying, but I led an EE program where students used the same breadboards replaced on a 6-year cycle nearly every lesson for 40 lessons each semester. Final projects often had half a dozen or more. We just about never saw issues. These weren’t cheap knock-offs, though. And we provided only plated 22 gauge jumpers. I guess you get what you pay for.
I can’t imagine these DIY boards being less costly than the ones I can buy. I could understand doing it if you needed a specialized version, but for general purpose use it makes zero sense other than that it’s an interesting project of its own.
Why? I know why but still people always forget the cost of labor
You want to create a pcb and hand solder a thousand connectors in perfect orientation in 3d good for you
If I want a breadboard ill just get a 3 pack from Amazon for 8.99 which will.arive in a day or 2 rather than a week or 2 for a blank pcb
why do anything? someone else will probably do it better eventually anyway. right?
We’re hackers, we geek out and do often useless/redundant stuff in order to see what we can learn along the way. This guy is gonna hold that breadboard in his hand and feel a type pride and accomplishment from having successfully designed and made something that you just can’t get from ordering from amazon.
As a software engineer it can be hard to convey the desire to create something physical after a time, even the best software falls from favor and gets replaced. it’s nice to create something you can hold and keep.
If your designing your own boards and getting them from PCBWay, you are using a hotplate and paste. Nobody hand soldiers that much stuff. I couldn’t do it but it’s memorizing to watch. They always leave out the part were they make the card they place on the board with the holes all in the perfect positions so they can wipe the soldiering paste over them.
Ben Eater’s analysis video suggests that you stay far, far away from breadboards that cost far, far less than $10. 3-for-$9 means $3/each, which is squarely in the garbage quality range. Ben’s key takeaway is you really, really want spring steel contacts, anything less and you’re talking nearly single-use, and it’s hard to verify what metal is inside without destructive testing (peeling the backing off). Since the plastic outside of these breadboards look pretty much the same, many vendors don’t even know what they are selling.
For the “whys”.
Look at the url. This is Hack a Day. It doesn’t have to have a why, it can just be a project for the sake of a challenge or even just for the sake of a project.
Look at the picture. See how the printed breadboard gets integrated into a PCB, potentially with other components. I suppose one could use this technique to make all sorts of specialized testing or dev kits. Of course.. one could always just double-sticky tape or glue a pre-made breadboard to a PCB. But this way you have complete control of the number of rows and columns, which parts are connected and which are not. You could even do a non-rectangular shape if you wish. Is any of that worth it? I don’t know.. maybe. Maybe not. Go read the url again!