The intersection between “woodworkers” and “programmers” is not a densely populated part of the Venn diagram, but [Michael Schiebler] is there with his Kerf Bend Wizard to help us make wood twist and bend like magic.
Kerf bending is a fine technique we have covered before: by cutting away material on the inside face of a piece of wood, you create an area weak enough to allow for bending. The question becomes: how much wood do I remove? And where? That’s where Kerf Bend Wizard comes to the rescue.
More after the break…

You feed it a spline– either manually or via DXF–and it feeds you a cut pattern that will satisfy that spline: just enough wood removed in just the right places that the edges of the cut should touch when the bend is achieved. This means less cut time and a stronger piece than eyeballing the kerfs. It works with both a table saw blade or a tapered end mill on a CNC or manual router. You can specify the kerf width of your table saw, or angle of your end mill, along with your desired cut depth.

The output is DXF, convenient for use with a CNC, and a simple table giving distances from the edge of the piece and which side to cut, which is probably easier for use on the table saw. (Kerf Bend Wizard is happy to handle complex bends that require kerfing both sides of the material, as you can see.)

This was [Michael]’s thesis project, for which he hopefully got a good grade. The code is “semi-open” according to [Michael]; there’s a GitHub where you can grab an offline version for your own use, but no open-source license is on offer. Being a broke student and an artist to boot, [Michael] also can’t promise he will be able to keep the web version available without ads or some kind of monetization, so enjoy it while you can!
If CNCs or table saws aren’t your thing, kerf bending has long been used with laser cutters, too.
Our thanks (which, as always, is worth its weight in gold) to [Michael] for the tip. If you’re in the intersection of the Venn diagram with [Michael], we’d love to hear what you’re up to.


What’s the point of having such thick wood when you eliminate 90% of the strength by cutting through it? Why not just use real wood (not plywood) and steam-bend it? Or if you must bend plywood, why not just get the thin stuff that’s meant for it? Is this just for sculpture or something?
If you glue a thin plywood on the inside of the kerf-bent piece, you can restore most of the lost strength.
But then that must have a wedge shape.
Imho this is not meant for anything structural without reinforcement.
(source: being 3 weeks away from my fibe woodworkig diploma)
I think you misunderstand (or I do): Adding a layer of plywood to the inside of the curve, not inside each cut. For a bend going both ways you’d need to add plywood to both sides, of course.
No, in that case I misunderstood, thx for clarifying. But if you have thin layers of wood laying around, why not laminate the entire thing?
There’s plenty of real world applications, especially in furniture. Just google it. You’ll find plenty of examples where your two proposed solutions are infeasable. It’s a fairly established tecnique, not always perfect but useful in some cases.
Wood glue can be very strong, remember the commercials about it being stronger than the wood itself? (Or I’m showing my age)
Steam bending wood
Steam bending is thick wood is not even really possible, glue laminating is probably the best way to achieve the desired shape with all the structural strength… But this is kinda cool, like if your were trying to make a reception desk with a multi radius curved facade, where structural strength is not a concern… Alternatively if you glue 2 thinner kerf panels together with all the kerfs in the glue joint you can get it pretty sturdy… But yeah limited scope of application IRL
Depending on your definition of “thick” but it is possible, but two inch thick is the max: you need about an hour per inch of thickness and after two hours the lignon really starts to decompose.
Most people will not even have the facilities to steam bend wood. I work with wood (against my will and better judgement) and do not have anything other than bending a few very smal bits.
“Just” is such a nasty 4-letter word in that it trivializes an action or process that is otherwise quite difficult, complicated, time-consuming, or burdened by a need for robust equipment / jigs.
As for losing strength, glue can be placed in the Kerns as the material is bent into its final shapes, achieving good rigidity. I would imagine a tie strap is used for simpler shapes, but I’m curious to know how a talented craftsman would do it.
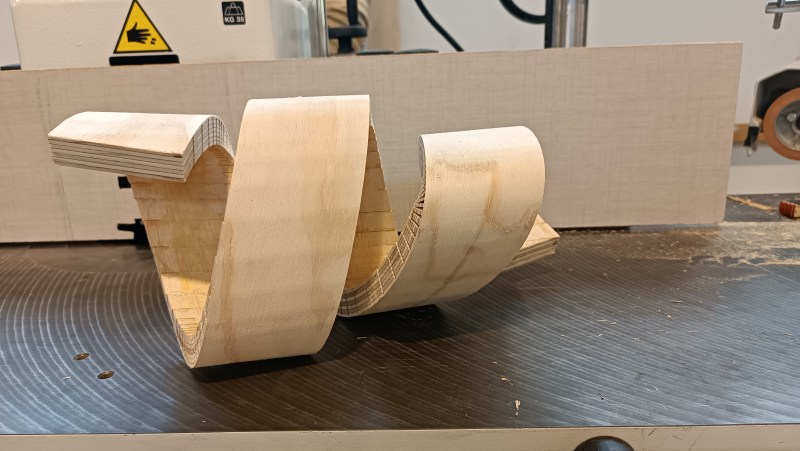
For complex stuff like that helicoid I place PVA glue in the middle of the kerfs and a drop of CA glue on the ends. Then when you press it closed the CA sets instantly and keeps the part together long enough for the PVA to set.
PVA glue isn’t void-filling, it has no holding power when not pressed. You could do this with e.g. expanding PU (polyurethane) glue.
Une résine peut probablement remplacer la colle et remplir les rainures usinées.
Kerns = kerfs. Stupid autocorrect
Super cool and smart! I am affraid their uni owns the IP tho
maybe on the software, but this method is quite old. I have seen it used in old radios from the 1930’s to get the right shape for the case.
I would bet there is no “IP”, as there are multitudes of pattern development software offering, that have been open source since the dawn times, or “just” use paper ,which works great for all kinds of curves and conical shapes
that said, it is still a very good student project, but the IP thing is crinjy, and reeks of someone looking for a fight but not finding it
I thought it was just Mattias Wandel in there…
The photos of a helix and other figures executed in wood do not appear in Michael Schiebler’s webpages. Could the article’s author divulge the source?
They are photos I took but haven’t added to the site yet. Sooner or later I’ll post them as well as a writeup on how the algorithm works.
I would love to try this, but with a slightly ground blade in more of a “V” shape. Wood working hates me, and I it, but I do love trying new things. (Everything wants to poke, slice dismember or kill you, amazing I’m still alive and have all my fingers, though the chainsaw got one of my toes…)
I think I saw someone doing something similar with a V shaped router bit, possibly on a CNC.
(I suspect Laura Kampf was it.)
I learned a simple method: take a sample board , leave a space for a clamp and cut a kerf. Clamp the end bend the board. Measure your radius from the kerf and the lift distance is the kerf spacing. Used this on my toy train tables. Carl.
Looks comfortable…