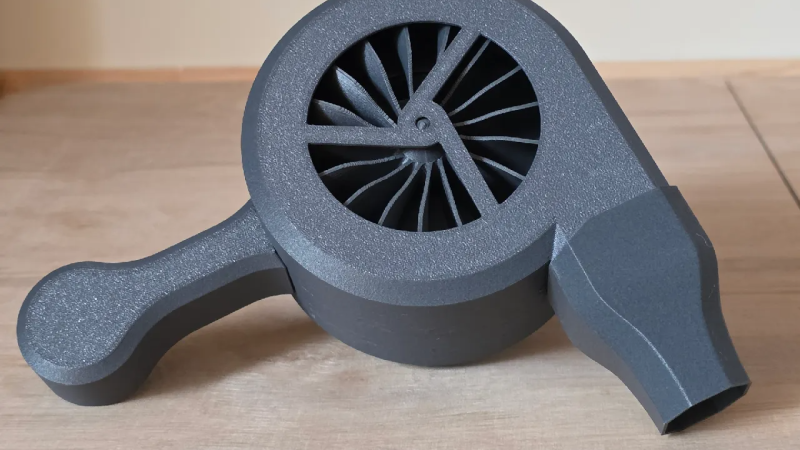
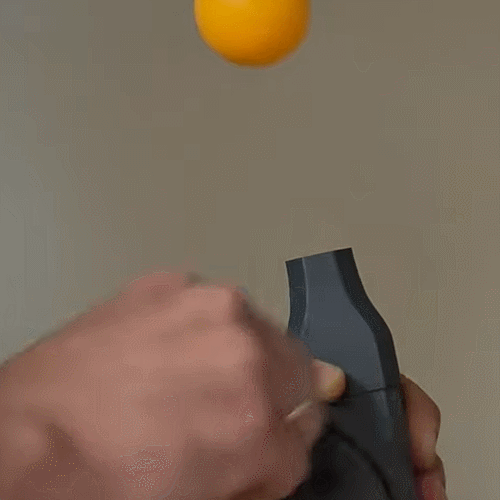
There was a time when print-in-place moving parts were a curiosity, but [Tomek] shows that things are now at a point where a hand-cranked turbine blower with integrated planetary gears can be entirely 3D printed. Some assembly is needed, but there is no added hardware beyond the printed parts. The blower is capable of decent airflow and can probably be optimized even further. Have a look at it work in the video below.
 Every piece being 3D printed brings a few advantages. Prefer the hand crank on the other side? Simply mirror everything. Want a bigger version? Just scale everything up. Because all of the fasteners are printed as well as the parts, there’s no worry about external hardware no longer fitting oversized holes after scaling things up (scaling down might run into issues with tolerances, but if you manage an extra-small version, we’d love to hear about it).
There are a few good tips that are worth keeping in mind when it comes to print-in-place assemblies with moving parts. First, changing the seam location for each layer to ‘Random’ helps make moving parts smoother. This helps prevent the formation of a seam line, which can act as a little speed bump that gets in the way of smooth movement.
The other thing that helps is lubrication. A plastic-safe lubricant like PTFE-based Super Lube is a handy thing to have around the workshop and does wonders for smoothing out the action of 3D-printed moving parts. And we can attest that rubbing candle wax on mating surfaces works pretty well in a pinch.
One downside is that the blower is noisy in operation. 3D printed gears (and even printed bearings) can be effective, but do contribute to a distinct lack of silence compared to their purpose-built versions.
Still, a device like this is a sign of how far 3D printing has come, and how it enables projects that would otherwise remain an idea in a notebook. We do love 3D-printed gears.


A candidate for a pulley drive to reduce the noise.
What material would suit for a hillbilly drive belt, apart from rubber and leather?
Latex from XXL-size condoms could be used (don’t tie it in a belt; treat it as blind O-ring).
A piece of TPU filament with the ends welded together to make an o ring. I would recommend something softer than the usual 95A, it’s too slippery.
Pantyhose. In a pinch, I used a pair as an emergency replacement for an alternator belt in a Buick. 😅
Dental floss.
“First, changing the seam location for each layer to ‘Random’ helps make moving parts smoother.”
When I was doing a lot of print in place gear stuff (Emmet’s gear bearing, tank treads, etc) someone suggested to me to use the “Split” function in the slicer. This makes it treat all the segments as individual parts instead of a “single layer part”. Then it finishes each section before moving to the next.
It is the secret trick to not have your parts fuse together.
Example here: https://youtu.be/pkp7QXDnYlY?si=GM7hY_4YSdZJpvxu https://youtu.be/IWKhXGy7IQM?si=pMx84xMNTXf3n2RX
You don’t have to split parts (this can cause problems if some of them are off the ground). You just have to pest closing gap radius to zero. This is the Slicer feature that helps printing crappy parts with tiny misalignments, but sometimes can cause problems when very small gaps are on purpose.
Except for the link in the article that has every part needed.
I see 3D printed turbines in a lot of different applications. How are people deciding how to model these? For example how many blades, forward, or reverse swept, fin/ blade shape. Do people just try whatever looks good, and then print a different shape of it doesn’t work well? Or is there a good parametric model / designer out there that I’m not aware of?
I’ll bet you’re fun at parties. Do you by any chance use car tires, cling wrap, plastic packaged foods, synthetic fiber clothes, any electronic devices?
not a turbine but i had one of those toys which is just like a plastic propeller with a shaft hanging off of it…you spin the shaft between your hands and then it takes off and flies around a little bit. my kid broke the propeller so i decided to make a new one out of PETG. the original was just two flat blades at opposed 45 degree angles, which i happen to know is inefficient. for a given RPM, the blade near the center is moving much much slower than the blade tip, but they’re both hitting the air at the same angle.
so i just decided to make a constant-airspeed shape, where the pitch of the propeller at each spot was defined by the radius of that spot. so it was much steeper at the center, and almost flat at the edges. so far as i know, that aspect of it was ‘ideal’. but as for the airfoil of the propeller, i just used a thin flat shape even though its pitch varied, and that’s obviously not ideal (but was no worse than the original).
i played with it, and it shot up much more effectively than the original. it was very efficient at turning its rotation into thrust. unfortunately, it was so efficient at it that it almost immediately stopped spinning! so it actually flew less long than the original. i’m not sure if version 2.0 should have a reduced pitch (which would pose printing challenges), a reduced diameter (just use less rotational energy per unit time), or if there was something magical about the original design that generated a lot of ?pointless? vortices where it wasn’t going through the air at the right speed.
so it’s like you would imagine…some parts are idealized, some parts are known to be inefficient, and in the end the parts i didn’t even bother modeling cause a little trouble. so far as i know, almost all hobbyist aeronautics follows this practice, or alternatively they copy formulas out of a magazine or wikipedia article :)
In theory, fan-blade aerodynamics are just the same as airplane or boat propellers. Which is to say — they’re all different. :)
I have some quiet case fans on my computer that are plastic and clearly aerodynamically designed, and I have a squirrel-cage blower that has flat blades, and the whole thing is stamped out of aluminum. (And loud as heck!)
It seems to me that you can do as much engineering here as you’d like to, and 3D printing makes the “manufacture” easy, and iteration times short, which makes it an interesting area to explore.
So I second Matthew Griffin’s question! What’s a good propeller modeller software?
Finally, an item that claims to be entirely 3D printed that actually is! Usually it’s always clickbait and you need to add screws, nuts, motors and other electronics, but this is truly entirely 3D printed.
Why hand crank it. Add an octagon shaft in the center and use your drill to get some speed on it.
There’s actually a few tasks where the sensitivity of a hand-crank blower is a significant boon, although the main one I’m familiar with probably ends up cooking this blower from radiant heat: they’re lovely for blacksmithing with solid fuels. You automatically are intuitively adjusting the fire intensity when you use them and they spin down when you stop to actually use the heat.
Any chance of getting the STL?
Click the first link! He has sets of parts as .3mf files and each individual part as .STL.
Catgut also good