Fermentation is a culinary art where tiny organisms transform simple ingredients into complex flavors — but they’re finicky about temperature. To keep his brewing setup at the perfect conditions, [Ken] engineered the Fermenter, a DIY insulated chamber controlled by Home Assistant for precision and remote monitoring.
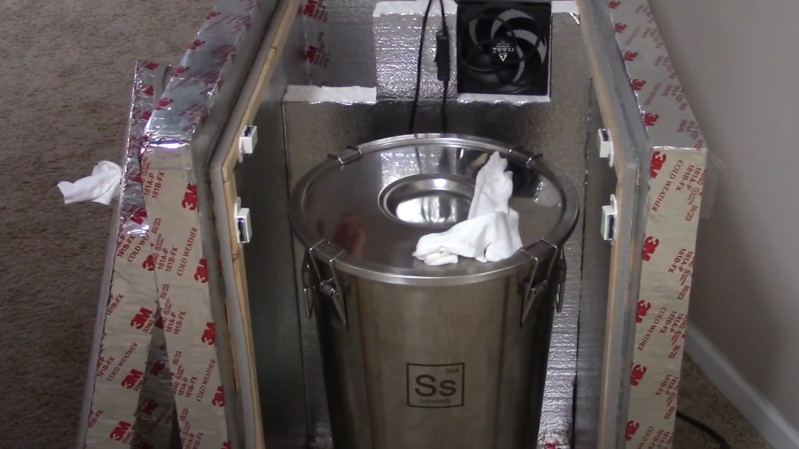
The Fermenter build starts with an insulated chamber constructed from thick, rigid foam board, foil tape, weather strips, and a clever use of magnets to secure the front and top panels, allowing quick access to monitor the fermentation process. The chamber is divided into two sections: a larger compartment housing the fermentation vessel and a smaller one containing frozen water bottles. A fan, triggered by the system, circulates cool air from the bottle chamber to regulate temperature when things get too warm.
The electronics are powered by an ESP8266 running ESPHome firmware, which exposes its GPIO pins for seamless integration with Home Assistant, an open-source home automation platform. A DS18B20 temperature sensor provides accurate readings from the fermentation chamber, while a relay controls the fan for cooling. By leveraging Home Assistant, [Ken] can monitor and adjust the Fermenter remotely, with the flexibility to integrate additional devices without rewiring. For instance, he added a heater using a heat mat and a smart outlet that operates independently of the ESP8266 but is still controlled via Home Assistant.
Thanks [Ken] for sending us the tip on this ingenious project he’s been brewing. If you’re using Home Assistant in a unique way, be sure to send in your project for us to share. Don’t forget to check out some of the other Home Assistant projects we’ve published over the years. Like a wind gauge, maybe. Or something Fallout-inspired.


Ah, the old “Son of Fermentation Chamber” rides again. I built one ages ago and ran it with BrewPi. It’s a great design.
How well does it cool though? Some ale yeasts make an incredible amount of heat when it gets going, and I find it’s difficult to keep it down. Always end up making “steam beer”.
Well enough. Although this particular project is what you build if you can’t afford to allocate a fridge to brewing beer.
I mean, is it fire and forget, or do you have to keep re-filling it with ice every few hours when the main fermentation is going?
So I usually have to replace two ice bottles about every 24 hours depending on the ambient temperature. For the 2 days or so when the yeast is at its maximum activity, two ice bottles can actually suppress the temperature rise (if desired), but you might have to replace ice bottles every 12-18 hours during that 2-3 day period.
I’ve found that this design can get the temperature down to about 20 degrees F below the ambient temperature though you’d have to swap ice bottles much more quickly if you were actually trying to hold it at that temp. I usually use this fermenter when I only need to keep the fermenter around 10 degrees or less below the ambient temperature.
Except in the winter, when the temps in my basement are colder I usually only use this fermenter for ales (which are fermented 10-20 degrees warmer than lagers). It works very well for ales.
What if you just load it up full with ice and control the cooling rate with the fan? Obviously it’s not going to last many days, but at least it avoids having to babysit the box multiple times a day.
What if…? Couldn’t you just…?
No.
As with anything fermentation related, temperature control is one factor determining the quality of the resultant beverage. This is why Ales are so common, they use yeast which has a wide ideal temp range. Pilsner are brewed at around 40°F, which requires glycol or other efficient cooling methods.
I’d say lagers are more common – in terms of beer sold/drunk. Ales are more common with the home brewers because they ferment fast and don’t require cooling – at least if you don’t mind a bit of cidery taste and lower ABV in your beer.
I don’t get cidery tastes in homebrew. That comes from using sucrose instead of dextrose.
Sucrose is a mix of glucose and fructose and it’s the fructose that gives it the fruity taste.
If you are using sucrose you can eliminate it by doing a 72 hour diacetyl rest.
It comes from brewing too hot. The yeast, or some ale yeasts at least, turn a sharp fruity flavor when they’re pushing against their survival temperatures. Sometimes that’s used for effect.
It has been proven over and over again that pilsners can be fermented at ale temperatures without off flavors. Sticking to old methods just because they have always worked, doesn’t mean that all other method will not work.
Try to use 34/70 at ale temperatures, you will be surprised with a nice and crispy lager with no off flavors. As we are here, also a 90 minute boil is unnecessary with the modern malts we have these days.
I think I’m missing something. Why are air cooling designs popular here? I would have thought liquid cooling/heating would be ideal. Probably costly, but freezing water bottles seems frustrating.
Air cooling systems are much easier and cheaper. Glycol systems exist, but are expensive. These systems are kind of like a portable AC unit that chills a glycol/water mixture which is then run through either a coil submerged in the beer or in a jacket wrapped around the fermenter. It’s possible to build your own glycol chiller, but it’s much more difficult.
I’ve found the air cooling systems work pretty well and if you don’t like changing ice bottles then you can always get an old fridge or chest freezer and control it with a similar temperature controller. I’ve got another project video on how to do that here: https://www.youtube.com/watch?v=JcBaPzFKumQ