To update an old saying for the modern day, one man’s e-waste is another man’s bill of materials. Upcycling has always been in the hacker’s toolkit, and cellphones provide a wealth of resources for those bold enough to seize them. [Huy Vector] was bold enough, and transformed an old smartphone into a portable pico projector and an ASMR-style video. That’s what we call efficiency!
Kidding aside, the speech-free video embedded below absolutely gives enough info to copy along with [Huy Vector] even though he doesn’t say a word the whole time. You’ll need deft hands and a phone you really don’t care about, because one of the early steps is pulling the LCD apart to remove the back layers to shine an LED through. You’ll absolutely need an old phone for that, since that trick doesn’t apply to the OLED displays that most flagships have been rocking the past few years.
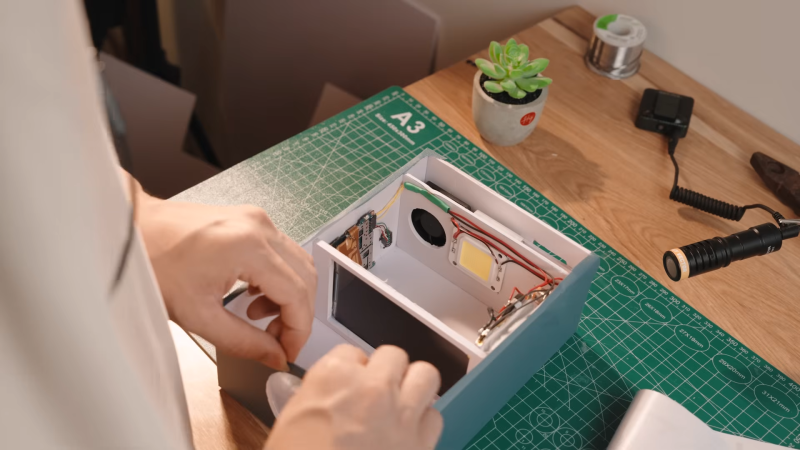
 It looks like he’s specifying a 20 W LED (the bill of materials is in the description of the video on YouTube), so this projector won’t be super bright, but it will certainly be usable in darkened rooms. At least that lower wattage also means the batteries salvaged from an old power bank should give enough runtime to finish a movie… as long as it’s not the director’s cut, anyway. A heatsink and fan keep the LED from cooking itself and what’s left of the cell phone inside the foam board case.
The projected image looks surprisingly good considering the only optics in this thing are the LCD and the lens from a 5x magnifying glass from AliExpress.
(Editor’s Note: Indeed. Surprisingly good. We’re guessing the image was “improved” in post-production, which is a bit of a bummer. See the discussion in the comments, and please keep it civil and/or constructive.)
The foam board case, too, ends up looking surprisingly good once the textured vinyl wrap is applied. That’s a quick and easy way to get a nice looking prototype, if you don’t particularly need durability.
It’s not the brightest screen you can build, nor the highest resolution projector we’ve seen– but it might just be the easiest such build we’ve featured. As long as you handle the tricky LCD disassembly step, this is absolutely something we could see doing with children, which isn’t always the case on Hackaday.


At 3min07 he says a 50W LED cob. He’s got a small cooler and a 40mm (I think?) fan to cool it down.
Those who do not study optics are doomed to make crappy optics.
No condenser lenses, simple biconvex projection lens.
There’s no way on god’s green earth he can project that image with those optics.
I’m calling it faked, doin’ it for the clicks…
Sadly, this could work with a bit more attention to the engineering and a lot less to the video production.
I concur. The projection looks far too good for something created from using a roughly 30×30 cm emissive surface with hotspots as light source. The projection should show a lot of artifacts from that.
Yeah, there’s no way you can get a sharp projected image with a big array LED like that. And the inside of the box is white and reflective, that’s going to tank the contrast ratio. It’s also telling that there’s no shot of the finished unit projecting that image, just the projected image itself.
This is absolutely fake.
Calling BS on this one. There is no way the projection is without artifacts. only ONE lens is used. The apparent image is not inline with the wall dimensions.
Prol’y used a AI oderous S to stich a image and screen capture video.
Sad that people do BS just for views, and it is listed on HAD :(
Yeah… I’m looking at the video image, and it does look too good to be true. I bet they are retouched in post. That’s a shame. He should have mentioned that.
If you look at the rest of the guy’s channel, the videos all seem to be legit, though. And I bet the box does work, just not nearly as well as it’s presented.
Bummer.
Yeah, these are the guys who defended the SOAP router on Kickstarter despite it being an obvious scam. But hey, a click is a click and keeps that ad impression money rolling in.
Being able to build a LED lamp in another video doesn’t speak much for being able to build a projector in this one..
If they didn’t remove the diffuser, this could have worked as a brighter version of those “shoebox projectors” that use the smartphone backlight itself. Unlike real projectors that pass collimated light through a transparent TFT, these form an image of the diffuse light coming out of the panel. Most of the light gets wasted, but at least it can work with a larger LED.
In the video, the diffuser is removed at 1:17. Then at 7:45 the screen again appears as if it had the diffuser. And then magically we get perfectly sharp projection without even subpixel artefacts.
Yeah. That was going to be my devil’s advocate answer to the “no condenser” crowd: LCD screens have diffusers essentially in contact with the LCD element, meaning the only light rays coming out the front are essentially normal to the surface, which is what you want from the condenser anyway. But then the images with and without it…
Maybe he ruined that first screen and then re-did it with one that he left the diffuser on? And didn’t realize that was the secret sauce? But you’d notice that it doesn’t work the second you light the thing up.
I was also thinking that the internal bounce inside the first white box might help with some of that — it’s basically a huge diffuser. But you’d still see hot spots on the screen, and should see them in the image, where the direct light from the LED passes through.
You should be able to see the white screen that’s holding the LCD frame — that second box has to be very well illuminated. And it should be in rough focus b/c it’s on the same plane.
I can’t convince myself that the sharp detail on the black letters looks plausible.
Just to make it clear, a diffuser diffuses light – it spreads it to all angles so you could see the LCD from other sides than just straight in front of it.
But the LCD itself does not collimate light to be “normal to the surface”. It still exits the screen over a somewhat narrower cone than what the diffuser would produce. A diffuser is not strictly necessary – it just improves the viewing angles of cheaper LCDs.
The point of the condenser lens, typically a fresnel lens, is to direct the light cone from the backlight towards the projecting lens, with the LCD in the middle, so the light from the far edges of the LCD panel wouldn’t miss the aperture and cause vignetting (fading out). Without a condenser lens, you would expect the picture to be very unevenly lit. A diffuser would help against this, but it would reduce contrast and the picture would still appear brighter in the middle.
heh, i thought the optics were too simple but i just shrugged and said seeing is believing :)
I made a similar projector about 20 years ago and It works just like that. I had a gasdischarge lamp, fresnel lenses and, old 15″ LCD screen and a simple lens in the output. The resolution was only 1280×1024 or something like that, but it looked just as ok as the image you see in the video. You can also see a lot of light leaking on the wall next to it.
Oh…. wait. I just opened the above video in 2160p and the projected image is even clearer than the rest of the room… Please ignore my above opinion and add me to the non-believers…
i guess the lack of condenser is really the “tell” here. i had to remind myself of how overhead projectors work but after that the main problem that i could see was that the image of the lcd is way bigger than the projector – even if you could focus an image of the screen with the front lens onto a (flat) screen, it would be of some small portion of the middle of the lcd and certainly not the whole thing
…well, actually now that i’m thinking about it i guess there only needs to be a path from the projection screen through the lens to a given pixel on the lcd. you’d still want a condenser to actually get the light onto the focusing lens but it’s not absolutely necessary as long as you can actually see the lcd through the lens
to recover from the embarrassing mistake of “completely forgetting elementary optics” i’ve drawn some diagrams and sufficiently convinced myself that simple projectors like this are, in fact, entirely possible.
as other commenters note you’d expect to see chromatic aberration. i’m trying to figure out how you’d ensure this thing was in focus, though. it seems like the lcd was just attached at Some Distance from the lens, without any ability to adjust it – perhaps we are to assume that the correct distance was measured off-screen? it doesn’t seem very precise in any case
Move back and forth from the wall until it focuses?
The killer bit of evidence is the fact that ordinary single lens magnifying glasses are not achromatic.
There should be a lot of chromatic aberration in the image, because the lens cannot focus red, blue and green at the same distance. The fact that there isn’t says the image was projected with an actual doublet from an actual projector, or added in post.
I was wondering how the heatsink is supposed to work properly with the LED-cob superglued on. I thought there was supposed to be some kind of mounting pressure involved
Let’s say it did work… somehow… then what in the optics world would be needed to make it look so sharp on the wall?
zero Petzval sum, f/8
Mandatory post for a real version of this concept
https://www.youtube.com/watch?v=YfvTjQ9MCwY
It won’t be with a cell phone but anyone who wants to see an ACTUAL projector build, this one is pretty cool and definitely goes into the difficulty involved:
https://www.youtube.com/watch?v=YfvTjQ9MCwY&t=167s
I happen to have the exact same magnifying glasses on hand (came from Amazon or something) so I figured I would give it a quick try with my phone brightness up all the way in a dark room.
Only about the middle 30% is in focus, both edges are very blurry. So this is clearly a fake, but it’s a pretty decent one.
knows projected image will be flipped, puts phone screen in backwards to compensate
with the screen and lens inline, the projector will have to be raised up off the ground like it is in the video
blurring at the edges of the “projected image”
My guess is that they did the project, then realized the quality would not be “good enough” to post. Which is a shame, because besides the outer parts of the screen being blurry, my 2 minute experiment is actually better quality that I would have expected. Maybe if they had gone with a smartwatch sized screen instead.
If it doesn’t look like a project from mid 90s it’s fake.
Even then it would be at the low end of optical quality, only the resolution would be improved (and based on the optics, irrelevant mush).
Reminds me of those comic book ads…
A small enough screen that you can get it all within the width of a big lens like this could work. But it’ll be dark b/c you can’t get much light through it without burning it up.
Double-plus the “it’s a shame” sentiment though, because playing around with the simplest optics yields really pretty-OK results. This project demonstrates amazing results, however, and that’s where it becomes hard to believe. I bet you’re right on the sequence of events.
I’m imaging the die from a COB LED on the wall quite nicely as we speak. But that’s not an source that’s physically larger than the lens…
Why it also can not work…
The Screen he uses did broke mid teardown :D
Visible at 6:23 and more
Fresnel lenses on both sides of the panel and a Cooke triplet are the ticket. The clickbait in the video… isn’t.
Thin lens-facing plastic Fresnel lenses can be subjected to some bending in an appropriate frame to attempt to improve the field curvature or aberrations uniaxially when a doublet lens is used, but this will add astigmatism.
Fresnel lenses are really just there to get perpendicular incidence across the panel and then to stuff the light into the projection lens entrance pupil at its focused position.
I’m happy to still have an absolute monster 400mm f/4 triplet from an epidiascope for such occasions.
The moment I saw those fingernails I knew something was afoot.
Fake, broken LCD (at 6.23), aberration, as posted above.
Shame to HaD to post such clickbait video.
I’ve been a reader for almost 20years, but, the quality is going down the drain, I’m afraid we need to leave this boat (moving to hackernews, but I miss the hardware oriented part)
Or you can re-use old phone/tablet without destroying it as a remote wifi display for your ESP32 project…
https://github.com/defdefred/UDisPlay