[Vik Olliver] has been extending the lower resolution limits of 3D printers with the RepRapMicron project, which aims to print structures with a feature size of ten micrometers. A molten plastic extruder would be impractical at such small scales, even if a hobbyist could manufacture one small enough, so instead [Vik]’s working on a system that uses a very fine needle point to place tiny droplets of UV resin on a substrate. These points have to be sharper than anything readily available, so his latest experiments have focused on electrochemically etching his own needles.
The needles start with a fine wire, which a 3D-printed bracket holds hanging down into a beaker of electrolyte, where another electrode is located. By applying a few volts across the circuit, with the wire acting as an anode, electrochemical erosion eventually wears through the wire and it drops off, leaving an atomically sharp point. Titanium wire performs best, but Nichrome and stainless steel also work. Copper wire doesn’t work, and by extension, nor does the plated copper wire sometimes sold as “stainless steel” by sketchy online merchants.
The electrolyte was made from either a 5% sodium chloride solution or 1% nitric acid. The salt solution produced a very thin, fine point, but also produced a cloudy suspension of metal hydroxides around the wire, which made it hard to tell when the wire had broken off. The goal of nitric acid was to prevent hydroxide formation; it produced a shorter, blunter tip with a pitted shaft, but it simply etched the tip of the wire to a point, with the rest of the wire never dropping off. Some experimentation revealed that a mixture of the two electrolyte solutions struck a good balance which etched fine points like the pure salt solution, but also avoided cloudy precipitates.
If you’re interested in seeing more of the RepRapMicron, we’ve looked at a previous iteration which scribed a minuscule Jolly Wrencher in marker ink. On a more macro scale, we’ve also seen one 3D printer which used a similar resin deposition scheme.


Vape shops are an easy source for SS wire if anyone needs it …
Yeah, and they tend to contain what it says on the label. Problem is, vaping products are not legal in many places and that can apply to the point where you can’t order the bits in from overseas. However, you can generally still get Nichrome or pick the little stainless steel strands out of braided electric fence line…
Acupuncture anyone?
Ironically, the needles are often sold as 3D printer nozzle cleaning kits. And yeah, they’re pretty sharp.
Nothing beats nature though, I wonder how long a prickly pear cactus needle would last. Those things are nasty.
I would be wary of words like ‘atomically sharp point’ when the only instrument to measure sharpness is a camera
Technically everything is atomically sharp. Even a steel ball, it ends up in a single atom whatever your contact point. As usual, it’s pure marketing bullshit, since we don’t actually need (and can’t use) a single atom to hold a drop of resin anyway.
The funny part is, I can see the tip isn’t ‘atomically’ sharp. Its multiple pixels wide. Still an interesting article and the technique is probably really valuable for some niche applications. A little more skepticism would go a long way on hackaday lately.
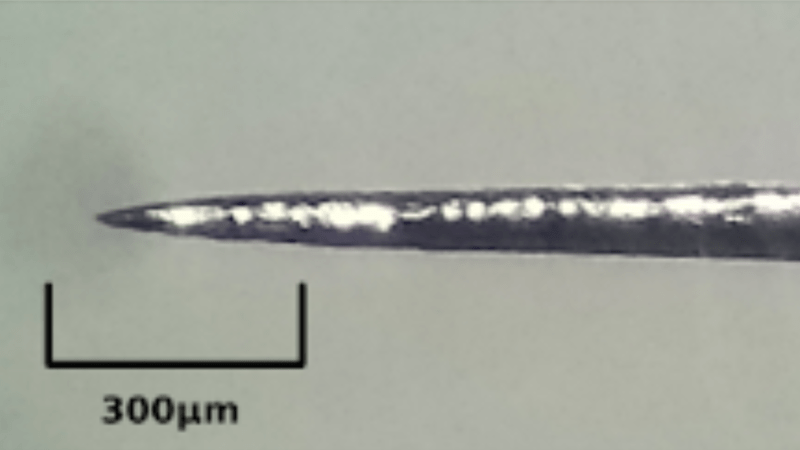
Slight misunderstanding: the probe image in this article is the best practical type that’s made for current hardware. The linked entry shows finer tips, far below the resolution of the crapcam on the 100x trinocular microscope. Unfortunately the higher magnification (2,400x) microscope is not camera compatible at that magnification. It shows the finest points to be beyond its resolution and still tapering.
I also doubt that it is even remotly possible to get “atomically” pointy needles from a metal substrate just with a simple isotropic etching process.
There is a reason why crystals are etched anistropically and even those needles have still a few atoms at the tip, e.g. some “budget” needles could be found here: e.g. https://www.budgetsensors.com/
It is, actually. There are some very famous photos of the tips of tungsten needles, created using emission micrographs.
The usual way is to use a tungsten wire, mounted on a balanced arm. The arm is balanced so that the needle just dips into a beaker of electrolyte, which if memory serves is sodium hydroxide. The needle dips into the electrolyte, completing the etching circuit, but also a small electromagnet that pulls the arm the other way. This breaks the circuit, which .. you get the idea. Because the tip of the wire spends more time in etching, a point develops.
There’s probably a fair amount of experimentation to get the solution concentration correct, etc. etc.
This technique is well known in electron microscopy circles, and also used for making very fine microprobes for semiconductor probing.
We used this technique in the developmental biology lab where I did my PhD. The needles were needed as ultrathin scalpels to operate on chicken and mouse embryos.
We also used this technique during my PhD to build field emission points (FEPs) to use them as electron sources in high vacuum low temperature environments.
Try cutting a piece of partially strain hardened copper wire with new and purpose reserved flush cutters at a 45 degree angle with the angled faces inward. Should leave a very fine point. Makes a good probe tip for electronics.
As far as stainless steel wire goes, perhaps the biting tip of vicegrip pliers will work similar as I have tested that for cutting steel wire. The resulting squished tip is sharp. Resulting angles are a matter of which vicegrips are used of course.
Did that. The tip does different thing when you move it in different directions, isn’t as sharp as an etched one, and the pointy end goes off at an angle. I switched to hypodermic needles as I have a bountiful supply, then the eched wires to get a uniform point.
In the physics department at the University of Nebraska, we used this same technique to create the tips for our scanning tunneling microscope. You need a very precise point for those microscopes to work properly.
came here to talk about this! , former thermo fisher scientific employee here, the secret sauce is a combination of immense tension and chemical etching , basically have to normalize the material beforehand so grains are not the shear plane, basically non crystalline caramel. BTW you really should switch to a lab6 crystal, a chimp can install one of those and make it work right!
Ooook! Will try stretching and etching. I did that with the first one accidentally after trying to see how sharp I could get a wire by streching it (answer: not very). My technique has improved, but I didn’t appreciate why that one came out so well. TBH For this application there’s such a thing as too fine!
Long ago, I did the same thing for SEM electron filaments. The technology has since moved on.
In the chemistry department at Imperial College (as undergraduates) we just stretched a wire with pliers until it snapped! It took a small amount of practice but it absolutely worked for STM. I couldn’t tell you what alloy we used but I think anything that shows visible necking under strain would do.
If you think about it you can see why this would give you a bright metal tip that’s sharp at the atomic scale. Possibly this approach is more obvious for chemists, as it’s a scaled-down version of a standard glassware-making technique.
What about glass micropipettes? They can be made with tip diameters as small as 0.1μm. I suspect the pressure to deliver the resin through the pipette would be too high, but it could still be used in the same way as the needles. Delicate? Yes, absolutely. But I doubt the needles are being crashed into the substrate and previous layers, so it may be ok.
Availability is a key issue, as this project is in the same vein as RepRap. Very fine pipettes need a pulling machine – perhaps another project? They also don’t conduct well, so levelling is going to be tricky. They tend to clog with crap, because common resins aren’t designed for that size hole. Finally, the system is depositing with a film, not a droplet. This lets capillary action do the consistent work, rather than having to design a very, very accurate micro dispenser. If you work on it, let me know!
On the subject of conductivity, a conductive coating might be worth it for the ability to control your print medium.
I just watched your latest presentation, nice work.
I like how everyone has stuck to the point in this discussion!