We don’t know about you, but one of the biggest hassles of having a 3D printer at home or in the ‘shop is the space it takes up. Wouldn’t it be useful if you could fold it down? Well, you’re in luck because over on Hackaday.io, that’s precisely what [Malte Schrader] has achieved with their Portable CoreXY 3D printer.
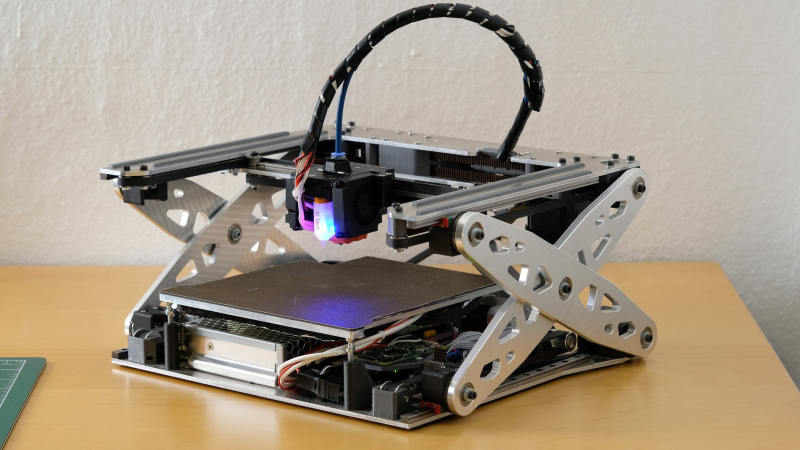
The typical CoreXY design you find in the wild features a moving bed that starts at the top and moves downwards away from the XY gantry as the print progresses. The CoreXY kinematics take care of positioning the hotend in the XY plane with a pair of motors and some cunning pulley drives. Go check this out if you want to read more about that. Anyway, in this case, the bed is fixed to the base with a 3-point kinematic mount (to allow the hot end to be trammed) but is otherwise vertically immobile. That bed is AC-heated, allowing for a much smaller power supply to be fitted and reducing the annoying cooling fan noise that’s all too common with high-power bed heaters.
The XY gantry is mounted at each end on a pair of scissor lift mechanisms, which are belt-driven and geared together from a single stepper motor paired with a reduction gearbox. This hopefully will resolve any issues with X-axis tilting that [Malte] reports from a previous version.
The coarse tramming is handled by the bed mounts, with a hotend-mounted BLTouch further dialling it in and compensating for any bed distortion measured immediately before printing. Simple and effective.
As will be clear from the video below, the folding for storage is a natural consequence of the Z-axis mechanism, which we reckon is pretty elegant and well executed—check out those custom CNC machine Aluminium parts! When the Z-axis is folded flat for storage, the hotend part of the Bowden tube feed is mounted to a pivot, allowing it to fold down as well. They even added a pivot to the other end of the cable bundle / Bowden feed so the whole bundle folds down neatly inside the frame. Nice job!
If you want a little more detail about CoreXY kinematics, check out our handy guide. But what about the H-Bot we hear you ask? Fear not, we’re on it.


This is brilliant. There are a lot of appliances that compete for space and this could fit in a drawer. Maybe a bellow for an enclosure and then it would fit the needs of a lot more people.
I wonder how stable, the X axis is: How large wobble during movements?
It can be quite stable (see chem/physics laboratory liftboys) but this thing seems to use belts to move scissor endpoints.
I’d have expected screws (with maybe a single motor driving both via a single belt) – this would be inherently stiffer I think (maybe with flat bearings at all screw shaft endings).
That would be my concern – those centre bearings are doing a lot of work.
The print looks good, but I wonder what the 100th or 1000th print would look like.
This is super neat, even if it’s late to the party with the Positron having been out in the wild for a while.
I saw a recent video where the Positron team talked about the desktop appliance-like nature of a foldable printer (in reference to the rationale behind the upcoming larger Proton). While this one doesn’t seem to have a comparable folded-footprint-to-build-area ratio, its upright orientation and natural self-folding definitely makes this one a better fit for the job of a “put it away when you’re not using it” kind of printer.
Plus, the look of the scissor lift is just darn cool.
“put it away when you’re not using it kind of printer.”
Hmm you know the printer as an appliance made me think,
A little design modification and you could mount this in an undercabinet configuration so the build would descend as the model “grew” then tuck itself away afterwards.
Print from a drawer? Pretty cool idea!
no I didnt mean from a drawer.
Im talking about mounting it on the bottom of wall mounted shelves so in the standby mode the printer is “invisible”.
It would kind of look like this video. https://youtu.be/9rdfPjgdic4?si=45G_u8-bZ-V67KKo
Originally I just assumed you’d only need mounting clips on the top, but you’d probably want to put the weight on the stable part rather than the mobile part, so just have the build plate move downward and nothing else.
And youd also need something to clip it in place when it’s stored so you can power off the steppers. But altogether I think it would actually be simpler.
Reminds me of:
https://hackaday.com/2019/10/02/x-printer-fits-in-a-backpack/
I also like this presentation:
https://www.youtube.com/watch?v=nRvL-KlX-9w
It shows his thought child from multiple directions so you have a much better idea of construction details, and he’s got some ideas for improvements. I like using lead screws instead of a geared stepper motor with belts for the Z-axis.
The best way to fix the X-Y wobble (also mentioned by Henrik above) is to connect the left side and the right side of the scissors together.
Indeed that’s where it is copied from
Interesting side point from the original that z-axis position has a sin(x) relationship to the stepper input.
That gives you the highest load and worst precision at the start of the print, which isn’t ideal since that’s the part that’s guaranteed to be present on all prints. You can mitigate it a bit in the design by limiting how far you fold and gearing down the z-axis, but I don’t see a way to eliminate that weakness.
I’ve toyed with that problem a bit, imo it can be dealt with by over-constraining the scissor mechanism (see link below). That way the precision is best around both extremes, especially at the start of the print… but it sure bumps cost and complexity. Bonus is that it’s stiff and guaranteed to be free from slop.
That first article from 2022 is from same maker! This is improved version.
I designed and mad a resin 3d printer with this system some time ago…
https://www.youtube.com/watch?v=Jp6w0H66sAA
Shout out for the Lemontrin/Positron:
https://hackaday.com/2024/12/26/open-source-lemontron-3d-printer-is-ready-to-build
That is very very beautiful. I’m glad I don’t have the problem of space. I have a built in closet in my house where my printer is in, which also helps with sound as I covered the walls in sound dampening foam.
What a stunning piece of engineering. Especially with this time laps that I now watched 20 times at least. If it’s fast enough it would be cool as a portable printer.
I’m inspired! Add see-through bellows to keep temperatures stable, or is that so “last year”?
As I replied to this project in 2022:
“Here’s another concept. Add rail + carriage to the positive sloped arm, and a second carriage to the horizontal rail. Join the new carriages with a hinge. Requires a second motor, but realizes continuous motion, removes the singularity issue and enables backlash elimination.”
animation here: https://twitter.com/MisterHW/status/1548355687134023689
Overall, the mechanism looks cool but really has its problems. I don’t blame the creator for basically abandoning the build.
Sorry, I didn’t see your post at the time. It’s a very interesting solution to solve the singularity problem!
Why did it take this long for someone to think of such a seemingly obvious and elegant solution?
Okay, yeah. That is pretty damn cool. I’ve seen a lot of clever 3d printer designs, but this one is my new favorite.
I designed my own printer specifically to fit into the storage space I had for it, but making the thing collapse without having to take it apart is… I’m a fan.
I could see this being nice for a mobile demo device, since it is easier to carry and place in your car. Craft-fair makers and educators might like it.
For everyone else it’s hard to imagine that the flattening feature justifies the added complexity and instability.
I was a diehard fan of delta printers for many years. The design and operation is just so aesthetically pleasing. But I eventually came to accept that simplicity and rigidity mean less 3d printer maintenance, and less maintenance means more time for fun.
Intriguing project, but I have so many questions about the scissor lift mechanism. How does Z axis control work? Do the z-axis steppers need close-loop control? The amount lift provided by a unit of rotation depends on the current position of the z axis. One unit of rotation will provide more lift at lower heights than at higher heights. That will also affect accuracy in the z axis at lower heights.
Nice :)
I built a foldable 3d printer 7 years ago to use on my sailboat.With collapsible portal and traditional Prusa-like design, it fits in a comparatively small case.But this project is completely another level.