Giant Tetris Adds Some Retro To Your Room

giant tetris

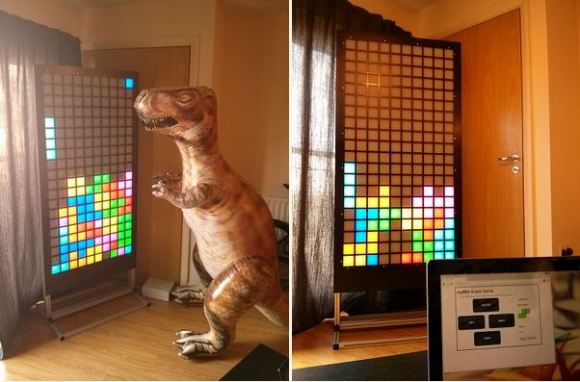
[Sam] just finished off this awesome 6 foot tall Tetris game using National Instruments myRIO with FPGA.

The build makes use of a 10 x 20 grid of RGB LEDs controlled by the myRIO. It’s played by using a web interface on any device, as long as you have WebSockets support. [Sam] had originally built it using an Arduino at the heart, but wanted a stand-alone device to do everything — no extra computer or Raspberry Pi for the web interface. That’s when he discovered the myRIO — it’s a pretty cool piece of hardware that we haven’t seen too much of yet, other than the recent Picasso with a Paintball gun project…

Don’t forget to watch the following video to see the game in action!

Continue reading “Giant Tetris Adds Some Retro To Your Room”

Confuse The Birds With This Daylight Simulation System

F7WW1DAHQP02H5D.LARGE

Hackers love a challenge. So when [Patrick’s] father-in-law asked him to look into a daylight simulation system for his bird breeding cages, [Patrick] quickly discovered the ridiculous prices for commercial systems… so he convinced his father-in-law to let him design and build one instead.

Like any project, [Patrick] quickly listed the requirements of the system before starting anything.

  • It must brighten gradually in the morning
  • Stay constant throughout the day
  • Dim in the evening to a very low intensity

In addition to this, the lighting transition should be smooth, and the lights cannot flicker, as this can be stressful for the birds — oh, and it needs to be reliable.

To build the system, [Patrick] has chosen an Arduino Duemillenova, an RTC, a small LCD screen, some cheap LEDs from eBay and a handful of N-channel NPN transistors to provide the PWM for the LEDs. The entire system cost less than $100 — a much cheaper alternative to commercial systems.

We think the system looks great, but as a big fan of the Hack a Day community, [Patrick] would love to hear your feedback!

Robot Foosball Will Kick Your Butt If You Play Slowly

foosball_pt3_1

Sometimes we find a project that is so far outside of our realm of experience, it just makes us sit back and think “wow”. This is definitely one of those projects. [Saba] has created a Robotic Foosball set that learns.

[Saba Khalilnaji] is a recent engineering graduate from UC Berkeley, and his passion is robotics. After taking an Artificial Intelligence class during his degree (you can take it online through edX!), he has decided to dabble in AI by building this awesome robot Foosball set.

His “basic” understanding of machine learning includes a few topics such as Supervised Learning, Unsupervised Learning and Reinforcement Learning. For this project he’s testing out a real-world application of Reinforcement Learning using the Markov Decision Process or MDP for short. At an extremely top level description it works by programming an agent to learn from the consequences of its actions in a given environment. There are a set of states, actions, probabilities for given state and action, and rewards for specific state and action sets.

Before we butcher the explanation anymore, check out his blog for more information — and watch the following video.

Continue reading “Robot Foosball Will Kick Your Butt If You Play Slowly”

This Little Piggy Stayed Home And Became A Stove

FPQRAZDHRWN9J10.MEDIUM

This little piggy probably should have gone to the market. Instead, its become an extremely decorative, and cute, wood burning stove!

After being inspired by a similar Instructable that guides you through the creation of a wood stove using an expired gas cylinder, [Ruudvande] had to try it himself. The problem was — he didn’t have a gas tank. Luckily for him, he found someone who did, but as it turned out, they wanted to turn it into a barbecue! So, slightly sidetracked, he built them a barbecue using the center of the cylinder, and got to keep the ends and enough steel to make Mr. Piggy himself.

Almost the entire wood burning stove is made of scrap bits and pieces of steel, and various pieces of mounting hardware. Armed with just a MIG welder, [Ruudvande] welded it together all by hand, and we think it turned out great! He’s not quite happy with it yet though and plans to upgrade the chimney, put a larger grill inside, paint it, and even add a glass window to the door.

Cyclone Dust Collector Requires No Bags Or Filters

After discovering their dust collection vacuum was blowing through filters and leaking powdered fiberglass dust all over their workshop, the folks at i3Detroit decided to take matters into their own hands, and built this awesome cyclone dust collector that requires no bags or filters!

They were inspired by a similar wooden sawdust collector, but as they cut many different materials, they decided to build a steel cyclone for durability. The build makes use of two 5-gallon buckets, a 5-gallon vacuum cleaner, and a meticulously designed sheet metal cyclone cone. The vacuum creates a strong suction force and the dust enters the cyclone, getting sucked to the bottom and into the blue bucket. This keeps the filter in the vacuum clean, and keeps all the debris in an easy to access bucket. Continue reading “Cyclone Dust Collector Requires No Bags Or Filters”

EL Wire Nixie Tube Is In Your Reach

FUQ84C3HS0D05D9.MEDIUM

Nixie tubes are awesome, but sometimes a little out of reach for some makers, whether it is a matter of obtaining them, or figuring out how to drive them. The hackerspace over at H3 Laboratories decided to try making a fun alternative — EL wire nixie tubes.

[Marty] leads us through the build in a very detailed Instructable, which makes use of CoolNeon EL wire. He’s using an Arduino Uno with a CoolNeon shield to control it. The trickiest part of this build is forming the numbers to minimize the overlap — to figure this out he modeled it in Blender. He created a test jig and formed the numbers using coat hanger wire first before playing around with the EL wire.

EL wire can be soldered together — it’s just a bit of a fine art, which is explained in another detailed Instructable. To black out parts of the number and the trailing wires, [Marty] made use of black plastic dip. The numbers are mounted on a Styrofoam cylinder which fits into the bottom of a large masonry jar. It’s a great build and a fun project to get into Nixies … without actually getting into Nixies.

Stick around for a video of it in operation.

Continue reading “EL Wire Nixie Tube Is In Your Reach”

3D Printing Metal Structures With A 6-axis Robot

robot printer

[Joris Laarman] is working on a project called the MX3D-Metal which uses an ABB industrial robot arm and a welding machine to create strong metal structures on any working surface and in any direction.

He started last year with the MX3D Resin printer, which is the exact same concept, but instead of metal, it uses a two-part epoxy that bonds instantly upon mixing. Their lab is located in Amsterdam, and they work closely with IAAC (the Institute for Advanced Architecture of Catalonia) — Autodesk provides funding for the research.

[Joris] has successfully printed complex structures using steel, stainless steel, bronze, copper, and even aluminum. Poking around their website you can find many examples of different things they have printed, including intricate matrices of multiple curved lines which end up looking more organic than mechanical. It uses mostly the same concept as the Rostock Welding robot we covered a few months ago, which is open source and fairly cheap to make at home!

Stick around for a video of both the MX3D-Metal and Resin robot printers in action!

Continue reading “3D Printing Metal Structures With A 6-axis Robot”