Cyclone Dust Collector Requires No Bags Or Filters

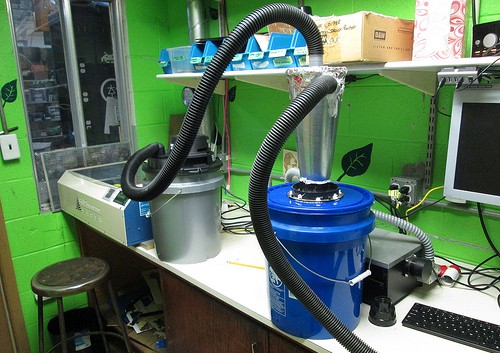
After discovering their dust collection vacuum was blowing through filters and leaking powdered fiberglass dust all over their workshop, the folks at i3Detroit decided to take matters into their own hands, and built this awesome cyclone dust collector that requires no bags or filters!

They were inspired by a similar wooden sawdust collector, but as they cut many different materials, they decided to build a steel cyclone for durability. The build makes use of two 5-gallon buckets, a 5-gallon vacuum cleaner, and a meticulously designed sheet metal cyclone cone. The vacuum creates a strong suction force and the dust enters the cyclone, getting sucked to the bottom and into the blue bucket. This keeps the filter in the vacuum clean, and keeps all the debris in an easy to access bucket. Continue reading “Cyclone Dust Collector Requires No Bags Or Filters”

EL Wire Nixie Tube Is In Your Reach

FUQ84C3HS0D05D9.MEDIUM

Nixie tubes are awesome, but sometimes a little out of reach for some makers, whether it is a matter of obtaining them, or figuring out how to drive them. The hackerspace over at H3 Laboratories decided to try making a fun alternative — EL wire nixie tubes.

[Marty] leads us through the build in a very detailed Instructable, which makes use of CoolNeon EL wire. He’s using an Arduino Uno with a CoolNeon shield to control it. The trickiest part of this build is forming the numbers to minimize the overlap — to figure this out he modeled it in Blender. He created a test jig and formed the numbers using coat hanger wire first before playing around with the EL wire.

EL wire can be soldered together — it’s just a bit of a fine art, which is explained in another detailed Instructable. To black out parts of the number and the trailing wires, [Marty] made use of black plastic dip. The numbers are mounted on a Styrofoam cylinder which fits into the bottom of a large masonry jar. It’s a great build and a fun project to get into Nixies … without actually getting into Nixies.

Stick around for a video of it in operation.

Continue reading “EL Wire Nixie Tube Is In Your Reach”

3D Printing Metal Structures With A 6-axis Robot

robot printer

[Joris Laarman] is working on a project called the MX3D-Metal which uses an ABB industrial robot arm and a welding machine to create strong metal structures on any working surface and in any direction.

He started last year with the MX3D Resin printer, which is the exact same concept, but instead of metal, it uses a two-part epoxy that bonds instantly upon mixing. Their lab is located in Amsterdam, and they work closely with IAAC (the Institute for Advanced Architecture of Catalonia) — Autodesk provides funding for the research.

[Joris] has successfully printed complex structures using steel, stainless steel, bronze, copper, and even aluminum. Poking around their website you can find many examples of different things they have printed, including intricate matrices of multiple curved lines which end up looking more organic than mechanical. It uses mostly the same concept as the Rostock Welding robot we covered a few months ago, which is open source and fairly cheap to make at home!

Stick around for a video of both the MX3D-Metal and Resin robot printers in action!

Continue reading “3D Printing Metal Structures With A 6-axis Robot”

We Salute The Television Tube Flag

From [Gijs] comes Beeldbuis Vlag Tijsdlijn, or television tube flag (Translated). We’re not up on our Dutch, but it appears that [Gijs] and friends have created a television tube which waves much like a flag in response to airflow from a fan.  The effect is pretty darn amazing, and that’s putting it mildly. To create this hack, [Gijs] built a modified Wobbulator. The Wobbulator is an early video synthesizer which used added steering coils to modify the operation of a standard TV tube. When excited, the coils would deflect the tube’s electron beam, causing some rather trippy images to appear on-screen. (Yes, here at Hackaday “trippy” is a scientific term).

[Gijs] wanted his screen to be “waved” by a fan, just like a flag would wave. To do this he used an anemometer made of ping-pong ball halves. The anemometer spins up a DC motor from a CD-ROM drive. In this application, the motor acts as a generator, creating a DC voltage. An ATmega328 running the Arduino code reads the voltage from the motor. If the anemometer is spinning, the Arduino then outputs a sinusoidal value. The Arduino’s output is amplified and applied to the coil on the CRT. A network of power resistors ensures the amplifier is correctly loaded. The results speak for themselves. In the video after the break, the tube flag is displaying a slide show of photographs of its construction. As an added hack, [Gijs] used an Arduino Leonardo as a USB keyboard. When the anemometer spins, the primary ATmega328 sends a signal to the Leonardo, which then emulates a push of the arrow keys on the host computer. This lets the tube flag advance its own images. Very cool work indeed!

Continue reading “We Salute The Television Tube Flag”

Guest Post: Try Radar For Your Next Project

Sensors. The low-end stuff that we can get our hands on usually suffers from poor range, lack of sensitivity, and no way to characterize what the target is. But today we can use the good stuff that, until recently, was only available to military: radar. In this post we will discuss how radar works, commercially available small radar devices, and where to learn more to help make it easy to add radar to your next project. Reach out and sense something!
Continue reading “Guest Post: Try Radar For Your Next Project”

LuxBlaster: Blast A Beam Of Light At The Most Intense Light Source

HighBeams

[Hazim] wrote in to tell us about his project that teaches inconsiderate drivers a lesson! Well, theoretically. The LuxBlaster is a spot light which points towards the most intense light source.

The idea is that you can blast drivers who do not turn their high-beams off with a reverse high-beam of your own. It is very important to note that this should never be used, as [Hazim] also clearly states. While this project is meant to prove that it can be done (a “what if”) project, it has two components that are very well done and can easily be used in different projects: the Arduino controlled spotlight and the light intensity tracker.

What would you use an Arduino controlled spotlight for? Smart lighting? What about a light source tracker? Let us know in the comments.

Continue reading “LuxBlaster: Blast A Beam Of Light At The Most Intense Light Source”

BRAIGO – A Lego Braille Printer

Accessibility devices tend to be prohibitively expensive, and it’s always nice to see a hacker apply their skills to making these devices more affordable. BRAIGO is a low cost braille printer by [Shubham Banerjee]. He built the printer using parts from the LEGO Mindstorms EV3 kit, with a few additions. This LEGO kit retails for $349, and a standard braille printer costs over $2000.

The BRAIGO print head uses weights and a pin to punch holes in standard calculator paper rolls. LEGO motors are used to feed the paper and align the head for accurate printing. It takes about 5 to 7 seconds to print each letter, which are entered on the Mindstorms controller.

While this is a great prototype, [Shubham] intends to continue development with the goal of creating an affordable braille printer. He’s a bit swamped with media requests right now, but is working on releasing BRAIGO as an open source project so others can contribute. It’s an impressive project, especially for a 12 year old student. After the break, watch the BRAIGO do some printing.

Continue reading “BRAIGO – A Lego Braille Printer”