Southwest Tour: [Mikey Sklar’s] Homestead

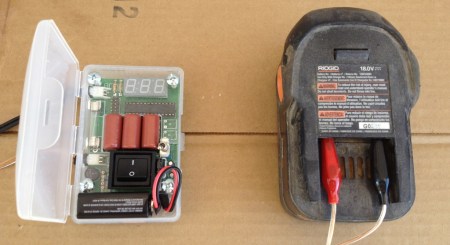
While on our southwest tour, we were sure to make some time to go visit [Mikey Sklar]. He’s been a friend of hackaday for a long time, both as a writer and as someone who sends us cool projects. As you may have noticed from some of the posts we’ve done on his projects, [Mikey] lives in the middle of the desert and is attempting to lead a fairly self sustaining life style. He and [Wendy] showed us their gardens, the hot spring on their property,and some cool building materials they’ve utilized. We got to tour [Mikey’s] workshop and check out how his solar system was set up. It was pretty cool seeing “da Pimp” being used to revive old batteries. [Mikey] even mentioned that he’s building in a lot of safeguards in the next revision based on the feedback he got online.

What I really enjoyed about talking with [Mikey] and [Wendy] was that they didn’t act like they had it all figured out. They’re approaching this whole lifestyle as a learning adventure as you can hear when [Mikey] talks about their bees.


Mikey Sklar On The Daily Show

mikey sklar

Yesterday’s The Daily Show (8-23-06) had a segment featuring friend of Hack-A-Day Mikey Sklar. You probably remember his projects: Making RFID proof pockets, embedding an RFID chip in his hand, and his current project the high-lighter, a trampoline controlled flame thrower. Mikey is on the road to Burning Man right now so he hasn’t seen the 2 minutes they got out of the 8.5 hours of filming. It can’t be all bad though: this screen cap is right before Samantha Bee unzips her pants and he got just as much screen time as Ray Kurzweil. You can download the torrent here. Mikey’s segment starts at 7 minutes; there is some more during the credits.

UPDATE: Dan Lane (also chipped) uploaded the short segment to YouTube. Video after the break.

Continue reading “Mikey Sklar On The Daily Show”

Fiber Laser Gives DIY PCBs A Professional Finish

While low-cost professional PCB fabrication has largely supplanted making circuit boards at home, there’s still something to be said for being able to go from design to prototype in an afternoon. Luckily we aren’t limited to the old toner transfer trick for DIY boards these days, as CNC routers and powerful lasers can be used to etch boards quickly and accurately.

But there’s still a problem — those methods leave you with a board that has exposed traces. That might work in a pinch for a one-off, but such boards are prone to shorts, and frankly just don’t look very good. Which is why [Mikey Sklar] has been experimenting with applying both a soldermask and silkscreen to his homemade boards.

The process he describes starts after the board has already been etched. First he rolls on the soldermask, and then sandwiches the board between layers of transparency film and clear acrylic before curing it under a UV light. After two coats of the soldermask, the board goes into a fiber laser and the silkscreen and mask layers are loaded into the software and the machine is set to a relatively low power (here, 40%). The trick is that the mask layer is set to run four times versus the single run of the silkscreen, which ensures that the copper is fully exposed.

Since the board doesn’t need to be moved between operations, you don’t have to worry about the registration being off. The end result really does look quite nice, with the silkscreen especially popping visually a lot more than we would have assumed.

We’ve previously covered how [Mikey] uses his CNC router and fiber laser to cut out and etch the boards, so this latest installment brings the whole thing full circle. The equipment you’ll need to follow along at home isn’t cheap, but we can’t argue with the final results.

Continue reading “Fiber Laser Gives DIY PCBs A Professional Finish”

Aluminum Business Cards Make Viable PCB Stencils

[Mikey Sklar] had a problem—namely, running low on the brass material typically used for making PCB stencils. Thankfully, a replacement material was not hard to find. It turns out you can use aluminum business card blanks to make viable PCB stencils.

Why business card blanks? They’re cheap, for a start—maybe 15 cents each in quantity. They’re also the right thickness, at just 0.8 mm 0.18 mm, and they’re flat, unlike rolled materials that can tend to flip up when you’re trying to spread paste. They’re only good for small PCBs, of course, but for many applications, they’ll do just fine.

To cut these, you’ll probably want a laser cutter. [Mikey] was duly equipped in that regard already, which helped. Using a 20 watt fiber laser at a power of 80%, he was able to get nice accurate cuts for the stencils. Thanks to the small size of the PCBs in question, the stencils for three PCBs could be crammed on to a single card.

If you’re not happy with your existing PCB stencil material, you might like to try these aluminium blanks on for size. We’ve covered other stenciling topics before, too.

Continue reading “Aluminum Business Cards Make Viable PCB Stencils”

CNC Router And Fiber Laser Bring The Best Of Both Worlds To PCB Prototyping

Jack of all trades, master of none, as the saying goes, and that’s especially true for PCB prototyping tools. Sure, it’s possible to use a CNC router to mill out a PCB, and ditto for a fiber laser. But neither tool is perfect; the router creates a lot of dust and the fiberglass eats a lot of tools, while a laser is great for burning away copper but takes a long time to burn through all the substrate. So, why not put both tools to work?

Of course, this assumes you’re lucky enough to have both tools available, as [Mikey Sklar] does. He doesn’t call out which specific CNC router he has, but any desktop machine should probably do since all it’s doing is drilling any needed through-holes and hogging out the outline of the board, leaving bridges to keep the blanks connected, of course.

Once the milling operations are done, [Mikey] switches to his xTool F1 20W fiber laser. The blanks are placed on the laser’s bed, the CNC-drilled through holes are used as fiducials to align everything, and the laser gets busy. For the smallish boards [Mikey] used to demonstrate his method, it only took 90 seconds to cut the traces. He also used the laser to cut a solder paste stencil from thin brass shim stock in only a few minutes. The brief video below shows the whole process and the excellent results.

In a world where professionally made PCBs are just a few mouse clicks (and a week’s shipping) away, rolling your own boards seems to make little sense. But for the truly impatient, adding the machines to quickly and easily make your own PCBs just might be worth the cost. One thing’s for sure, though — the more we see what the current generation of desktop fiber lasers can accomplish, the more we feel like skipping a couple of mortgage payments to afford one.

Continue reading “CNC Router And Fiber Laser Bring The Best Of Both Worlds To PCB Prototyping”

Book Review: The Good Life Lab

the-good-life-lab

Stop whatever you’re doing and get this book. I’ve just finished reading it and I have to say that [Wendy] and [Mikey] could easily be the poster children for modern day hacking, and this book could be the manual for a life built on hacking.

When I visited [Wendy] and [Mikey] last year I was blown away.  Their little homestead was a veritable smorgasbord of hacks. Everywhere I looked, things were cobbled together, modified, repaired, and improved. There wasn’t a single piece of their lives that wasn’t somehow improved by their efforts to play an active role in their own living.

That sounds a bit cheesy I know. We all play an active role in our lives right? Sure. But what they have done is created a hacker’s homestead. My projects tend to live on my workbench, occasionally poking into my daily life, but they went were there was virtually nothing and hacked together everything they found they needed.  Their life is their workbench.

Continue reading “Book Review: The Good Life Lab”

Open Source Capactive Charger Resurrects An Electric Skateboard

mikey-sklar-on-electric-skateboard

Here’s [Mikey Sklar] posing on his new electric skateboard. Well, it’s new to him at any rate. He bought it used on eBay for $250. That may not sound like much of a deal, but these will run more like $800 retail. The savings comes because the thing would no longer charge. But it took him just an hour and a half with his capacitive charger to resurrect the flat lithium cells.

The first thing he did in trouble shooting the situation was to measure the voltage of the battery pack. It registered 5V, which is a far cry from the 36V it should supply. The built-in charger does nothing, as it’s circuitry isn’t designed to work in a situation like this one. But [Mikey] has a tool perfect for this purpose. Da Pimp is a capacitive charger which we’ve seen before. It succeeds where the other failed because it is able to adapt itself to the internal resistance of the battery, no matter what voltage level it starts at.

[Mikey] shows off the use of his charger in the clip after the break. His first test run was more than two miles without issue.

Continue reading “Open Source Capactive Charger Resurrects An Electric Skateboard”