Creality CR10-S Upgrade Shows The Effect Of Bad Power

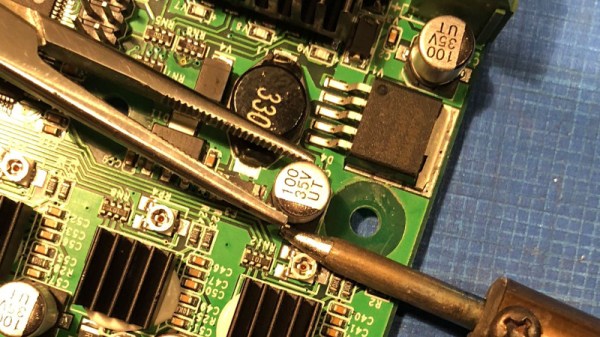
The Creality CR10-S is a printer that has become quite popular, and is not an uncommon sight in a hackspace or makerspace. Some models have a slight defect, a smoothing capacitor is of insufficient size, resulting in reduced print quality. [Jozerworx] has replaced the capacitor, and posted a full guide as to how the task can be performed.

Hackaday readers will have among their number many for whom replacing a surface mount electrolytic is no bother at all, indeed we’d expect most 3D printer owners to be able to perform the task. Maybe that the post has such an extensive FAQ and seems to be aimed at newbies to soldering points to 3D printing having moved to a wider market. But it has to be remembered that the value in this piece is not in the work, but in the characterisation. At the end he posts graphs showing the effect of the modification on the temperature of the extruder, and on the temperature noise brought about by the poor capacitor choice. A reduction from a +/- 3 Celcius variation to one of around +- 0.1 Celcius may not seem like much, but it seems it has a significant effect on the reliability of the printer.

So this isn’t the most elite of hacks, on a printer heading for a wider marketplace. But it serves to illustrate that bad quality power regulation can have some surprising effects. It seems every new printer comes with a list of community-developed mods to make it usable, perhaps one day we’ll find a printer that’s at peak performance out-of-the-box.

Automatic part remover for 3D printer

Automatically 3D Print Infinite Number Of Parts

We’ve seen 3D printers coming out with infinite build volumes, including some attempts at patenting that may or may not stall their development. One way around the controversy is to do it in a completely different way. [Aad van der Geest]’s solution may not give you the ability to print an infinitely long part, but it will allow you to print an infinite number of the same, or different, parts, at least until your spool runs out.

[Aad]’s solution is to have a blade automatically remove each part from the print bed before going on to the next. For that he put together a rail system that sits on the bed of his Ultimaker 2, but out of the way on the periphery. A servo at one end pulls a blade along the rails, sweeping over the bed and moving any parts on the bed to one end where they fall away. This is all done by a combination of special G-code and a circuit built around a PIC12F629.

One of many things that we think is pretty clever, as well as fun to watch, is that after the part is finished, the extruder moves to the top corner of the printer and presses a micro switch to tell the PIC12F629 to start the part removal process. You can see this in the first video below. The G-code takes over again after a configurable pause.

But [Aad]’s put in more features than just that. As the second video below shows, after the parts have been scraped from the build plate, a pin on the extruder is used to lift and drop the blade a few times to remove small parts that tend to stay on the blade. Also, the extruder is purged between prints by being moved over a small ridge a few times. This of course is also in that special G-code.

How do you produce the special G-code, since obviously it also has to include the parts to print? For that [Aad]’s written a Windows program called gcmerge. It reads a configuration file, which you edit, that contains: a list of files containing the G-code for your parts, how many to print, whether or not you want the extruder to be purged between prints, various extruder temperatures, cooling times, and so on. You can find all this, as well as source for the gcmerge program, packaged up on a hackaday.io page. Incidentally, you can find the PIC12F629 code there too.

Continue reading “Automatically 3D Print Infinite Number Of Parts”

Writing with a 3D printer

Good Penmanship With A 3D Printer

[Chris Mitchell] was going to make his own plotter for doing cursive writing for cards but realized he might be able to use his 3D printer to do the writing instead. But then he couldn’t find any suitable software so he did what you’re supposed to do in this situation, he wrote his own called 3DWriter. He even 3D printed a holder so he could attach a pen to the side of the extruder. When not in use as a plotter he simply retracts the pen tip.

The software is written in C# for Windows and is available on GitHub along with a detailed write-up. He clearly put a lot of thought into what features the software offers. After selecting the font, you type in whatever you want printed and then preview it to make sure it looks good. There’s also a bunch of G-Code settings you can fill in such as bed size, the horizontal and vertical offsets of the pen tip from the extruder tip, drawing speed and so on. There’s even an option to do a dry run with the pen raised so you can make sure it’ll draw on the bed where you expect it to.

The code itself is quite clean and easy to understand. If you’re curious like we were at what information is in the font files and how it’s translated into G-Code then download the source from the GitHub page and have a look. [Chris] settled on a font set called Hershey fonts since they’re primarily stroke based fonts as opposed to outline fonts which are what other programs he’d looked at used.

This makes us think of all those 3D printers with busted extruders we’ve seen collecting dust on hackerspace shelves or simply ones considered obsolete. Using them as a plotter gives them new life — even if just as a fun way to learn about writing code for CNC machines. It makes us wonder what other 2D uses they can be put to… cutting vinyl? laser printing? Ideas anyone?

In any case, have a look at the video below to see it in action as a 2D plotter. As a bonus, you’ll also see line art it drew using an Inkscape plugin.

Continue reading “Good Penmanship With A 3D Printer”

Super Sizing The Printrbot Metal Simple

The Printrbot Simple Metal is a good 3D printer, with a few qualifications. More accurately, the Printrbot Simple Metal is a good first 3D printer. It’s robust, takes a beating, can produce high-quality prints, and is a great introduction to 3D printing for just $600. There are limitations to the Printbot Simple Metal, the most important is the relatively small 150mm cubed build volume.

[ken.do] wanted to print large parts, specifically scale aircraft wings and panels. While the Printrbot can’t handle these things normally, the design of the printer does lend itself to increasing the size of the build volume to 500mm long and 500mm high.

Increasing the build height on the Printrbot is as simple as adding two longer smooth rods and a single threaded rod to the Z axis. Increasing the X axis is a bit trickier: it requires a very flat sheet that doesn’t warp or bend over 500 mm, even when it’s being supported in different places. [ken.do] is engineering stiffness into a build plate here. The solution to a huge bed is a two kilogram aluminum bed supported by heavier rails and riding on a massive printed bushing block. Does it work? Sure does.

If you want to print tall objects, the current crop of 3D printers has you covered: just get a delta, and you’re limited only by the length of the extrusion used in the body. Creating big objects in all three dimensions is a marginally solved problem – just get a big printer. Big printers have drawbacks, notably the incredible power requirements for a huge heated build plate.

The ability to print long objects is a problem that’s usually not addressed with either commercial 3D printers or RepRaps. We’re glad to see someone has finally realized the limitations of the current crop of 3D printers and has come up with a way to turn a very good first printer into something that solves a problem not covered by other 3D printers.