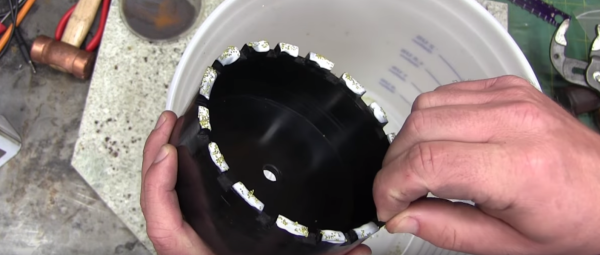
Everyone’s favorite Canadian is at it again. This time, [AVE] needed to cut a large hole in a stone countertop. They making coring bits for this, but a bit this size would cost upwards of $400. Not a problem. [AvE] broke out the tools and built his own stone cutting bit.
Everything starts with a 6″ plastic pipe cap. [AvE] center drilled the cap, then threaded it. A turned down bolt makes a great arbor for this new tool. The edge of the cap was then slotted. [AvE] used a clapped out Bridgeport milling machine, but you could do the same job with a hacksaw or a Dremel tool.
The secret sauce is industrial diamonds. That’s right, this is a diamond cutting bit. [AvE] ordered 20 grams of 20-25 mesh industrial diamonds. “Mesh” defines the size of the individual diamonds — in this case around 50 microns and up. Now, how to bind diamond and plastic? Plumber’s transition cement didn’t work – the diamonds and coating just peeled off like a sunburn. The solution turned out to be JB-Weld. A liberal coating of JB-Weld on the face of the tool, a sprinkling of industrial diamonds, and the pipe cap was ready to cut.
The cutting operation was slow, steady, and lots of cooling water. [AvE] made it most of the way through his countertop before having to refurbish his bit.
[AvE] usually is a man of many words, as can be seen in this post about his EDM machine. This time though, he gave us the silent treatment — an entire video with no words, set to classical music. It’s great seeing YouTubers step outside their comfort zone and trying something new.
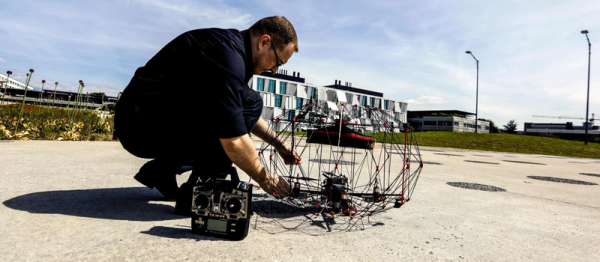
Picture this: you’re at home and you hear a rapping on your door. At last!– your parcel has arrived. You open the door, snatch a drone out of the air, fold it up, remove your package, unfold it and set it down only for it to take off on its merry way. Hand-delivery courier drones might be just over the horizon.
Designed in the [Laboratory of Intelligent Systems] at Switzerland’s École Polytechnique Fédérale de Lausanne and funded by [NCCR Robotics], this delivery drone comes equipped with its own collapsible carbon fibre shield — it fold up small enough to fit in a backpack — and is able to carry packages such as letters, small parcels, and first aid supplies up to 500 g and to 2 km away!
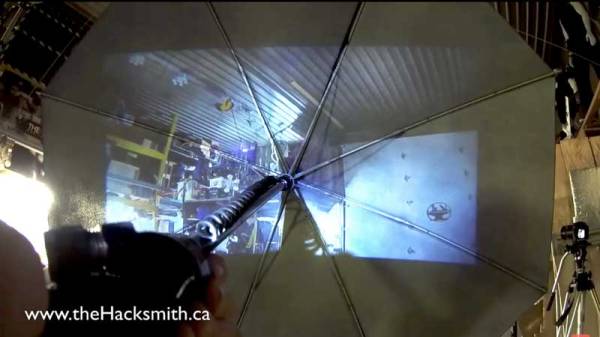
Yes! Someone made the Kingman umbrella and yes it can shoot and yes it has a display on the inside. [James Hobson] just put up a video on YouTube for this excellent project detailing the process that went into creating this live working prop and it is amazing.
The build starts with finding a rugged umbrella and was tested by standing on it as well as decimating a few household objects. Compress CO2 cartridges provide the fuel for propelling blow darts as well as other non-lethal forms of ammunition. The coolest part of the project is the screen inside the portable that allows you to see-through the dome. This is accomplished by a combination of a small camera and a portable mini projector. Simple yet awesome.
The camera is mounted near the muzzle whereas the projector is sliced-up and integrated into the grip. The handle in question is itself 3D printed and includes a custom trigger into the design. Check out the video for a demonstration of the project.
Movie props have a special place in every maker’s heart and this project is an excellent example of imagination meeting ingenuity. After seeing this video, security agencies are going to be giving umbrella owners some suspicious looks though creating own of your own could be a very rewarding experience. If you are looking for a more obvious prop, then check out the PiPBoy Terminal from Fallout which is sure to get everyone’s attention. Continue reading “Hacker Maketh Kingsman Umbrella”→
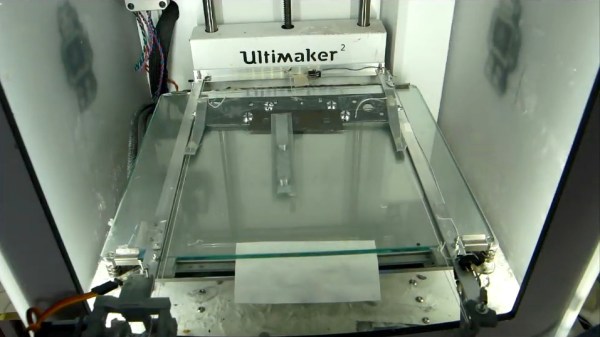
We’ve seen 3D printers coming out with infinite build volumes, including some attempts at patenting that may or may not stall their development. One way around the controversy is to do it in a completely different way. [Aad van der Geest]’s solution may not give you the ability to print an infinitely long part, but it will allow you to print an infinite number of the same, or different, parts, at least until your spool runs out.
[Aad]’s solution is to have a blade automatically remove each part from the print bed before going on to the next. For that he put together a rail system that sits on the bed of his Ultimaker 2, but out of the way on the periphery. A servo at one end pulls a blade along the rails, sweeping over the bed and moving any parts on the bed to one end where they fall away. This is all done by a combination of special G-code and a circuit built around a PIC12F629.
One of many things that we think is pretty clever, as well as fun to watch, is that after the part is finished, the extruder moves to the top corner of the printer and presses a micro switch to tell the PIC12F629 to start the part removal process. You can see this in the first video below. The G-code takes over again after a configurable pause.
But [Aad]’s put in more features than just that. As the second video below shows, after the parts have been scraped from the build plate, a pin on the extruder is used to lift and drop the blade a few times to remove small parts that tend to stay on the blade. Also, the extruder is purged between prints by being moved over a small ridge a few times. This of course is also in that special G-code.
How do you produce the special G-code, since obviously it also has to include the parts to print? For that [Aad]’s written a Windows program called gcmerge. It reads a configuration file, which you edit, that contains: a list of files containing the G-code for your parts, how many to print, whether or not you want the extruder to be purged between prints, various extruder temperatures, cooling times, and so on. You can find all this, as well as source for the gcmerge program, packaged up on a hackaday.io page. Incidentally, you can find the PIC12F629 code there too.
The loss of memory is an extremely difficult situation, not just for those afflicted, but also for immediate family, close friends, and care givers. With no cure available for dementia, providing care is an extremely demanding task for everyone involved – both mentally and physically. Patients are unable to retain recent events and information, but will most likely be able to recall some amount of past memories. This presents serious challenges when they encounter “modern” technology and cannot figure out how to use and operate everyday devices that normal people take for granted.
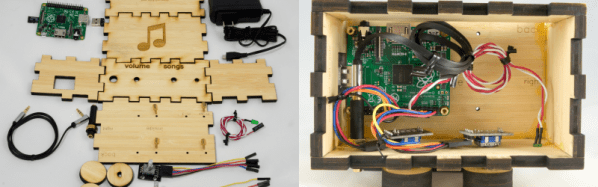
[rosswesleyporter]’s Dad had trouble using modern iPods and CD players, so he built DQMusicBox — a Dementia friendly music player. It’s very simple interface resembling a radio from half a century ago. There are just two large, clearly marked rotary dials — one for Volume, the other for Songs, and a headphone socket. The inspiration came from a very moving documentary called “Alive Inside” which explores how music brings extreme joy to people with dementia.
The device is built around a Raspberry Pi, enclosed in a laser cut enclosure and requires no soldering — making it easy for anyone to build one for themselves using easily available parts. The Raspberry Pi runs on a lightweight, optimized version of Raspbian called DietPi. The music playback is handled by VLC ensuring support for a large number of music formats. A Python script looks for music files, sets up the VLC-NOX player and handles knob and button events. A bundled image file for the software includes everything needed to get it running, making setup easy and quick. Since Raspberry Pi’s are prone to OS corruption when power is disconnected without performing a proper shutdown, [Ross] uses write protection on the SD-card and walks you through the process of how it works.
Between his Project page, Github and DQMusicBox website, you will be able to get all the information needed to replicate this excellent project. And for his next version, he already has a few ideas for improvement and would like to hear if other hackers have suggestions.
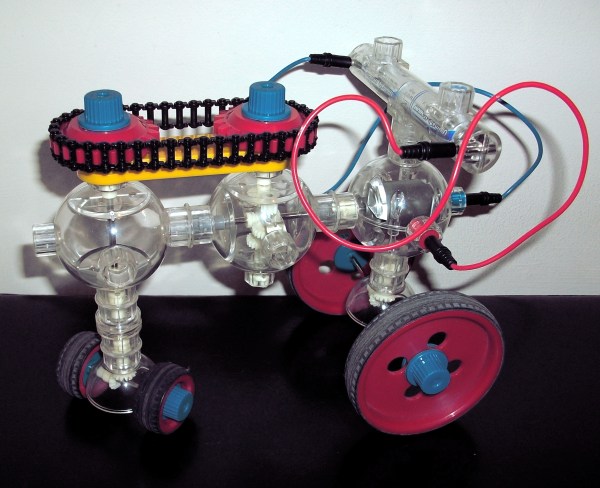
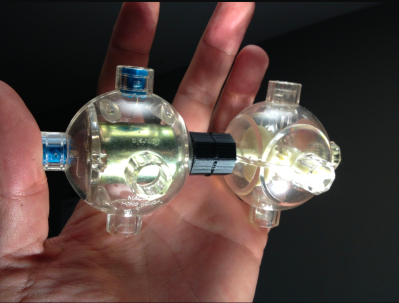
In the magical 80s, there was a building set that stood apart from the rest. Capsela, originally created by Mitzubishi Pencil Company (the Uniball folks) looked like a series of clear plastic spheres with gears and motors inside. The signature Capsela modules served as both enclosure and functional component. The set came with a variety of gear options like planetary gear, worm gear, and clutch capsules. You could use chain drives and propellers. A lot of the parts were water-resistant, and part of the toy’s shtik was that you could make boats out of it with pontoons keeping most of the robot out of the water.
Capsela’s sets were relatively simple, with only DC motors to make things move. However, as the product found success, the company built increasingly larger and more complicated sets with greater capabilities. For instance, in ’87 they released the Robotic Workshop that included an IR remote that could be configured with a Commodore 64. Later on the Capsela Voice Command 6000 was released, featuring a microcontroller that could understand 8 verbal commands as well as interpret IR signals within 25 feet.
I never got any of those fancy sets, but I still found a lot to do with the basic set my parents bought me for Christmas. The unique architecture of the set was both boon and bane–it certainly was a striking set, in terms of its appearance. However, there were only so many ways you could those spheres together. Also, if you weren’t making a boat the pontoons were fairly useless, with the most clever solution being to use one as a wheel substitute.
The thing that really did it for me, other than hacking out reconfigurable boats in my bathtub, was being able to see everything. All the gearboxes could be seen though the clear plastic. How many nerds learned about mechanical engineering by peering through Capsela spheres?
As with all things, Capsela had its peak and faded away. The product was licensed to a number of new manufacturers, but never found the same success. They tried focusing on the educational market but no dice.
Nevertheless, the product has retained a degree of nostalgia for those of us who outgrew it. A few years ago, software developer [José Romaniello] described how the toy set him on a path toward being an engineer. He started a Hacker News thread that engaged a bunch of fans in a nerdfest about how great the toy was and how one might 3D print new pieces. Not much was done in the 3DP world that I have seen, other than re-creating Capsela’s hex connectors and that sort of thing.
It’s Baaaaack….
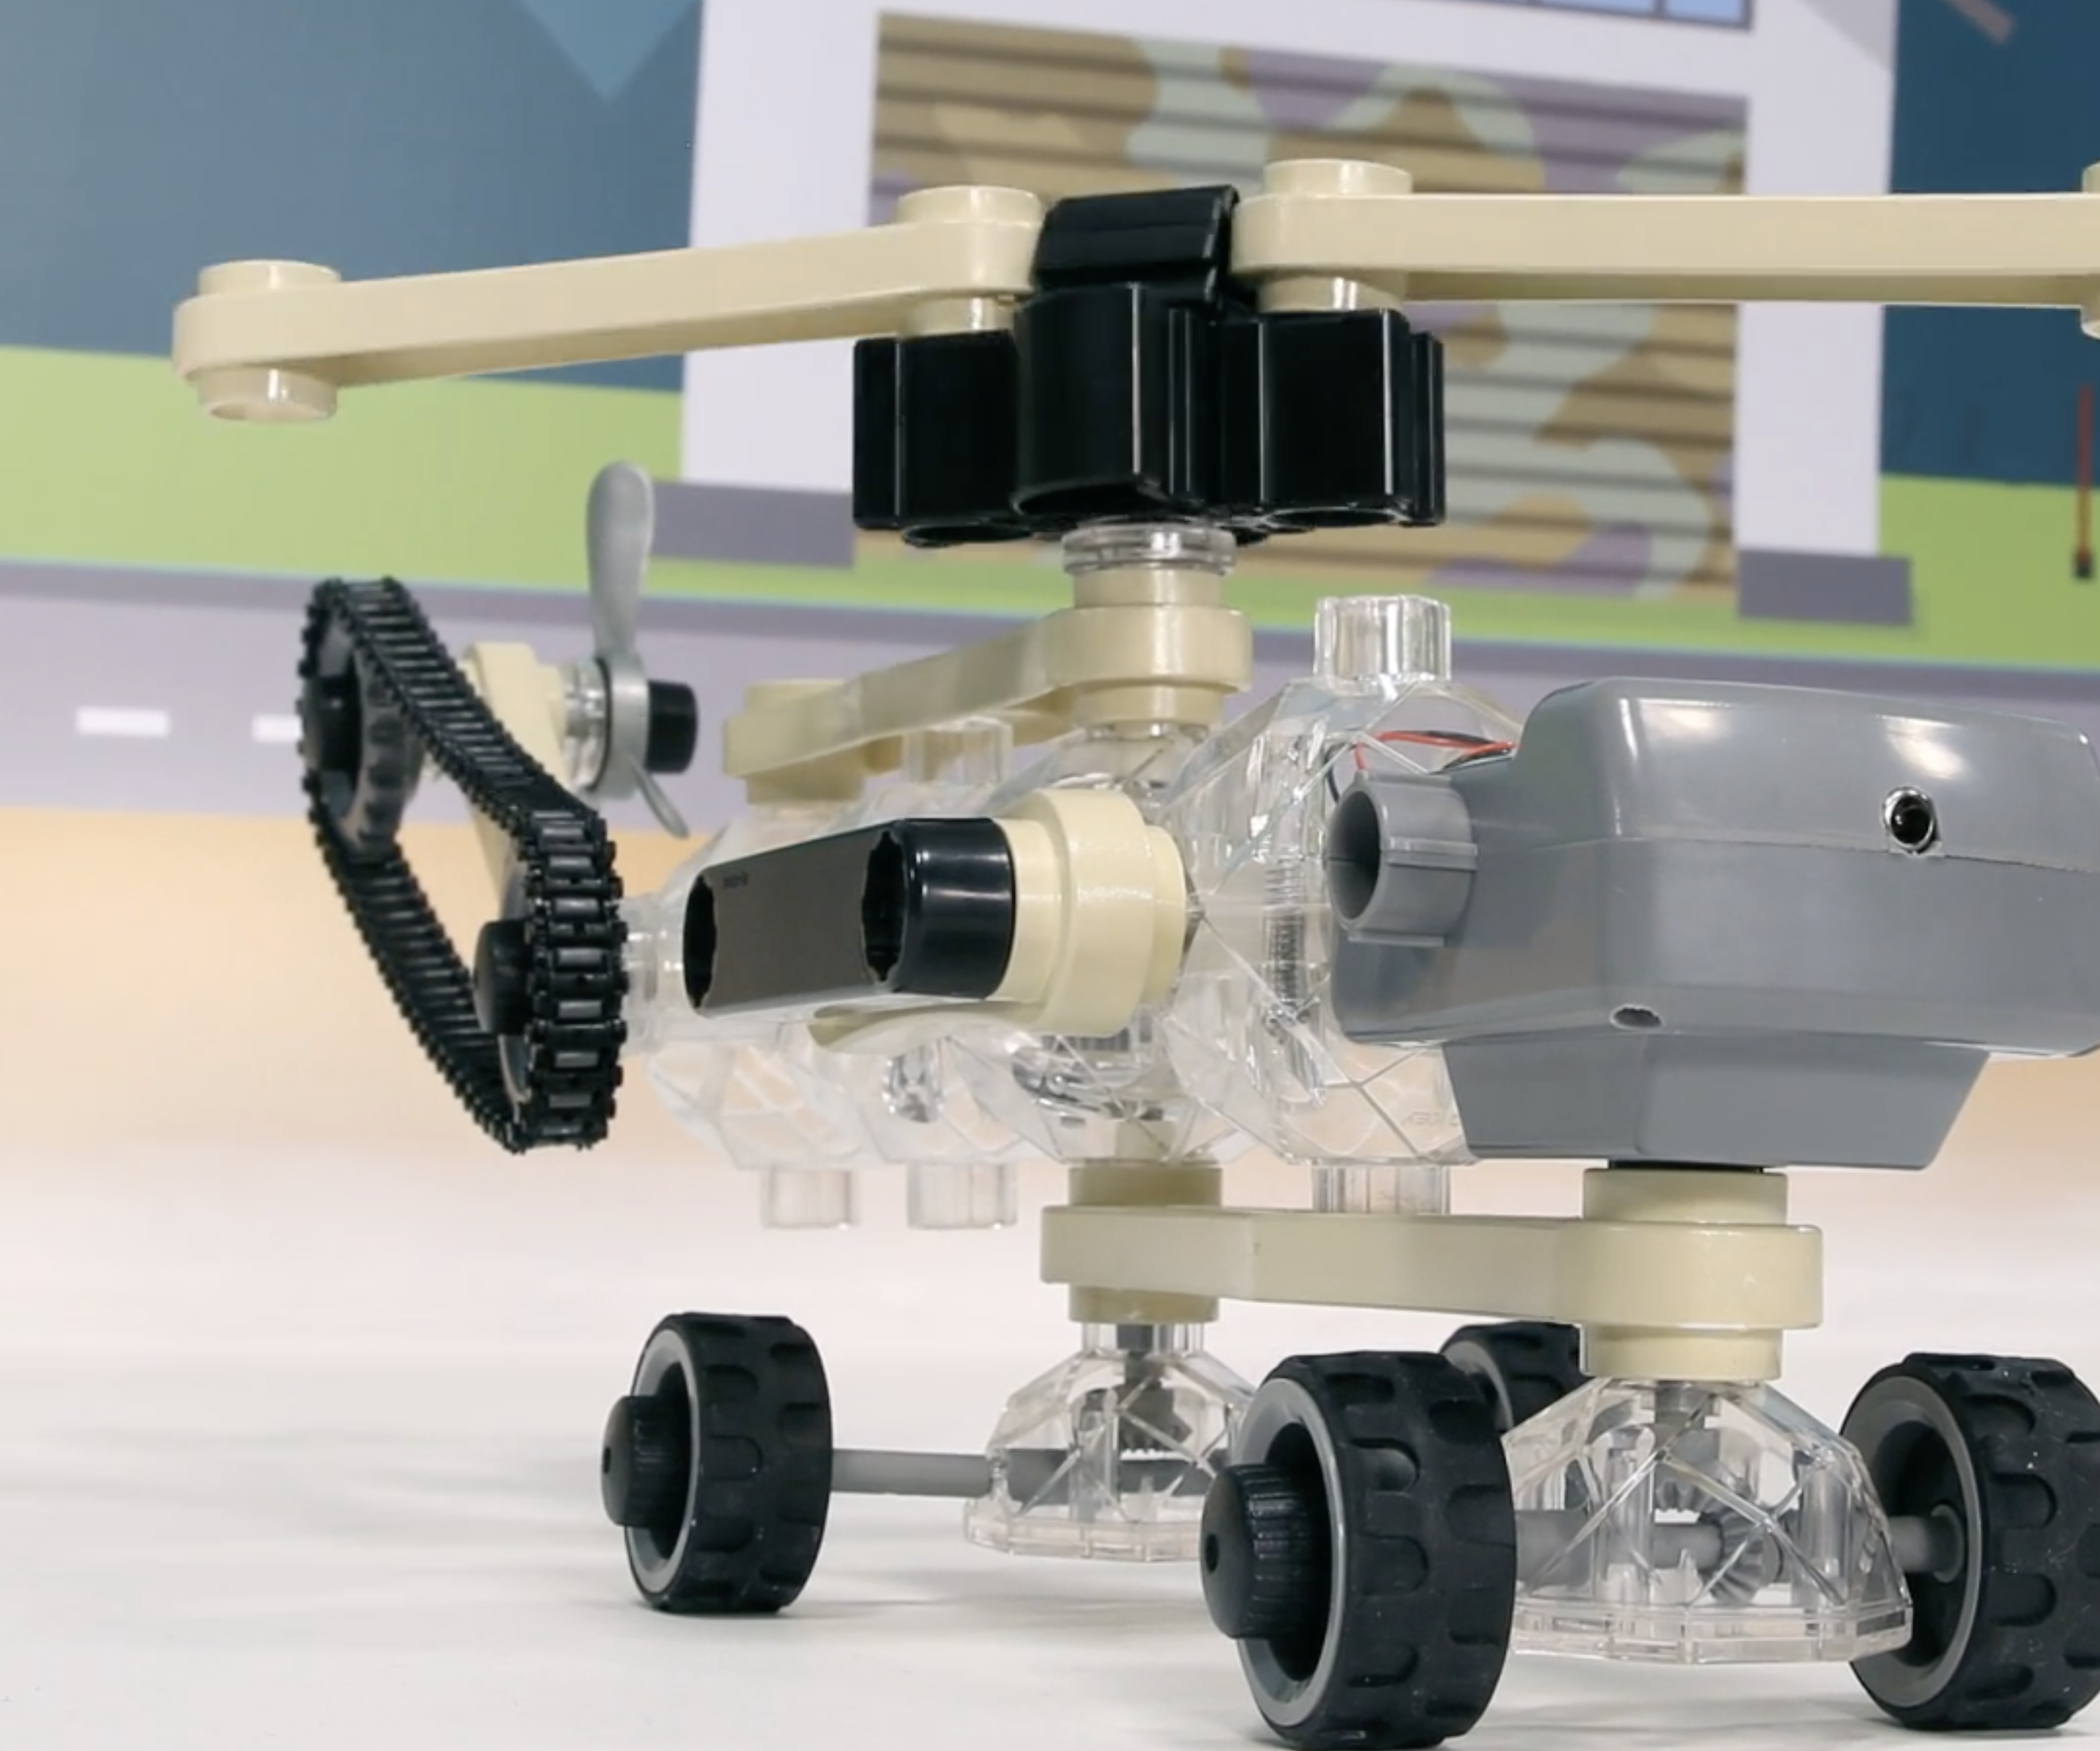
“If they can remake Beauty and the Beast they can bring back Capsela”, is how I’m assuming the thought process went. Sure enough, a company emerged with a redesigned version of the set, available over the internet and in brick and mortar stores. Put out by a shell company called the Unitrust Development Company, the product has been renamed IQ Key.
The new kits seem very similar to those classic sets from the 80s, other than superficial changes in the product’s appearance — the faceted geography of the pontoons and capsules suggest a refreshed product — it looks pretty much the same. The battery pack (slash switch) has also been redesigned, and looks like it may have an IR receiver built in. The company has also redesigned those hexagonal connectors and now they are circular and bayonet into place.
Is it the same old Capsela we knew and loved? Maybe, maybe not, but there’s only one way to find out: to hack the hell out of it!
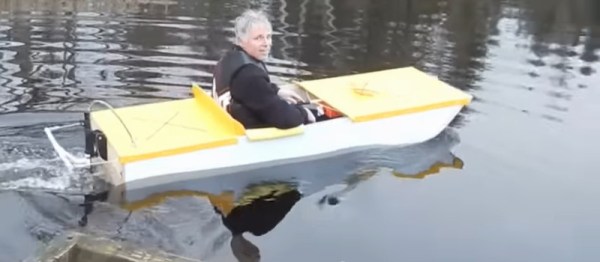
They say the two best days of a boat owner’s life are the day that they buy the boat and the day they sell it. If you built your boat from scratch though, you might have a few more good days than that. [Paul] at [ElkinsDIY] is no stranger to building boats, but his other creations are a little too heavy for him to easily lift, so his latest is a fully electric, handmade boat that comes in at under 30 pounds and is sure to provide him with many more great days.
While the weight of the boat itself is an improvement over his older designs, this doesn’t include the weight of the batteries and the motor. To increase buoyancy to float this extra weight he made the boat slightly longer. A tiller provides steering and a trolling motor is used for propulsion. As of this video, the boat has a slight leak, but [Paul] plans to shore this up as he hammers out the kinks.
The boat is very manageable for one person and looks like a blast for cruising around the local lakes. Since it’s built with common tools and materials virtually anyone should be able to build something similar, even if you don’t have this specific type of plastic on hand. And, while this one might not do well in heavy wind or seas, it’s possible to build a small one-person boat that can cross entire oceans.