Wah-Wah-Won’t, To Wah-Wah-Will

This is the tale of [Chris], who discovered he was no [Jimi Hendrix] in his youth, and shelved his trusty wah-wah pedal as a result. Many years later as a bassist with more modest aims he brought it out of retirement and built a blend pedal kit to allow him to bring in a bit of wah to the mix when he wanted it, but as more of a Voodoo Grown-Up than the full Voodoo Chile.

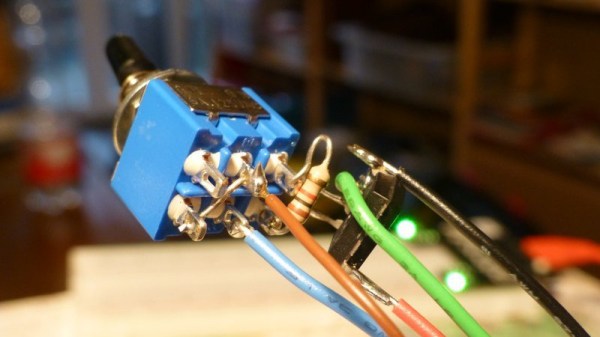
The kit worked and he should have been happy with it, but for one thing. As he increased the mix on the loop box instead of getting more wah he simply got less volume. A bit of detective work reached the conclusion that the old pedal was inverting everything, and that he needed to put in a circuit to correct that when needed. A single op-amp and a switch, with the op-amp circuit dead-bug-style on the back of the switch, completed the modification.

Wah pedals seem to be a recurring feature here. We’ve brought you one made of Lego among many others, as well as one repurposed as a synth controller.

Caped Beagle Is FPGA Superhero

We miss the days when everything had daughterboards. Now, Arduinos have shields and Raspberry Pis have hats. The BeagleBone has capes. Whatever. However, regardless of the name, the open source BeagleWire cape/shield/hat/daughterboard connects to a BeagleBone and provides a Lattice iCE40HX FPGA, some support hardware, and common I/O connectors like Pmod and Grove. You can see a video about the board below.

In addition to the FPGA, the board contains a EEPROM, RAM, flash memory, an oscillator, and a few buttons, switches and LEDs. The buttons even feature hardware debouncing. The parts list and design files are all available and — depending on a successful crowdfunding campaign — you might be able to buy one for $75 in the future.

The board is configured to communicate over the 100 MHz 16-bit GPMC port. Linux software and example drivers are available so it should be fairly simple to get the FPGA and CPU talking to each other for your own purposes.

If you decide to build your own, there’s a one-click button that will populate a DigiKey cart for you with most of the components. Although the DigiKey site complained about an error, it did seem to order 24 of the 26 components and the total came to just over $50. Of course, you’d still need to source the missing parts and the board.

We’ve talked about the Lattice iCE FPGAs quite a bit in the past. Not only do you have our tutorial videos, but there are plenty of others, too.

Continue reading “Caped Beagle Is FPGA Superhero”

Creality CR10-S Upgrade Shows The Effect Of Bad Power

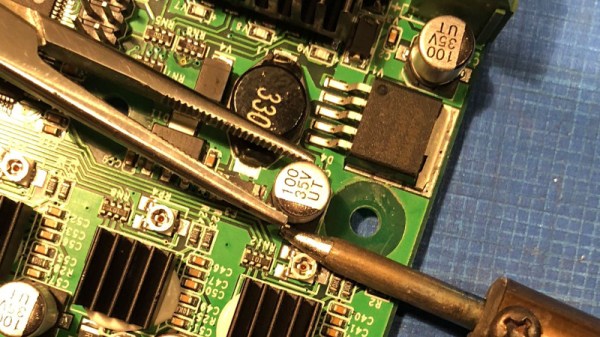
The Creality CR10-S is a printer that has become quite popular, and is not an uncommon sight in a hackspace or makerspace. Some models have a slight defect, a smoothing capacitor is of insufficient size, resulting in reduced print quality. [Jozerworx] has replaced the capacitor, and posted a full guide as to how the task can be performed.

Hackaday readers will have among their number many for whom replacing a surface mount electrolytic is no bother at all, indeed we’d expect most 3D printer owners to be able to perform the task. Maybe that the post has such an extensive FAQ and seems to be aimed at newbies to soldering points to 3D printing having moved to a wider market. But it has to be remembered that the value in this piece is not in the work, but in the characterisation. At the end he posts graphs showing the effect of the modification on the temperature of the extruder, and on the temperature noise brought about by the poor capacitor choice. A reduction from a +/- 3 Celcius variation to one of around +- 0.1 Celcius may not seem like much, but it seems it has a significant effect on the reliability of the printer.

So this isn’t the most elite of hacks, on a printer heading for a wider marketplace. But it serves to illustrate that bad quality power regulation can have some surprising effects. It seems every new printer comes with a list of community-developed mods to make it usable, perhaps one day we’ll find a printer that’s at peak performance out-of-the-box.

An Old Way To Make A New Crank Handle

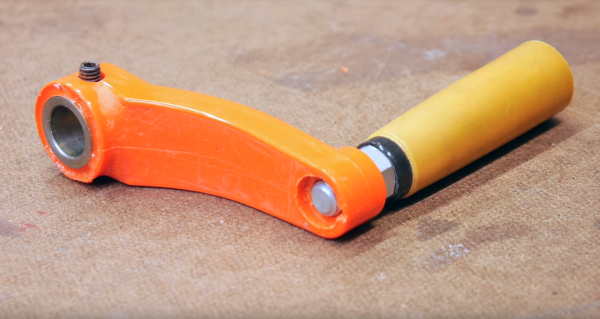
When the crank handle on [Eric Strebel]’s cheapo drill press broke in two, did he design and print a replacement? Nah. He kicked it old school and cast a new one in urethane resin.

In his newest video, [Eric] shows us his approach to molding and casting a handle that’s likely stronger than the original. The old crank handle attached to the shaft with a brass collar and a grub screw, so he planned around their reuse. After gluing the two pieces together and smoothing the joint with body filler, he packs the back of the handle with clay. This is a great idea. The original handle just has hollow ribbing, which is probably why it broke in the first place. It also simplifies the cast a great deal.

Here’s where things get really interesting. [Eric] planned to make a one-piece mold instead of two halves. At this point it becomes injection molding, so before he gets out the reusable molding box, he adds an injection sprue as an entry point for the resin, and a plug to support the sprue and the handle. Finally, [Eric] mixes up some nice bright Chevy orange resin and casts the new handle. A few hours later, he was back to drilling.

Crank past the break to watch [Eric]’s process, because it’s pretty fun to watch the resin rise in the clear silicone mold. If you want to take a deeper dive into injection molding, we can fill that need.

Continue reading “An Old Way To Make A New Crank Handle”

R.O.B. Gets A Proper RC Resurrection

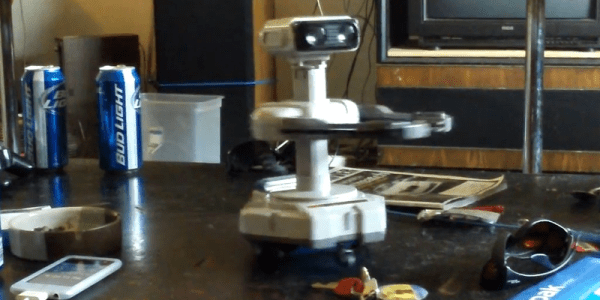
More than 30 years ago, Nintendo’s R.O.B graced toy shelves, helping usher in an age of video games that is here to stay. For the few of us lucky to own one of these relics, we’ll find that R.O.B’s internal mechanisms that drive the arms and neck movements are just begging to be modified. That’s exactly what [Kenny Storm] did, installing a few continuous-rotation servos to give R.O.B a new mobile life of its own.

The original R.O.B featured a surprisingly intricate gearbox configuration embedded inside the shoulders for both up-and-down shoulder movement and hand-pinching. (For a more detailed investigation on the internals of the original hardware, have a look at this teardown.) This hack is sparsely documented, but from what we can gather, the mobile R.O.B uses all three existing degrees of freedom that the original supported while furthermore adding mobility with continuous rotation servos.

Glancing at the dates from this forum post, this find is almost 8 years old. Age is never a dealbreaker here, though, as the sheer quaintness of this hack will surely stand the test of time. Watching R.O.B take up a presence with mobility on this desk hearkens back to our childhood mysticism of unboxing this companion with our Nintendo when we were children. Finally (shameless plug!), if you’re just as excited as the author at the chance of seeing R.O.B back on your shelf with at-home-manufacturing techniques, have a go at printing my 1:1 scale R.O.B head replica.

Continue reading “R.O.B. Gets A Proper RC Resurrection”

Automated Syrup System Is Sweet Sweet Madness

Here at Hackaday we are big fans of the TV show, “How It’s Made”. It’s not much of a stretch to assume that, as somebody who is currently reading this site, you’ve probably seen it yourself. While it’s always interesting to see the behind the scenes process to create everyday products, one of the most fascinating aspects of the show is seeing how hard it is to make things. Seriously, it’s enough to make you wonder how companies are turning a profit on some of these products when you see just how much technology and manual work is required to produce them.

That’s precisely the feeling we got when browsing through this absolutely incredible overview of how [HDC3] makes his maple syrup. If that’s not a sentence you ever thought you’d see on Hackaday, you aren’t alone. But this isn’t a rusty old pail hanging off of a tap, this is a high-tech automated system that’s capable of draining 100’s of gallons of sap from whole groves of trees. We’ll never look at a bottle of syrup in the store the same away again.

It all starts with hundreds of tiny taps that are drilled into the trees and connected to a network of flexible hoses. The plumbing arrangement is so complex that, in certain, areas high tension support wires are necessary to hold up the weight of the hoses and their sweet contents. The main hose leads to an Arduino-powered collection station which maintains a 100 kPa (29 inHg) vacuum throughout the entire system.

The sap is temporarily held in a 250 gallon container, but at this point it’s still just that: sap. It needs to be refined into something suitable for putting on your pancakes. The first step of that process utilizes a reverse osmosis filtration system to pull the water out of the sap and increase its sugar concentration. [HDC3] says the filtration system is built from eBay scores and parts from the home improvement store, and it certainly looks the part of something that would be under a kitchen sink. This system is able to increase the sugar concentration of the sap from around 2% as it comes out of the trees to 8%. But it’s still a far way off from being ready to use.

Interestingly enough, the last steps of the process are about as old-school as they come. The semi-concentrated sap is placed in a long low metal pan, and heated over a wood fire to drive off more of the water. This process continues until the sap is roughly 60% sugar, at which point it is filtered and moved into the house to finish boiling on the stove.

All told, the syrup is boiled for eight hours to bring its sugar content up to 66%. Even with the improvements [HDC3] has made to the system, he reveals that all this hard work only results in slightly more than a half-gallon of final syrup. Talk about dedication.

It probably comes as no surprise that this is the first time Hackaday has ever run a story about producing maple syrup. However we’ve seen a number of automated beer brewing systems that seem to have been tackled with similar zeal. There’s probably a conclusion to be drawn there about the average hacker’s diet, but that’s a bit outside our wheelhouse.

[via /r/DIY]

Thermal Camera Diagnoses Thermal Issue On A Sonoff Switch

No matter what your experience level with troubleshooting, there’s always at least a little apprehension when you have to start poking through a mains powered device. A little fear is a good thing; it keeps you focused. For some, though, the aversion to playing with high voltage is too much, which can cause problems when something fails. So what do you do when you’re reluctant to even open the case? Easy — diagnose the problem with an infrared camera.

[Bald Engineer]’s electrophobia started early, with some ill-advised experiments in transcutaneous conduction. So when his new Sonoff WiFi switch failed soon after deploying it to control a lamp in his studio, popping the top while it was powered up was out of the question. The piquant aroma of hot plastic was his first clue to the problem, so he whipped out his Flir One Thermal Camera and watched the device as it powered up. The GIF nearby shows that there was clearly a problem, with a bloom of heat quickly spreading out from the center of the unit. A few IR images of the top and bottom gave him some clues as to the culprits, but probing the board in those areas once power was removed revealed no obviously damaged components.

[Bald Engineer] hasn’t yet gotten to the bottom of this, but his current thinking is that the NCP1117 regulator might be bad, since it rapidly spikes to 115°C. Still, we think this is a nifty diagnostic technique to add to our toolkit, and a great excuse to buy an IR camera. Or, we could go with an open-source thermal camera instead.

[via Dangerous Prototypes]