Manual Data Recovery With A Hex Editor

Let’s say you use an SD card-base portable audio recorder for work – doing an interview, perhaps. Things go well until one day, you turn the recorder off before stopping the recording. Without pressing that big red Stop button, the file doesn’t close, and you’re left with a very large 0kB file on the SD card. How do you get it back?  There are tools that will do it for you, but they cost money. You can do it yourself with a hex editor, though, and it’s actually pretty easy.

The software required for this feat of data recovery is Roadkil’s Disk Imager to dump all the bits on the SD card to an image file, the free version of ISO Buster to show the block addresses and length of each file, and the hex editor of your choice. The process starts as simply an experiment for hot to create an MP3 file by cutting and pasting bits into a hex editor. A good file was found in the hex editor, copied to a new file, and played. Everything works so far; great.

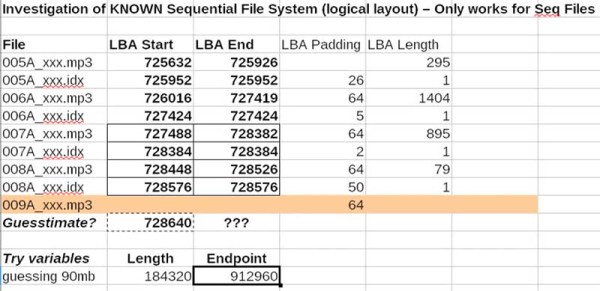
For the actual data recovery, a spreadsheet was created to make an educated guess as to where the lost file should be. Starting at this address, about 90MB of data was copied into a new hex editor window. This is where the recovery hit a snag. Because the SD card was plugged into a Mac before, a bunch of data was written on the card. This went into the first available place on the disk, which just happened to be the header of the lost MP3 file.

That’s not a problem; there’s already the header from an MP3 file sitting in a hex editor from the first experiment to see if this was possible. By copying a few hundred bytes to the front of the lost file, the file was corrected just enough that an MP3 player could reconstruct the file.

It’s not perfect – the first fifty seconds of the interview was garbled. The rest of the interview was saved, though, and that’s much better than losing the entire thing. Thanks [Lewin] for sending this one in.

Continue reading “Manual Data Recovery With A Hex Editor”

Built-in Hex Editor Unlocks Plasma TV Features

[Nick] tipped us off about a guide to unlock extra features on Panasonic televisions. The hack works on the G10 models of plasma TVs and uses the service menu to gain access to the EEPROM memory. With a few quick steps you can change some data with a built in hex editor, unlocking several new settings menus, or bricking your entertainment centerpiece. We’ve seen some Samsung TV hacking in the past and hope that with increased processing power in today’s models we’ll someday see consumer TVs available with open-source firmware so that we can integrate of our favorite entertainment software.

Samsung TV Firmware Hacking

tv-firmware-hacking

[Erdem] is leading up the efforts to reverse engineer Samsung TV firmware with a project called SamyGo. Official Samsung firmware uses the Linux kernel, making it a familiar system to work with for many developers. So far they’ve implemented NFS and SAMBA for sharing files over the network, improved playback from USB devices, and unlocked the ability to use non-Samsung WiFi dongles.

In order to make changes to the system, you need to enable a telnet connection on the device. The SamyGo team accomplished this by changing an official version of the firmware in a hex editor to start the telnet daemon at boot time. This altered firmware is then flashed using Samsung’s built in upgrade system. Once telnet is enabled, non-official firmware can be manually flashed.

We’d love to see this project expand to other TV Brands in the future. In fact, we were looking for something like this back in June when we realized that our Sony Bravia runs a Linux kernel and can be updated via USB drive.  Be careful if you want to try this out. We can only imagine the fallout after telling your significant other that you bricked a high-priced LCD.