Fridge Compressor Turned Into Capable Little Four-Stroke Engine

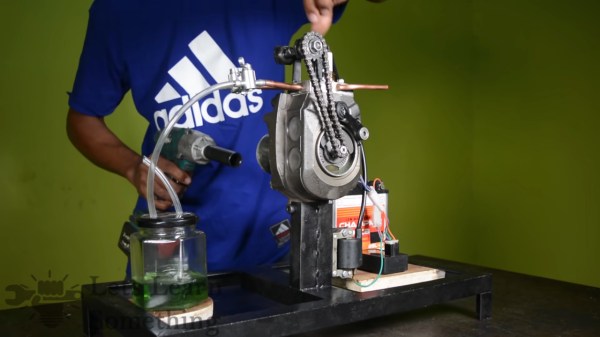
Never underestimate the power of a well-stocked junk bin. Along with a TIG welder and mechanical ingenuity bordering on genius-level, all of which come to bear on this fridge compressor to four-stroke engine build.

The video posted by [Let’s Learn Something] is long, but watching it at double speed doesn’t take away much from the enjoyment. By using a piston-type compressor, a lot of the precision machining is already taken care of here. Adding the intake and exhaust valves, camshaft, timing chain, carburetor, and ignition system are still pretty challenging tasks, though. We loved the home-made timing chain sprockets, made with nothing more than a drill and an angle grinder. In a truly inspired moment, flat-head screws are turned into valves, rocker arms are fabricated from bits of scrap, and a bolt becomes a camshaft with built-up TIG filler. Ignition and carburetion are cobbled together from more bits of scrap, resulting in an engine that fired up the first time — and promptly melted the epoxy holding the exhaust header to the cylinder head.

Now, compressor-to-engine conversions aren’t exactly new territory. We’ve seen both fridge compressors and automotive AC compressors turned into engines before. But most of what we’ve seen has been simple two-stroke engines. We’re really impressed with the skill needed to bring off a four-stroke engine like this, and we feel like we picked up quite a few junk-box tips from this one.

Continue reading “Fridge Compressor Turned Into Capable Little Four-Stroke Engine”

Boost Tube Replacement Through 3D Printing

[Sam] is the lucky owner of a 1990 VW Corrado G60. To the uninitiated, that’s the souped-up, go fast version with the fancy supercharger on top. While performing some mods to the air intake (car-speak for “hacks”), there came a need for a custom tube to eliminate the original silencer box. With available options costing up to $400, suddenly 3D printing a replacement seemed like a better answer.

3D printing intake parts for a supercharged vehicle has some unique challenges. The intake must be able to take the boost pressures seen by the engine, in this case up to around 10 psi. There must be no air leaks at all as this risks confusing the sensors that measure how much air is entering the engine. Lastly, the tube must be able to withstand the hot, and often oily environment under the hood.

The first attempt was completed with TPU filament, which unfortunately did not hold pressure. A followup with PLA faredĀ better, but was unable to withstand the heat present in the engine bay. After some experimentation, a successful print was made in PETG which was more robust. In the final design, [Sam] applied a rubber coating and then some aluminum tape, to both help seal any micro-holes in the 3D printed surface as well as help protect against heat.

After over a month of testing, [Sam]’s data logs indicate the tube is performing well and holding boost. It goes to show that with some perseverance and iterative design, 3D printed parts can often save the day.

Perhaps you’re inspired by this hack but need to jack up your car to work on it? Never fear, you can 3D print those too.