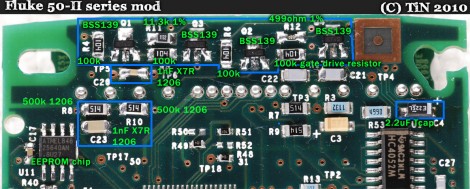
The difference between Fluke’s 54 II and 51 II thermometers is the addition of a second channel for dual temperature sensing, and buttons which control data logging. Oh, and an additional $150 in price for the higher model. [TiN] was poking around inside and with the help of some forum members he figured out how to unlock additional features on his low-end Fluke temperature meter. You can do the same if you don’t mind cracking open the meter, sourcing and soldering most of the components seen above, cutting holes in the case for the buttons, and hoping it still works when you put everything back together.
It seems that Fluke designed one full-featured unit and watered it down to fill a hole in the lower-priced market just like some other testing-hardware manufacturers (Rigol’s digital storage oscilloscopes come to mind). But the MSP430 P337I in this meter cannot be reflashed, so this would most likely be unhackable hardware if the firmware for the two models is different. After some intensive study of the PCB layout [TiN] found a set of resistors which seemed to serve no external hardware purpose. They do connect to the microcontroller and together they create a two-bit code. He was able to get pictures of the four different hardware models and work out which resistor combinations identify the different meters. Now he can get the firmware to believe it is operating a Fluke 54 II, the rest is just putting the correct passive components onto the unpopulated locations.
We think the quest is what is of interest with this hack. [TiN] did an amazing job of photographing and writing about each step in the process. We’re unlikely to try this ourselves but loved reading about it.


