A small, colorful synth built for a 3-year-old. It has five pots, four sliders, and a tiny screen.

Baby’s First Synth Was Daddy’s First Project

We absolutely adore inspired labor-of-love tales such as this one. [Alastair] wanted to build a synth for his daughter’s third birthday in spite of having no prior hardware knowledge. It became the perfect excuse to learn about CAD, microcontrollers, PCB design, and of course, 3D printing.

So, why a synth for a toddler? Aside from plain old ‘why not?’, the story goes that she received a Montessori busy-type board which she seemed to enjoy, and it reminded [Alastair] of the control surface of a synth. He wondered how hard it could be to build something similar that made sound and didn’t require constant button presses.

[Alastair] began his journey by dusting off a 15-year-old Arduino Inventors Kit. The initial goal was to get potentiometer readings and map them to 12 discrete values, and then emit MIDI messages. This was easy enough, and it was time to move to a synth module and an Elegoo Nano.

The full adventure is definitely worth the read. Be sure to check out the pink version in action after the break. You really don’t wanna miss the lil’ panda bear. Trust us.

Continue reading “Baby’s First Synth Was Daddy’s First Project”

Car-Cade Build Drives Unthrottled Determination

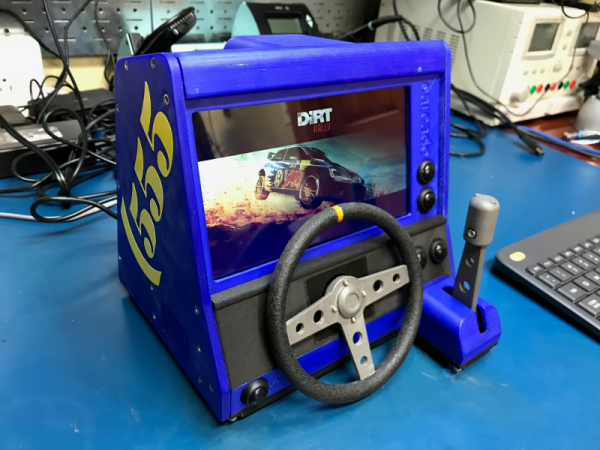
Remember those dashboard-shaped racing games from the ’80s, like Tomy Turnin’ Turbo? [Daniel] has long wanted to bring one of those into the modern age. After finding that someone beat him to it, he went in another direction and built his own mini-cabinet from the ground up, dedicated to Dirt Rally.

The idea was to build the smallest possible computer than can run SteamOS and fit inside of a cabinet printed on a Prusa clone. At first, [Daniel] tried driving a MinnowBoard around. The frame rate was atrocious, so he switched to an ASUS mini-STX board and went from there.

The printed steering wheel and throttle are both analog inputs—each uses a 10kΩ pot connected to a Pimoroni PiCade controller. We love [Daniel]’s lo-tech way of using rubber bands to self-center them. We also love the post-processing he did on the steering wheel to give it that just-right grippy feel (it’s Plasti-Dip rubber paint), because it looks fantastic.

The lovely blue cabinet is an homage to [Daniel]’s Dirt Rally destroyer of choice, the rally blue ’95 Subaru Impreza. He had an arduous print/sand/prime/paint plan all worked out for the prototype, but ultimately printed the parts in different colors to get the look right. [Daniel] went through four different blue filaments alone before he was satisfied.

Motor around the break for a quick walk around the completed cabinet, and park it for the teaser video that scored [Daniel] a swag bag from the Dirt Rally devs through the magic of social media. Now that it’s cold and flu season in the northern hemisphere, maybe you’d prefer to play driving games without touching anything.

Continue reading “Car-Cade Build Drives Unthrottled Determination”

Handy Power Supply With 3D Printed Case

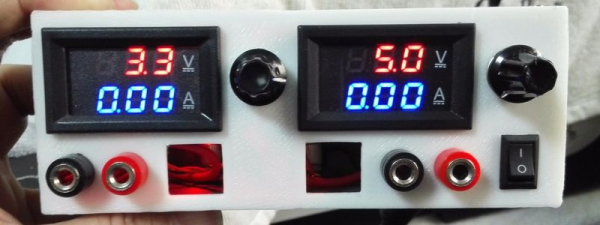
You can never have too many power supplies around your workbench. It is easy to buy them or cobble something together for most purposes. But once in a while you see one that is simple and also looks good, like this one from [RegisHsu].

The project is simple since it uses off-the-shelf DC-to-DC converter modules, and good-looking LED meters to measure voltage and current. The dual supply can accept 5 to 16 V in (presumably from a wall transformer) and deliver 1.3 V to 15.5 V out at 2 amps. [RegisHsu] removed an adjustment pot from the converter board and replaced it with a 10-turn pot to allow voltage adjustment.

Given the parts, you probably don’t even need a wiring diagram. However, the part that brings it together is the 3D-printed case, which [RegisHsu] has on Thingiverse. We’ve looked at muti-turn pot replacements before, and this is hardly the first power supply project we’ve posted.