There’s something about pinball that draws in hackers, makers, and engineers. Maybe it’s the flashing lights, the sounds, the complex mechanical movements. Could it be the subtle tactics required to master the game? Whatever the reason, everyone loves pinball, and more than a few hackers have dedicated their time and money toward building, restoring, and hacking pinball machines. This week’s Hacklet is all about the best pinball projects on Hackaday.io!
 We start with [zittware] and Star Trek: The Mirror Universe Pinball. [Zittware] worked with [clay], [fc2sw], and [steve] to create this awesome project. They took a 1978 Bally Star Trek pinball machine, and rebuilt an evil mirror universe version. The electronics include nixie tubes and a bulletproof power supply based upon an ATX computer setup. New play field elements and hardware were created on a CNC. Evil graphics were created with the help of Photoshop. The game is completely playable, and was a crowd favorite in the Hackaday Sci-Fi contest. The electronics and cabinet work are all open source. Unfortunately those pesky copyright laws prevent the team from sharing the artwork.
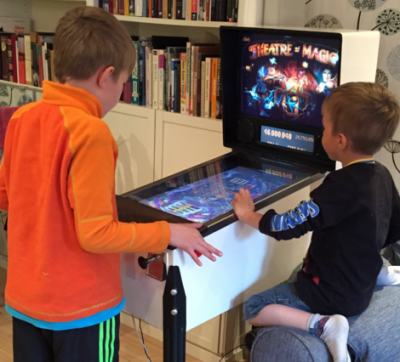 Next up is [Erland Lewin] with RINNIG Pinball Simulator. Some hackers have the space for a few real pinball machines. For the rest of us, there is virtual pinball. [Erland Lewin] built this mini virtual pinball machine from plywood, some real pinball hardware, and a lot of ingenuity. The play field is a 24″ dell computer monitor, while the back glass is a 20″ monitor. A final 15″ monitor takes the place of the Dot Matrix Display (DMD) often found on pinball machines. The whole system is driven by an Intel i3 computer. [Erland] is going to try to use the on-board graphics. If he runs into trouble, he can always switch to a discrete graphics card. The machine has turned out great, and his sons love playing classic pinball machines on their own “kid sized” table.
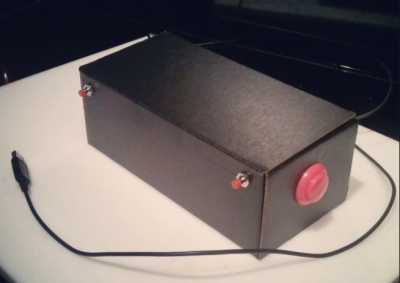 If virtual pinball is still a bit large for you, [Loyal J] has you covered with Pinbox Jr. Desktop computer virtual pinball has been a thing since the days of Windows XP. Somehow tapping keyboard keys isn’t quite the same as hitting real flipper buttons. Pinbox Jr. is a prototype pinball controller built inside a cardboard box. A Teensy 3.1 translates the buttons to USB keyboard inputs. Two large arcade buttons act as the flippers while two smaller buttons are available for game options and other functions. [Loyal J] even added a triple axis accelerometer so pinbox responds to rough play with a tilt! All this project needs is a solenoid to replicate that real pinball feel.
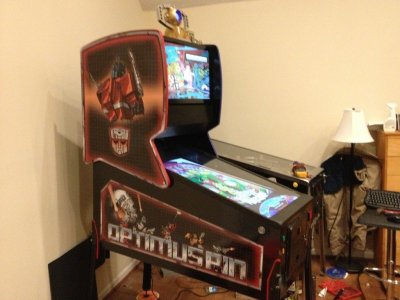 At the top of the virtual pinball mountain stands [Randy Walker] with Optimus-Pin. Optimus is a full-sized virtual pinball cabinet. It’s a 3 screen affair, much like RINNIG Pinball up top. [Randy] took things to the next level with an absolutely gorgeous custom cabinet. The Transformers inspired artwork was created on commission by commercial artist [Javier Reyes]. Optimus really recreates the feel of playing pinball with 8 solenoids placed in strategic positions around the cabinet. Even the whirring of play-field motors is replicated by a hidden Volkswagen wiper motor. Optimus also comes with a complete light show including RGB LED strips, strobes, and a shaker to rattle the entire cabinet.
If you want to see more pinball projects check out our brand new pinball projects list! If I missed your project, don’t be shy! Just drop me a message on Hackaday.io. That’s it for this week’s Hacklet. As always, see you next week. Same hack time, same hack channel, bringing you the best of Hackaday.io!