Carl Friedrich Gauss was, to put it mildly, a polymath responsible for a large percentage of the things we take for granted in the modern world. As a physicist and mathematician he pioneered several fields of study including within the field of magnetism. But since he died decades before the first car was built, it’s unlikely he could have imagined this creation, a magnetic slot-car race track called the Gauss Speedway by [Jeff McBride], which bears the name of the famous scientist.
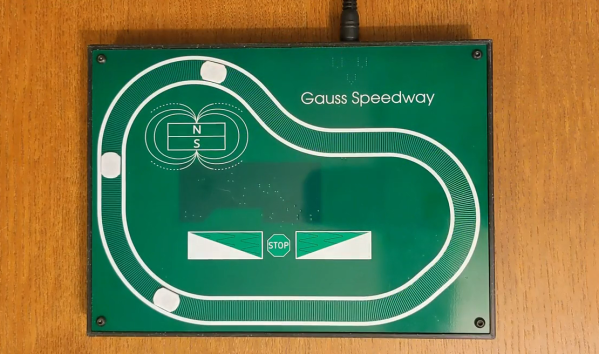
The Gauss Speedway takes its inspiration from a recent development in robotics, where many small robots can travel around a large area with the help of circuit traces integrated into their operating area. With the right current applied to these traces, magnetic fields are generated which propel the robots. [Jeff] wanted to build something similar, integrated into a printed circuit board directly, and came up with the slot car idea. The small cars have tiny magnets in them which interact with the traces in the PCB, allowing the cars to move with high precision around the track. He did abandon the traditional slot car controller in favor of a push-button style one directly on the PCB too, which means everything is completely integrated.
While this was more of a demonstration or proof-of-concept, some of the features of this style of robot can be seen in this video, which shows them moving extremely rapidly with high precision, on uneven surfaces, or even up walls. Magnetic robots like these are seeing quite a renaissance, and we’ve even seen some that use magnetism to shape-shift.
 sensor input, and the servo. A button press tells the Arduino to start the race by pulling the start gate down and starting the timer. When the light sensor is covered, the timer for that lane stops. The time is shown for each lane using a different colored 4-digit 7-segment LED.


