Postpone your holiday shopping and spend some quality time with editors Mike Szczys and Elliot Williams as they sift through the week in Hackaday. Which programming language is the greenest? How many trackballs can a mouse possibly have? And can a Bluetooth dongle run DOOM? Join us to find out!
Take a look at the links below if you want to follow along, and as always, tell us what you think about this episode in the comments!
One could be excused for thinking sometimes that the concept of connecting devices with other devices for automation purposes is a fairly recent invention. Yet for all the (relatively) recent hype of the Internet of Things and the ‘smart home’, laboratories have been wiring up their gear to run complicated measurement and test sequences for many decades now, along with factories doing much the same for automating production processes.
Much like the chaotic universe of IoT devices, lab equipment from different manufacturers feature a wide number of incompatible protocol and interface standards. Ultimately these would coalesce into IEEE-488.1 (GPIB) as the physical layer and by 1990 the first Standard Commands for Programmable Instruments (SCPI) standard was released that built on top of IEEE-488.
SCPI defines (as the name suggests) standard commands to interact with instruments. It has over the past decades gone on to provide remote interaction capabilities to everything from oscilloscopes and power supplies to exotic scientific equipment. Many off the shelf devices a hobbyist can buy today feature an SCPI interface via its Ethernet, USB or RS-232C port(s) that combined with software can be used to automate one’s home lab.
Even better is that it’s relatively straightforward to add SCPI functionality to one’s own devices as well, so long as it has at least an MCU and some way to communicate with the outside world.
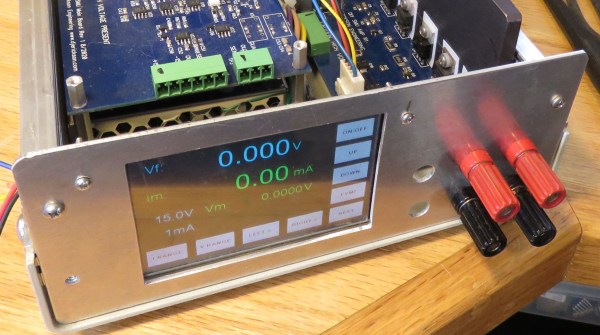
An SMU or Source Measurement Unit works a bit like a power supply, in that it can source current into a load and a bit like an electronic load, in that it can sink current from a power source. It includes a crossover circuit, so that it cleanly and predictably swaps between sink and source modes automatically. This makes it terribly useful for testing all manner of power circuits, charging and characterizing batteries or just saving bench space by replacing two separate boxes.
This DIY-SMU from analog electronics guru [Dave Erikson] is a full four-quadrant design, meaning that it can operate with both positive and negative voltages. The design shows excellent performance, comparable to commercial instruments that cost serious money, which is testament to [Dave]’s skill and experience.
Source: Wikipedia
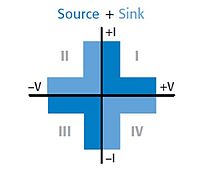
The quadrants can be understood if you imagine a graph with voltage on the horizontal axis, and current on the vertical. Both axes can swing to both polarities, with quadrants I & III indicating power delivered into a load and quadrants II & IV power absorbed from a source.
The very detailed project logs show every gory detail, every problem found and the work to solve it. Its a long read, which for those interested in such devices, will be time well spent in this scribe’s humble opinion.
The DIY-SMU is mostly analog in nature, with the control portion courtesy of a Teensy 3.2, with a Nextion TFT display with touch for the user interface. The firmware even supports SCPI over USB to allow remote control and data gathering, so its ready to drop right into your test and measurement stack. For more reading goodness, checkout JSMU, a related project, taking inspiration from the DIY-SMU. Details can be found on this project GitHub repo.
Many power supply projects have graced these pages over the years, like this 2015 Hackaday Prize Entry but this is one of the few four-quadrant designs to be found, so hats off!
When [kiwih] picked up an Agilent 54621A scope, he was amused that it had a floppy disk. At one time, it was high-tech to use a disk to transfer scope data to your computer. Today, not so much. However, on the back was a serial port. Surely it was possible to read data from there. It is, and what results is a nice walkthrough of finding the port’s info and interfacing with it using Python.
Normally, you’d use the included BenchLinkXL software to grab data from the port, but that software is so old it would not run under Windows 10 or Wine. Searching didn’t turn up much on the serial port, but it did locate a manual for a similar Agilent scope. That manual wasn’t too helpful since it assumed you were connecting via a LAN or USB. However, it did make reference to an older model that was also similar and that was the key to finding a manual that did explain the serial port protocol.
The command set looks suspiciously like SCPI — Standard Commands for Programmable Instruments — which is a layer on top of the GPIB protocol. Many scopes speak that language, so that’s not surprising. That also means if you are in the mood to communicate with an SCPI scope, you might find the code useful, even if you don’t use a serial port or have this exact Agilent model.
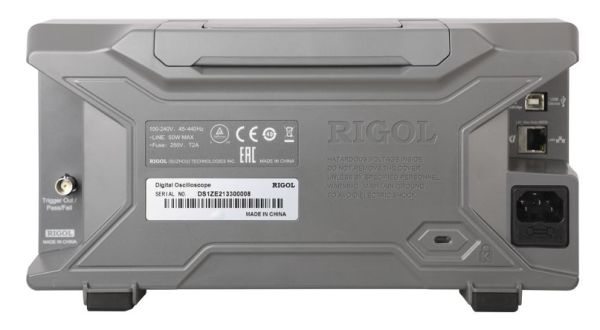
SCPI has a lot of uses. For example, try talking to your scope. The cheap Rigol and similar scopes usually have SCPI and you can control and read them using the same kind of techniques.