David Murray and Kevin Williams with an early X16 prototype

Commander X16: A Dreamy 8 Bit Computer Comes Closer To Reality

Imagine the ultimate homage to 1980s 8-bit home computers. It might  look like [David Murray] aka The 8-Bit Guy’s Commander X16.

As a core group of geeks, hackers, and developers age, we yearn for the computers of our youth. VIC-20s, Commodore Pets, 64s, 128s, Ataris, Apple IIes, and the list goes on and on. For many of us, our first hands on experience with a computer was with such a machine that is now called “retro”. Sadly, many of these relics are getting more expensive as demand increases and supplies dwindle. Working examples are harder to find, and even those can break down. Original monitors, peripherals, and accessories are also getting scarcer. This is all quite understandable when we consider that some of these classics are over 40 years old.

What was it that we loved about these old rigs that makes them so attractive? [David] decided to distil what makes a classic a classic, and then turn that list into a spec list for what he calls his “Dream Computer”. He found that things like a printed and spiral bound manual were a big part of the charm and utility of these early home computers. Booting directly to a prompt and being able to directly control the hardware was another highly desirable trait.

[David] also took the time to determine what people don’t like about these retro machines: Wacky keyboard layouts, composite video output, and glacially slow storage. Swapping multiple floppies to load a program or respooling a cassette tape is just as undesirable in 2021 as it was in 1981. Who knew?
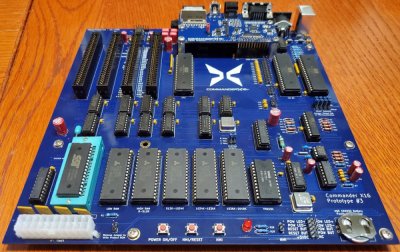
X16 Prototype #3
The X16’s’ prototyping is still in progress.

The result of [David]’s research is the Commander X16. Inspired by the VIC-20, it’s a fresh take on the retrocomputer that only uses parts that are currently available. You can see the first video in a series about the development of the X16 below the break. Be aware that a lot of progress has been made since the video came out in 2019, but it still provides an excellent starting point for learning about the project.

The X16’s specifications read like dream list made in the mid 80s: 256 color VGA, up to 2MB memory, an 8 MHz 6502, plenty of expansion ports, and even ports for SNES style controllers.  And what else will this dream machine include? You guessed it: A spiral bound manual!

It’s not possible to list all of the great features of the X16 in this space, so check out the Commander X16 FAQ for all the details. If this project makes your heart go pitter patter, you may be interested to know that they need help with software development! An emulator is available for development. The goal is to have a healthy software ecosystem in place when the X16 launches.

You may also enjoy reading about other 6502 retrocomputer reports such as this “Brain in a vat” 6502 computer, or a guided tour of the birthplace of the 6502 and the Commodore 64 with our very own Bil Herd.

Thank you to [Truth] for bringing us a report of this fine project via the Tip Line. Keep those tips coming!

Continue reading “Commander X16: A Dreamy 8 Bit Computer Comes Closer To Reality”

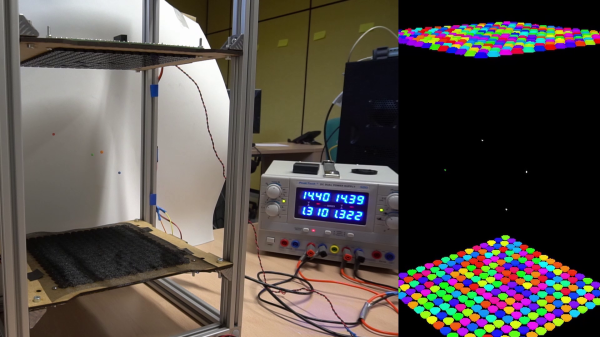
Ultrasonic levitation rig.

Phased Array Levitation Is Science In Action

Levitation may seem like magic. However, for certain objects, and in certain conditions, it’s actually a solved technology. If you want to move small particles around or do experiments with ultrasonic haptic feedback, you might find SonicSurface to be a useful platform for experimentation.

The build comes to us from [UpnaLab], and is no small feat of engineering. It packs in 256 ultrasonic emitters in a 16×16 grid, with individual phase control across the entire panel. This allows for the generation of complex ultrasonic wave fields over the SonicSurface board. Two boards can be paired together in a vertically opposed configuration, too. This allows the levitation of tiny particles in 3D space.

As you might expect, an FPGA is pressed into service to handle the heavy lifting – in this case, an Altera CoreEP4CE6. Commands are sent to the SonicSurface by a USB-to-serial connection from an attached PC.

The board is largely limited to the levitation of small spherical pieces of foam, with the ultrasonic field levitating them in midair. However, the project video shows how these tiny pieces of foam can be attached to threads, tapes, and other objects in order to manipulate them with the ultrasonic array.

It may not be a simple project, but it serves as a great basis for your own levitation experiments. Of course, if you want to start smaller, that’s fine too. If you come up with any great levitation breakthroughs of your own, be sure to let us know.

DIY Source Measurement Unit

DIY Source Measurement Unit Shows All The Details

An SMU or Source Measurement Unit works a bit like a power supply, in that it can source current into a load and a bit like an electronic load, in that it can sink current from a power source. It includes a crossover circuit, so that it cleanly and predictably swaps between sink and source modes automatically. This makes it terribly useful for testing all manner of power circuits, charging and characterizing batteries or just saving bench space by replacing two separate boxes.

This DIY-SMU from analog electronics guru [Dave Erikson] is a full four-quadrant design, meaning that it can operate with both positive and negative voltages. The design shows excellent performance, comparable to commercial instruments that cost serious money, which is testament to [Dave]’s skill and experience.

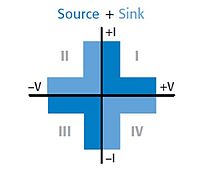
Source: Wikipedia

The quadrants can be understood if you imagine a graph with voltage on the horizontal axis, and current on the vertical. Both axes can swing to both polarities, with quadrants I & III indicating power delivered into a load and quadrants II & IV power absorbed from a source.

The very detailed project logs show every gory detail, every problem found and the work to solve it. Its a long read, which for those interested in such devices, will be time well spent in this scribe’s humble opinion.

The DIY-SMU is mostly analog in nature, with the control portion courtesy of a Teensy 3.2, with a Nextion TFT display with touch for the user interface. The firmware even supports SCPI over USB to allow remote control and data gathering, so its ready to drop right into your test and measurement stack. For more reading goodness, checkout JSMU, a related project, taking inspiration from the DIY-SMU. Details can be found on this project GitHub repo.

Many power supply projects have graced these pages over the years, like this 2015 Hackaday Prize Entry but this is one of the few four-quadrant designs to be found, so hats off!

Continue reading “DIY Source Measurement Unit Shows All The Details”

Robot with star shaped wheels made of foam.

Build An Amphibious Robot Using Pool Noodles For Wheels

If you only think of wheels as round, you’re limiting yourself from experiencing the true wider world of whacky designs. [wadevag] has been experimenting with some such concepts, and has had success building an amphibious robot platform using star-shaped wheels built out of pool noodles.

The concept is similar to that of whegs. A portmanteau of wheel-legs, they’re in effect a form of leg that moves with a rotating motion. Essentially, the points of the stars on the wheels act like legs, pushing the robot along one by one, rather than having continuous contact with the ground as in a typical round wheel.

The flotation provided by the foam allows the robot to easily sit on top of the water’s surface, and the star shape allows them to act as viable paddles too. This is perhaps their primary advantage. A round wheel would not provide anywhere near as much forward propulsion.

[wadevag] shows off the concept’s abilities on water, concrete, and snow, and it handles them all ably. Impressively, it can both enter and exit the water under its own power. While it’s probably not a viable solution for a very heavy robot, for a lightweight design, it could work wonders. It’s not the first time we’ve seen some oddball wheel designs, either. Video after the break.

Continue reading “Build An Amphibious Robot Using Pool Noodles For Wheels”

Raspberry Pi Powered Standing Desk Rises To New Heights

Like many office workers, [David Kong] found himself the lucky recipient of a motorized sit-stand desk. Also like most office workers with such a desk, he found himself mostly sitting. Reminders on his phone did little to change habits and [David] resolved to automate his desk to rise on a schedule.

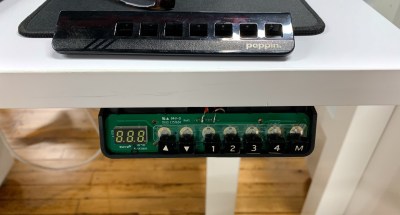
the control board for a poppin sit stand desk

Taking off the front panel of the control box required a few screws and [David] was delighted to find some testing pins right on the PCB.By connecting the right pins together, he could simulate any button being pressed. A Toshiba TLP222A solid-state relay made it simple to connect the pins together, the next step was triggering the relay on some sort of timer.

Speaking of timers, the oft-lauded 555 timer was considered. However, the length of time desired wasn’t as well suited for the 555, and the appeal of just tweaking a file to adjust the interval was tempting. Going to the other end of the spectrum, [David] had a Raspberry Pi zero laying around he had been meaning to play with.

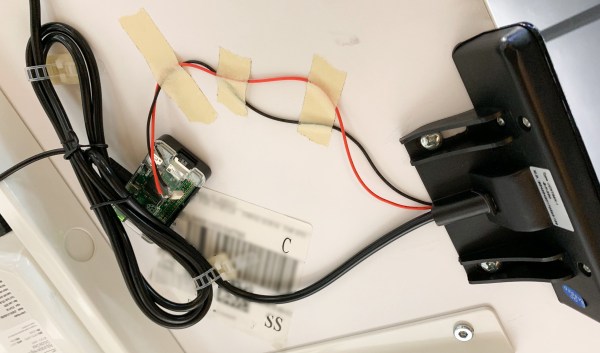
After soldering the relay to pin 17 and writing a quick 10 line python script that is executed on startup, [David] had a working solution that could be taped to the underside of the desk, out of sight. Rather than being on a fixed timer, the desk raises every 45 to 60 minutes. The impact on his life has been wonderful, which was the goal of this particular project. It’s been a few months and he hasn’t had to tweak or fix anything. Is a whole 64-bit multicore processor a bit of an overkill for toggling a pin every hour or so? Yes. But we can’t really fault him for reaching for what was already lying around. The results speak for themselves.

Perhaps this would be something you would incorporate when you’re building your own standing desk?

Golden Rice’s Appearance On Philippine Store Shelves And The Rise Of Biofortification

After decades in development, the Philippines became the first country on July 21st of this year to formally approve the commercial propagation of so-called golden rice. This is a rice strain that has been genetically engineered to produce beta-carotene in its grains. This is the same compound that has made carrots so famous, and is a significant source of vitamin A.

Getting enough vitamin A is essential for not only children and newborns, but also for pregnant and lactating women. Currently, vitamin A deficiency (VAD) is the primary cause of preventable childhood blindness and an important cause of infant mortality. While VAD is hardly the only major form of world-wide malnutrition, biofortification efforts like golden rice stand to dramatically improve the lives of millions of people around the globe by reducing the impact of VAD.

This raises questions of how effective initiatives like golden rice are likely to be, and whether biofortification of staple foods may become more common in the future, including in the US where fortification of foods has already become commonplace. Continue reading “Golden Rice’s Appearance On Philippine Store Shelves And The Rise Of Biofortification”

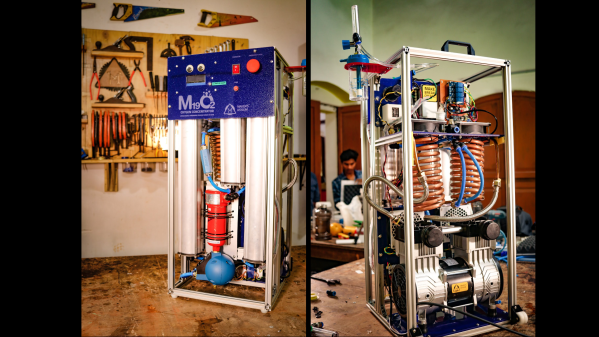
Two views of the M19O2 oxygen concentrator

Design Improvements Make DIY Oxygen Concentrator Even Better

A lot of projects we feature on these pages are of the “one and done” variety — tactical builds that serve a specific purpose with little need for further development. Some projects, though, come out as rough prototypes and then go through multiple rounds of refinement, a process we really enjoy tracking down and following. And when the project is something as important as an oxygen concentrator that can be built and maintained easily, all the better.

The need for cheap oxygen concentrators stems directly from the COVID-19 pandemic, which suggested that high-flow oxygen therapy was a better choice than invasive intubations and mechanical ventilation. But medical-grade oxygen isn’t always easy to come by in all parts of the world, so easily built oxygen concentrators, which rely on the nitrogen-adsorbing properties of the mineral zeolite, are meant to fill the gaps. Early versions of the M19O2 and the related OxyKit concentrator, had a very homebrew feel to them, built on wooden frames as they were. And while the rustic nature of the early builds didn’t detract from their utility, the hackers behind them, including our own [Anool Mahidharia], have been making incremental improvements aimed at not only making the devices work better, but also making them easier to build.

The hackers at Maker’s Asylum have done a fantastic job at documenting their work, with everything posted to a GitHub repo so that anyone can undertake a build. And really, for something as important as making oxygen when it’s needed, there’s really no reason not to give this a try.