What It Takes: Turning A Hatchback Into A Race Car

We’ve spoken a lot about building race cars here at Hackaday, but what does it actually look like to go out and do it? The boys from [Bad Obsession Motorsport] dived into that very question with their Bargain Racement series last year.

The CityCar Cup championship aims to keep entry costs low and racing competitive by racing cheap hatchbacks with a strict ruleset. Credit: Nankang Tyre CityCar Cup

The series follows the duo as they build a Citroen C1 into a competitive race car to take on the City Car Cup, an entry-level racing series focused on keeping the field competitive and the racing close.

Even at this level, there’s plenty to do to prep the car for competition. The rollcage needs to be installed, seats changed out for race-spec gear, and plenty of wiring to do as well. [Nik] and [Richard] have plenty of experience in the field of motorsport, and shine a great light on how to do the job, and do it right.

All in all, building the car cost £5995 pounds, starting from a used £850 Citroen C1. However, actually going racing costs more than that. Between race suits and boots, a helmet, club memberships and race entry fees, it cost a full £8273 to get to the first race. It’s steep, though much of those costs are upfront. Keep the car off the walls and year on year, you only need to keep paying for entry fees, memberships and consumables like fuel and tires.

It’s a great look at everything from building a race car, to testing and then actually competing as well. It serves as an excellent real-world example of what we talk about in our series on how to get into cars, which just recently touched on prepping a car for endurance competition. Video after the break.

Continue reading “What It Takes: Turning A Hatchback Into A Race Car”

Linux: Coming Soon To M1 Macbooks

Regardless of the chipset or original intended use of any computer system, someone somewhere is going to want to try and run Linux on it. And why not? Linux is versatile and free to use as well as open-source, so it’s quite capable of running on almost anything. Of course, it takes a little while for the Linux folk to port the software to brand new hardware, but it’s virtually guaranteed that it’s only a matter of time before Linux is running on even the most locked-down of hardware, like the M1 MacBooks.

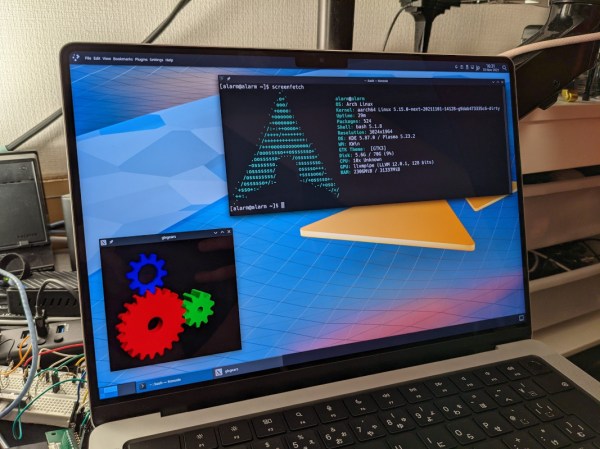
[Hector Martin] aka [marcan] has been hard at work getting Linux up and running on the latest Apple offerings with their ARM-based M1 processors. Since these are completely divorced from their x86 product line the process had to be worked from the ground up which included both booting Linux and modifying the kernel to include support for the hardware. [marcan] has a lot of hardware working such as the USB ports and the SD card slot, and notes that his setup is even compatible with the webcam notch included in the latest batch of MacBooks.

There are a few things still missing. He’s running Arch and doesn’t have the GPU configured yet, so all of the graphics are rendered in software. But he has put the computer through the wringer including running some computationally-intense software for nearly a full day before realizing that the machine wasn’t charging, which did not make much difference in performance. These machines are indeed quite capable with their new ARM chipsets and hopefully his work going forward will bring Linux to the rest of us who still use Macs even if they don’t want to run macOS.

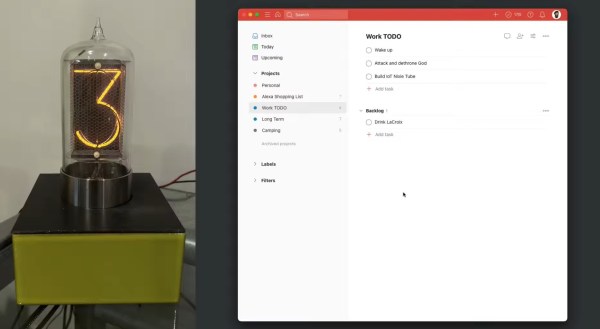
A nixie tube next to a screenshot of a to-do list

Nixie Tube Indicator Tells You How Many Tasks You’ve Got Left To Do

For busy people, keeping track of all the tasks on your to-do list can be a daunting task in itself. Luckily there’s software to help you keep organized, but it’s always nice to have a physical artifact as well. Inspired by some beautiful nixie clock designs, [Bertrand Fan] decided to build a nixie indicator that tells him how many open items are on his to-do list, giving a shot of instant gratification as it counts down with each finished task.

The task-management part of this project is a on-line tool called Todoist. This program comes with a useful Web API that allows you to connect it your own software projects and exchange data. [Bert] wrote some code to extract the number of outstanding tasks from his to-do list and send it to an ESP8266 D1 Mini that drives the nixie tube. Mindful of the security implications of letting such a device connect directly to the internet, he set up a Mac Mini to act as a gateway, connecting to the ESP8266 through WiFi and to the Todoist servers through a VPN.

The little ESP board is sitting in a 3D-printed case, together with the nixie driver circuits and a socket to hold the tube. A ceramic tile glued to the front gives it a bit more of a sturdy, luxury feel to match the shiny glass and metal display device. The limitations of the nixie tube restrict the number of tasks indicated to nine, but we imagine this might actually be useful to help prevent [Bert] from overloading himself with too many tasks. After all, what’s the point of having this device if you can’t reach that satisfying “zero” at the end of the day?

Although nowadays nixie tubes are mostly associated with fancy clocks, we’ve seen them used in a variety of other uses, such as keeping track of 3D-printer filament, adding a display to a 1940s radio, or simply displaying nothing useful at all.

Continue reading “Nixie Tube Indicator Tells You How Many Tasks You’ve Got Left To Do”

Finally, A Piano BBQ Grill That You Can Drive Around The Workshop

It’s a truth universally acknowledged that sometimes a little music can add much to a nice afternoon picnic. It’s also well-known that meat cooked over hot coals should be turned regularly to allow for even cooking. This barbecue grille project from [Handy Geng] delivers on both counts.

The project uses a full 88 motors, activated by pressing keys on an electronic piano. The technique used is simple; rather than interface with the keyboard electronically or over MIDI, instead, a microswitch is installed under each individual key.

Thus, when the piano keys are pressed, the corresponding motors are switched on. Each motor turns a skewer loaded with meat, sitting above a box of hot coals. Thus, playing the piano turns the meat, allowing it to be cooked on all sides without burning.

As a further bonus, the entire piano barbecue grille is also motorized, allowing [Handy Geng] to do laps around his workshop while playing the piano and cooking up lunch. It’s a great way to cook up some grilled kebabs while simultaneously entertaining one’s guests.

We’ve seen some other fun grill hacks too – even robotic ones! Video after the break.

Continue reading “Finally, A Piano BBQ Grill That You Can Drive Around The Workshop”

Friday: Getting Social With Discord And Bring-a-Hack

With just a few days to go before the kickoff of the 2021 Hackaday Remoticon, we’re still working furiously behind the scenes to pack as much content as possible into the two day virtual event. In fact, there’s so much going on that we thought you’d appreciate getting a bit of a head start as far as planning your own personal course through the weekend goes. The event might be free, but that’s no reason not to squeeze as much out of it as you can.

Chat It Up on Discord

To begin with, you’re really going to want to join the official Hackaday Remoticon Discord server. We know some subset of the Hackaday readership would rather we used Matrix, or IRC, or maybe carefully modulated smoke signals; but at the end of the day, Discord has bubbled to the top as the defacto choice for this kind of thing. Give it a shot, you might actually like it.

The Discord server isn’t just a place for like-minded hackers to hang out and discuss the musical stylings of DJ Jackalope during the Saturday afterparty. It’s also how attendees can ask questions at the end of each presenter’s talk, as we’ll be turning off YouTube chat to keep things centralized. Even if you don’t plan on communicating with others (though you really should), the Discord server has an interactive schedule of events which will let you sign up to be notified when the talks you’ve selected are about to start, and we’ll be dropping important announcements and links in there as the event goes on.

Friday Bring-a-Hack on Gather Town

Like this, but with soldering irons.

Friday night ends with a Bring-a-Hack where attendees can show off whatever they’ve been working on using Gather. It’s a video chat platform inside a virtual 2D world that looks a bit like Legend of Zelda.

Using this virtual environment, you can easily drop into an ongoing video stream simply by walking up to the presenter. Once you’ve seen enough, just walk over to the next little cluster of users. The point is to recreate the experience of stopping by a crowded after party where everyone brought some hardware project along with them to get spark conversations. Space will be limited, with ticket holders and people in Discord getting the first dibs, so keep an eye on your inbox for information about how to join.

Of course this is not the only Friday evening activity. A few weeks ago we announced that Lewin Day will be hosting Hacker Trivia, giving our beloved commenters the chance to show off your unimpeachable knowledge of technology and Hackaday history. The Friday talk stream will dump immediately into trivia, but here’s the dedicated link if you want to set a reminder for yourself.

Try It, You’ll Like It!

It’s difficult, perhaps even impossible, to truly recreate the experience of going to an in-person hacker con. But with interactive events and the latest and greatest communication software, we’re hoping the 2021 Remoticon can get pretty close. All the pieces are in place, the only thing we need now is to have a whole bunch of excited hackers to join in and have a good time. Think you can help us out?

Back of Rigol DS1104Z oscilloscope with the Ethernet and USB ports visible.

SCPI: On Teaching Your Devices The Lingua Franca Of Laboratories

One could be excused for thinking sometimes that the concept of connecting devices with other devices for automation purposes is a fairly recent invention. Yet for all the (relatively) recent hype of the Internet of Things and the ‘smart home’, laboratories have been wiring up their gear to run complicated measurement and test sequences for many decades now, along with factories doing much the same for automating production processes.

Much like the chaotic universe of IoT devices, lab equipment from different manufacturers feature a wide number of incompatible protocol and interface standards. Ultimately these would coalesce into IEEE-488.1 (GPIB) as the physical layer and by 1990 the first Standard Commands for Programmable Instruments (SCPI) standard was released that built on top of IEEE-488.

SCPI defines (as the name suggests) standard commands to interact with instruments. It has over the past decades gone on to provide remote interaction capabilities to everything from oscilloscopes and power supplies to exotic scientific equipment. Many off the shelf devices a hobbyist can buy today feature an SCPI interface via its Ethernet, USB or RS-232C port(s) that combined with software can be used to automate one’s home lab.

Even better is that it’s relatively straightforward to add SCPI functionality to one’s own devices as well, so long as it has at least an MCU and some way to communicate with the outside world.

Continue reading “SCPI: On Teaching Your Devices The Lingua Franca Of Laboratories”

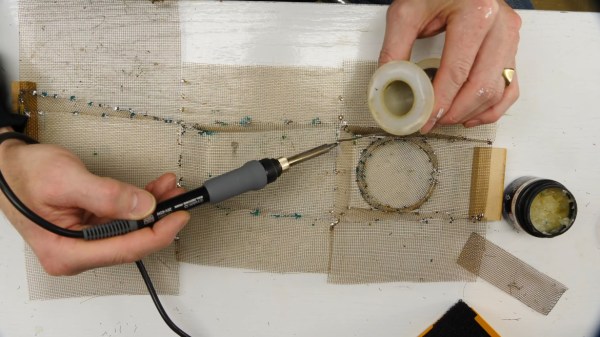
Brass screen is soldered together into a large mold for cardboard pulp.

How To Make A Classy, Brassy Cardboard Pulp Mold

When we last checked in with prolific prototypist [Eric Strebel], he was perfecting the design of an eco-friendly wireless charger and turning his initial paper prototype into a chipboard version 2.0 that takes manufacturing concerns into consideration. At the end of this second video in a series, [Eric] was printing out the early versions of the form by which he would eventually make a brass screen mold for working with cardboard pulp. You know, the stuff that some egg cartons are made from.

Soldering brass screen into a mold.In the video below, it’s time to build the pulp mold by creating three smaller molds and then joining them into one horizontal mold. The result is a single piece that then gets folded up into a charging stand, much like the egg carton. [Eric] is using brass screen here, but says that copper would be a good choice, too.

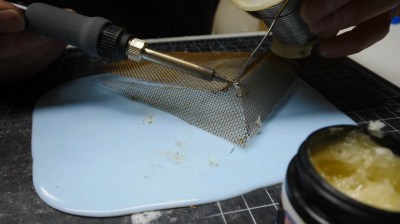
After cutting the brass with scissors and pounding them flat, he uses the 3D-printed molds from the previous video to press them into the correct shapes. Each of the three pieces needs a frame, which [Eric] makes from more brass screen, then stitches it to the mold piece with loose screen threads before securing the unions with solder.

Since the weight of all the water would likely bend the brass out of shape, [Eric] finished off the mold by soldering on a frame of flat brass strip. Check out this awesome process below, and stay tuned for the next video when [Eric] pulps some cardboard and pumps out some eco-friendly chargers.

Does this look too complicated? You could always skip the whole mesh mold thing and shape your cardboard confetti directly into 3D printed parts.

Continue reading “How To Make A Classy, Brassy Cardboard Pulp Mold”