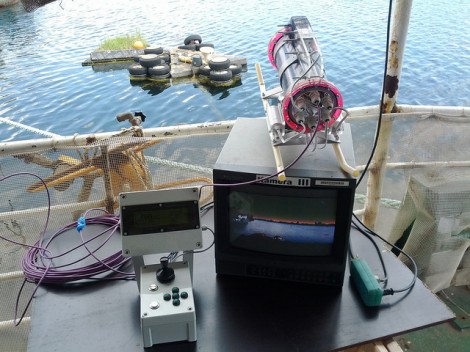
This rig looks so good it’s hard to believe this is the first ROV that [DZL] has ever built. It houses an HD camera which feeds the display at the operator’s station. You can see the controller to the left of that screen which uses a joystick and buttons to pilot the underwater vessel.
In order to simplify construction, [DZL] decided not to use propellers. The problem with that technique is that you need to have bearings that will allow the propeller shafts to turn without letting water in. Propulsion is instead provided by a group of small water pumps whose intake is on one end and outflow is on the other. These are mounted at various places on the body and each have one power cable that connects to the control circuitry in the main housing. The passage of cables through the enclosure is another possible leak point, but [DZL] found some off the shelf bushings that ended up making it pretty easy.
The link at the top is a round-up of all the different project posts. For us, the most interesting Flickr set is the one showing how the enclosure is put together. There is also a pretty neat dive video after the break that shows the craft being tested underwater.
[Thanks Vanessa]


Any ideas on where one could get little 12 volt submersible pumps like he’s using?
12 volt submersible pumps can be found in aquarium stores, they are “backup” pumps for power failure.
Here is a link http://www2.northerntool.com/water-pumps/12-volt-pumps.htm
just google 12 volt submersible pump
Marine/Boating shops would be my first stop
Bilge pumps work wonderfully, marine/boating stores will have them.
Hamilton Marine is where I got the 24V bilge pump I use for circulating coolant water in my laser cutter. They had a 12V version too.
The common approach (at least in the book “Build your own underwater robot”) is to use boat bilge pumps. The pumps that he is using are kitchen water pumps, I think for a drinking water spout on your faucet. It’s a super-cool build, and really well done.
However, it’s worth pointing out that the pumps do not solve the shaft leak problem, as you still will get leaks at the pump’s impellor shaft.
you can use magnetic drive pumps to solve the seal issue. They are commonly used for marine A/C and refrigeration systems. You can get them in both AC and DC versions
Kevin, very good suggestion. In my experience with them, the winding portion is not very waterproof in it’s factory housing, and something would have to be done get before it goes underwater. Most of the time when a boat sinks, these motors are shot because they are exposed to water on the windings.
I’m really hoping Open ROV will yield some DIY magnetic drive thrusters soon.
http://openrov.com/
I have used them for years some are potted in epoxy
http://www.marchpump.com/893-06/
He needs a small presurized water hose from the surface and 4 solenoid valves to turn the water jet on. That will take care of any shaft leaking issues.
Hey… I know that barge. :)
Spent a night out there before biking to CCCamp.
Glad to see they’re still hacking.
Brushless DC motors would work to drive propellers.
Computer cooling fans would work, though finding ones that turn in opposite directions to counter torque might not be possible.
The electronics inside the hub can be sealed by spraying with clear lacquer, but keep it out of the bearings.
If you can get to the insides enough to spray them with lacquer, you can probably swap two of the phases to reverse the rotation, no?
The article mentions finding bearings that will work under water. I was in engineering onboard USS Enterprise. The navy uses lignum vitae bushings on aircraft carriers. (36″ dia shafts, 80,000hp give or take) Anyone who knows how slippery a wet log is can imagine using wet wood as a bearing.
I have heard, read of lignum vitae being used to build working tools, and understood wood was probably the first bearing material, but never knew how well suited lignum vitae is for bearing use. From what I’m reading lignum vitae could also be used to manufacture lignum vitae to lignum vitae precision fluid seals, in the manner precision metal to metal seals are manufactured. Although I’m unsure if such a seal design could handle pressure differences in submerged applications. Maybe if there’s a way to balance the pressure on each side of the seal automatically? That’s my bench racing for the day.
In ww2 the wood was used as the seal/bearings on the main propeller shaft for submarines
http://www.biltema.se/sv/Bat/Pump/Vattenpump/Inline-pump-25981/
$18 in swedish krona, not bad. I use BLDC motors from RC gear.
That pressure housing is pretty nice although I’m a little bit skeptical of the depth capability of his hull penetrations. Those types of cable glands are normally rated on a NEMA scale and not on an Ingress Protection grading(IPXX).
The easiest way to minimize hull penetrations is to pot your motor controllers in epoxy and only run digital signal wires inside the pressure box.
If you do that on an RV, you aren’t far from putting the MCU in mineral oil. Cameras are the hard part, but that’s what scuba dive-light bodys are for.
Is the pressure can all COTS or are those custom fabricated components? They looked custom/lasercut but I didn’t see a build log so I’m left guessing if he glued on the flanges or if he found a flanged acrylic pipe section.
Perhaps I’m a bit thick, but why not use submersible aquarium impeller pumps?