Even if he hadn’t done any firmware hacking on this hard drive [Sprite_TM’s] digital exploration of the controller is fascinating. He gave a talk at this year’s Observe, Hack, Make (OHM2013) — a non-commercial community run event in the Netherlands and we can’t wait for the video. But all the information on how he hacked into the three-core controller chip is included in his write up.
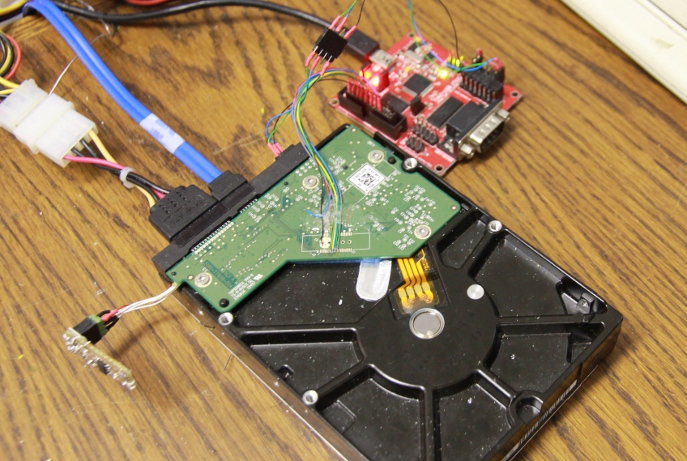
[Sprite_TM] mentions that you’re not going to find datasheets for the controllers on these drives. He got his foot in the door after finding a JTAG pinout mentioned on a forum post. The image above shows his JTAG hardware which he’s controlling with OpenOCD. This led him to discover that there are three cores inside the controller, each used for a different purpose. The difference between [Sprite_TM’s] work and that of mere mortals is that he has a knack for drawing surprisingly accurate conclusions from meager clues. To see what we mean check out the memory map for the second core which he posted on page 3 of his article.
Using JTAG he was able to inject a jump into the code (along with a filler word to keep the checksum valid) and run his own code. To begin the firmware hacking portion of the project he pulled the flash ROM off of the board and installed it on that little board sticking out on the left. This made it easy for him to backup and reflash the chip. Eventually this let him pull off the same proof of concept as a firmware-only hack (no JTAG necessary). He goes onto detail how an attacker who has root access could flash hacked firmware which compromises data without any indication to they system admin or user. But we also like his suggestion that you should try this out on your broken hard drives to see if you can reuse the controllers for embedded projects. That idea is a ton a fun!
When we were poking around the OHM2013 website (linked above) we noticed that the tickets are sold out; good for them! But if you were still able to buy them they take Bitcoin as one payment option. Are there any other conferences that allow Bitcoin for registration?


Another superb hack from Sprite_tm, you should be able to find the writeup for this on his website, it is a joy to read.
sprite_m is probably the best hacker that has ever been featured on this website.
Couple years ago I needed some TSOP Flash memory chips for a WRT router repair (long story). The most readily available source turned out to be the PCBs of bad HDDs (and DVD-RWs) I’ve collected over the years. Too bad they were all max 2MB only. Anyway, after desoldering third or fourth flash chip, I thought “I am taking a memory chip from one MCU board to transfer to another, with almost the same architecture, memory size etc., just slightly different peripherals”. Never had enough low level hardware programming experience to do much about it but always had a feeling it’s ultimately doable. Hats off to Jeroen (Spritesmods) for actually doing it!
P.S. There’s a TON of interesting stuff on HDD PCBs, even if you don’t hack it to the extent he did it. My personal favorite is the BLDC controller chip.
A lot of HDDs have a UART diagnostic port, too. The folks over at HDDForums do a bit of hacking by this route.
Personally I’ve always wanted to glue an angled mirror to a post attached to the head mechanism, and use the voice-coil (and servo tracks) to make a cheap high-accuracy galvo laser scanner. Feeding commands directly to the controller could effect very fast tracking. I’ll never have time to do it, so I’m putting the idea out there in case anyone else wants to pursue it. :)
Oops, I meant HDDGuru Forums. That. Sorry. :p
I think it may be too slow for a galvo – just the size/weight of the coil suggests that you either need to use unnecessarily high currents or use it only for something that requires very slow scanning, like simple oval shapes. The head arm with the coil has too much inertia IMHO.
Look up the maximum seek time for an hdd. Last I looked it was something like 70ms, with average being about 15ms. The mirror could be a bit of mylar foil attached at one end.
15 ms (milliseconds) is WAY too slow for a laser show galvo with any decent resolution. You need the thing to draw you 100s of lines in 1/24th of a second, so you need times in (low) hundreds of microseconds. No HDD head arm, no matter how lightweight or small (from 2.5″ HDD for example) has any hope of reaching that speed.
If you consider removing most of the arm which holds the read head, then you can substantially reduce the rotational inertia and probably get fairly good bandwidth. The only issue now is that you’re running open loop control, and I seem to remember that HDD’s rely on read track position to know where they are. I think you’d have to supply a feedback mechanism (encoder) for position.
from the comments section of his site
“Gdogg wrote at 2 Aug 2013, 19.53:
As usual your hacks make me feel like a stupid piece of shit. Well done!”
about sums it up for me. fantastic
He installed linux on his hard drive! Simply amazing (and funny as hell.)
So he’s running Linux off a hard drive which also run Linux?
He was running Linux on one of the ARM9 SoCs.
Ironically the kernel b0rked when it couldn’t find any storage device …
Hardware Inception……..
Nice. This dude knows his JTAG/[dis]assembly…
I tried similar with an old cable-modem. Similar issues, it has *0* readable strings. I never got to the point of figuring out the memory-map… Boggles my mind how that’s even feasible. I couldn’t even figure out the memory location of the FLASH, as it seemed to change based on the position in the boot-process. Also, I know it has serial port that outputs garbage on boot, and nothing thereafter. Ultimately, I figured, the actual serial-write stuff is likely buried somewhere in the OS, maybe a driver is involved, and likely called via something like printf… Probably goes through a dozen subroutines before finally reaching the IO address. Difficult for this JTAG/MIPS/disassembly-beginner to pinpoint from raw disassembly. I *was* able to figure out the memory-location for the two LEDs, which, thankfully, are initialized early-on in the boot process. Was pretty proud of that. And learned quite a bit, in the process.
Now I’ve a several-hundred MHz 32-bit MIPS-based blinky-LED ;)
But, This Dude… Wow.
How about coming up with a cheap DIY way to reset SMART information? There are a lot of drives that trip the SMART alert, but have absolutely nothing wrong with them. I have a 1TB drive that comes up with a parameter out of range warning but has passed every test I’ve thrown at it.
Most likely it experienced a transitory heat or power spike that did no damage, but once a SMART alert is set it’s there for good.