Who doesn’t have issues with component storage (seriously, tell us your secret in the comments)? IF you can get your spare parts organized, it’s still quite difficult to figure out where you actually squirreled them away. Labeling drawers is one thing, but what if you have hundreds or thousands of drawers (we’re looking at you, every Hackerspace that’s been around for more than a few months). This project adds a digital cue to well-organized parts storage by lighting up the component drawer for stock selected from your computerized inventory (translated).
The idea is that all of your parts are assigned a drawer space on the computer. When you go into the index and select a part, the assigned drawer is illuminated by an LED. The setup here is a breakout board for an I2C LED driver which interfaces with a Raspberry Pi, but the concept should be easy to implement with just about any system.
Need help getting to the point where you’re organized enough to implement this? So do we. Maybe revisiting this storage roundup will help.


This also could be practical for sorting-in spare resistors.
Imagine a sensor on which you place a resistor, a microcontroller measures the resistance, then the component drawer with the nearest value lights up.
Most of my resistors are only 0.1 cents a piece. Spare ones just get thrown in the garbage.
Some of us are dumb enough to buy grab bags of resistor values that we’ll never possibly use for any project whatsoever, but don’t realize it until spending days actually sorting them. Some never never realize it and end up buying resistor values that are actually useable and those useless resistors get lost amongst the collection.
Can confirm having fell victim to this.
After realizing that my bag of 200 resistors from The Source was never going to be used unless in desperate times, I bought a kit of 2000 from ebay with each value still on tape. That way, when I need a resistor, I now sort through 50 rolls of tape instead of 200 lonely naked resistors. Progress, with room for improvement I guess…
My secret is a bunch of Licefa brand SMD boxes with flip lid. See chapter 8 of the catalog here: http://www.licefa.de/fileadmin/LICEFA_MEDIEN/blaetterkatalog/2014/LIC_katalog_en/index.html
The whole E12 series of resistors in less than the area of a sheet of paper, and even the smallest boxes hold a few thousand 0603 resistors each.
“Trui” – Good solution for a few pieces, but the shop for more probably a better cabinet with drawers.
The boxes all snap together in a tray, and the trays, can be organized in tidy cabinets. I don’t see why it wouldn’t work for larger amounts. Myself, I probably have a few hundred of them.
A nice option is to make extra trays per project, so you can just take the entire tray to your desk, and have all the components for a certain board within easy reach.
This is great, but I have to wonder about having an entire box for a single resistor value! E.g. I find myself using tons of 1k and 10k, but not as much of the rest. Sadly I can’t see any unused space without thinking what I could cram into it! I’ve got resistors organised into decades; 100R – 1k, 1k-10k, 10k-100k and so on. SMD resistors live in lots of small self-seal bags, as do through-hole ceramic caps.
BTW, if you ever have the problem of over-filled storage drawers catching on the shelf above, try this trick with some cereal packet to keep the contents down:
http://imajeenyus.com/workshop/20111223_storage_drawer_retainer/index.shtml
You could apply an algorithm like Amazon’s chaos sort to this – divide parts into look-alike categories (all 0603 things look the same, all DIPs look the same, all QFNs look the same) and put one of each lookalike object in a drawer… need a WS2803D (18pin DIP)? See drawer 3, it’s the only DIP in there… along with a QFN A4988 driver, a bunch of 4.7k 0603 resistors, 3mm red LEDs and 10k potentiometer. The computer keeps track of which parts are in which drawer, then when you go to the drawer it’s obvious what you want… Inside each drawer it’s a chaotic mess of parts, but it’s organised in your database of parts.
Thanks Lindsay – I’ve actually enjoyed browsing through your website from time to time. Lots of info there.
I use these for larger parts:
http://www.harborfreight.com/24-divider-storage-container-94458.html
Smaller through-hole and surface-mount parts go in labeled coin envelopes, which stand up in a long skinny box along one side of the tool drawer:
http://www.uline.com/BL_1580/Coin-Envelopes
And of course there are also a couple boxes of random junk PCBs I haven’t bothered to harvest parts from yet.
Harbor Freight FTW. These are awesome too. http://www.harborfreight.com/24-container-storage-box-90243.html
The main thing I do is label every piece of cut tape holding SMT parts. Years ago I used to just write on their with a fine point sharpie pen. Now I usually go to the trouble of printing labels on a laser printer in 7 pt font. It’s pretty easy to open the template and quickly manual feed a label sheet. Then I cut out thin strips and stick them onto the cut tape. For paper-based strips, I put a copy on both sides.
Sometimes Digikey staples the labels to the bag, which is awesome, since I can just cut their printed text and stick it onto the cut tape. On some bags none-anti-static bags, it’s possible to peel their label off and reuse them. It’d be really, really awesome if Digikey printed the part number multiple times in small font, for labeling longer cut tape. A really really really awesome option would be a way to pay just a bit extra for Digikey to cut the tape into drawer-sized segments and label each piece on both sides. If that were an option cost an extra 50 cents per part, I’d certainly buy it. I wonder if anyone from Digikey will ever read this?!
Labeling cut tape does add quite a bit of work up-front, but it pays itself back many times over when building prototypes. When unlabeled strips are in bags, where the only way to know which parts are which types and what values, fumbling with the bags and carefully putting each part back into its bag before getting a similar-looking part out is just too much trouble and too distracting (at least for me) while trying to focus on circuitry. Similar looking parts end up on the table, outside their bags, with no reliable way to tell which is which.
When I’m done building something, it’s pretty easy to put the pile of parts away into their drawers, since every one is well labeled with high contrast printed text. In my experience, that’s the part which needs the optimization… not finding the parts from freshly stocked drawers, but a workable system for putting unused parts back after using a few from each strip, so over time the draws stay correctly stocked.
Well labeled strips also makes finding the part in a “category” drawer pretty easy, especially if it’s labeled on both sides.
I applaud you for cleaning up at the end of a build. This is by far my biggest problem and leads to the most fragmentation of my parts stock. I end up looking for parts later and come across an “assorted” bag of parts, remembering that this was my leftover from building foo and trying to remember what might be in there.
I use a Dymo label maker for my drawer labels: http://www.ebay.com/itm/like/231156144459?lpid=82
For organizer drawers, I have several of these :
http://www.homedepot.com/p/Stack-On-39-Compartment-Storage-Cabinet-DS-39-12/100023878
The drawers are wall-mounted and stackable; I’m actually picking up another one this weekend.
My “miscellaneous” stuff is in a giant parts bin…a big green storage box with everything from doorbell solenoids, old portable DVD players, security cameras, TV remotes, old cell phones…you name it.
For passives, I use 7 day pill boxes (4 slots per day, 28 slots per holder), just wipe off the printed days with acetone, stick on some labels showing resistance, and fill with your preference of size.
http://www.flickr.com/photos/93638530@N08/12538480783/
Don’t see the point of keeping passives on their tape, it’s just bulky and annoying to extract one when you need it, keeping them loose means you can just open the container and grab one with your tweezers.
Moisture is the primary reason I guess.
SMT tapes are not seal against moisture.
I tried that method but found the only cheap pill boxes I could find wouldn’t hold anything too small as there were gaps in the lids, so I bought a purposely made box for SMD components that works extremely well down to 0201 sizes.
Link to it in my post below (when it ges approved by a moderator)
For resistors and capacitors, I use this: http://digital-diy.com/forum/download/file.php?id=2802
Easy to organize, and uses very little space.
Cool…but useless…but cool…but useless…but cool. XD
It will get to awesome, once there are tons and tons of drawers to pick from. I hope he gets to have so much material!
Nice. An alternative method would be to have the drawers be pushed out using solenoids behind each drawer.
Heh, that would cost millions though.
For SMD components you can’t beat this for quality and price, good enough to put 0201 sized components in:
http://www.ebay.co.uk/itm/300499084538
It uses hindges for the 144 individual compartments, not just simply bending a bit of plastic like some of the cheap alternatives. I got one and am extremely pleased with it, though the free tweezers aren’t anything to shout about, get some of the Weitus ones from http://dx.com/s/weitus+tweezers , those are very good and very cheap.
Stores sell a small plastic 10 draw cabinet on wheels. Draws are large enough to even fit electronic kits, soldering irons, etc. J-Tron sells prepackaged resistor kits in metal cabinets. http://www.j-tron.com/store/cart.php?m=product_list&c=117
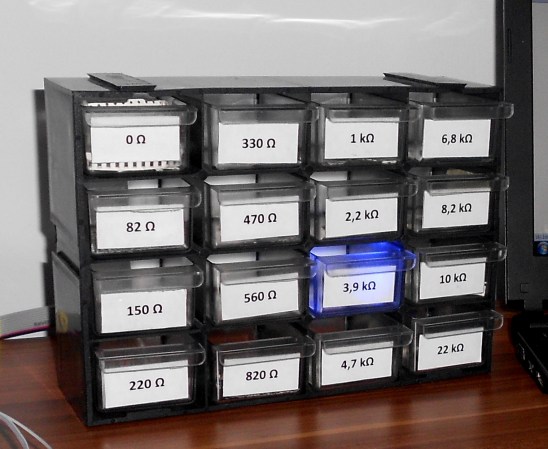
I think the cabinet with resistors is just an example. It was probably on the concept of illumination.
And I’m still trying to figure out what’s more useful for me, an illuminated parts tray or an entire parts tray full of 0Ohm resistors. Maybe I also should also get a tray full of ∞ Ohm resistors along with some 1Petabit DIP WORM memory and a bag full of preshorted tantal capacitors
0 Ohm “resistors” are very useful. A 0R resistor can save you two vias if you need to cross a trace, which if you are etching your own PCB can make life a lot easier when you can slap down some 0R “resistors” on the board instead of having to accurately drill, lace/rivet and solder a pile of vias!
Always keep at least some 1206 0R’s in your collection!
If you have a power supply in your circuit it is handy to put a zero ohm on the output. This lets you test the power supply without potentially frying the rest of your board. then once you are sure it works the way you expect solder in the zero ohm.
For home made PCB, I sometimes use 0805 or 1206 decoupling cap to line up the power pins on chips or route traces through them as the alternatives have a lot more inductances,
I route 1 trace between 0805 pads and 3 traces for 1206.
I use these alot for smaller parts. The compartments are lockable and this fits nicely on a bookshelf.
http://www.amazon.com/Craft-Lockables-Ultrasuede-Organizer-Purple/dp/B00428A7QI/ref=sr_1_2?ie=UTF8&qid=1392479196&sr=8-2&keywords=craft+mates
It is unfortunate it on;y comes in purple.
A bit bulky and expensive for me . I use a plastic book with clip in plastic pages with photo pockets on them. Suits most loose and taped components . I use some red double sided tape cut into 1/4 inch strips by 1 inch to stick down where they come out. Two books with all my resistors ,transistors zenners ,diodes , capacitors, IC’s ,notes , kit schematics,pin connectors ,SMD’s etc ,etc, all fit into 2 folders which cost me $10 all up . Easy to pick up quickly and take to a job.
May be something like those currency collector binder pages would come in handy for SMT cut tapes. They come in a 3 ring binder page and have 3 pockets each.
http://www.amazon.com/20-Twenty-Pages-3-Pocket-Collecting/dp/B002KDPEMY
When you don’t have a particular resistor available it should whip up a list of combinations that can be used. Then you can pick based on “I have a gagillion of these” or “this combo requires the fewest resistors”
I’ve been thinking about making something like this: http://www.youtube.com/watch?v=p-59afi4z94
The cups would diffuse the LEDs nicely :)
For my collection (which is all thru-hole), when I re-organized my shop I purchased a bunch of Stack-On brand 60 drawer cabinets.
I found that the biggest secret to organization was to first buy all the storage of the same size, shape, and color. I ended up spending about $300 USD on the storage cabinets alone. Then I used a p-touch labeller to make labels.
I found that one 60 drawer cabinet (with each drawer split into three compartments) could hold a complete E24 series of resistors (http://www.logwell.com/tech/components/resistor_values.html); I ended up purchasing 100 pcs of each resistor value for the drawers.
I’ll likely never need any other resistors for the rest of my life!
I’m working on one of these. My goal is to use an R/C circuit and an arduino to measure the resistor. The system will then light up the correct box. The boxes would be organized in a grid by the first 2 bands (as seen on hackaday before), I was going to make it simpler and light up the column and row. Should make sorting grab bags a synch.
Can’t you just read the resistor code from the device instead of measuring it ?
I don’t buy much through hole stuff anymore. I keep the SMT parts on the cut tape and write on the tape. I also try to keep the tape in the bag from digikey/mouser and use binder clips to keep the bags together. Keep them bundled by size and value under 1k, 1k-100k, 100k+
For other loose parts I have been having good luck with the plastic bins gerber baby food comes in. They are like small tupperware containers. If you have friends with an infant they can give you hundreds
All of this goes in a flat file cabinet I scored from a dumpster
I haven’t found a perfect solution for inconveniently sized items like resistors, but for most things I use individual plastic boxes from usplastic.com. i label boxes with a sharpie until I have an organization attack and make labels. The different sizes tend to line up well with the size of the drawers in my bisley 8 drawer cabinet, so the stacks stay perfectly aligned and it’s easy to pull a bunch of each part that I’m currently working with.
http://www.usplastic.com/catalog/item.aspx?itemid=23162&catid=802
Wow, nice First World Problem solution there. Everyone else in the world just uses drawer racks with labels and somehow can still manage to find the correct drawer without blinky lights. I bet this guy has a label on his soldering iron pointing out which end gets hot.
Good laugh there !
If you only play with pure digital circuits/microcontroller, there are only a handful of values of passives that you are going to be using anyways and you should probably use common values. e.g. decoupling caps, pull up/pull down, terminations, LED series resistors, USB, crystal oscillator caps and may be some high values for touch etc
It is when you start playing with analog stuff that you would care about a much wider range of values.
In the old days I put all my through hole resistors (mostly used) in a big bag. I can spot common value from the overall colour patterns and I can search for ranges of values too. That’s good exercise for my brains.
I split the group of 12 per decade in to twos.
10-12, 15-18, 22-27, 33-39, 47-56, 68-87.
6 drawers vertically low to high, by all the decades fit into one 6 X 10 set of drawers with room around the sides for other stuff.
Zero ohm “resistors” are jumpers in in disguise. I guess that in digital design only a handful of sizes will do, then just get one tackle box and be done with it. This is all encompassing 6(12) X 7 decades in a little over half of the cabinet. In logical tabled order unlabeled. I thought of colours but haven’t bothered, as I can see the contents.
I often reach for something whilst tweaking just like a decade box, with clipleads in hand. Start too high, come down down one more got it. Solder it in.
Pill vials would be a good choice for the untaped SMD stuff, easy to pour into hand and back in . Place them in a similar matrix of holes in place.
I use these bead boxes for my small through-hole parts and just label each cell. Surprised they haven’t been mentioned yet.
http://ecemadeeasy.com/wp-content/uploads/2011/01/bead-box.jpg
These kind of containers scare me in that the give of the lid sometimes allowed neighbouring cells to spill into each other if jostled/upside-down
They also break down over the years . Mine about 10 years and the bits break off.
I have a few different storage schemes for resistors but when I am experimenting this is the container I choose from
http://i.imgur.com/vG02HMG.jpg
On the left are resistors in glassine plastic bags with their value printed on a piece of paper in the bag. Of course they are arranged in ascending order depending on their value. No other box scheme scales like this. Fscking amateurs.
But what do I know? I am a jackass.
Interesting did you make that account with a space or something? Because I sure as hell didn’t post it. I think I’ll report it and see what comes of that.
I have been at multiple estate sales, from them I picked up sorting used resistors by decade, into drawrs:
http://eds.dyndns.org/~ircjunk/images/p1050890.jpg
new resistors are in milk crates, bagged by value, tubbed by decade.
pots go in tubs
http://eds.dyndns.org/~ircjunk/images/p1050891.jpg
If you’re organized enough to keep a computer inventory up to date, you probably already know where they are in the first place. I use a little plastic cabinet. Each drawer contains a range of resistors sorted into small zip-lock bags. 0-99.9Ω, 100-999.9Ω, etc. The front of the drawers are labelled with the ranges it holds. I have a pretty good assortment of thru-hole resistors in 5 small drawers. Same thing for caps. My SMD resistors are on labeled cut-tape or bagged, sorted into larger zip-lock bags in a similar fashion. I don’t put semiconductors in zip-lock bags. I need another cabinet.
Not absolutely about the organization of components. Breadboard rather convenient thing for prototyping, but sometimes happens too bulky and not really convenient. That if to use hinged installation, only by means of here such contacts – http://www.hobbyking.com/hobbyking/store/catalog/AM-1001C.jpg. To place each component in the small case to which to connect such contacts and to collect electric chains in a design like this – http://www.hobbyking.com/hobbyking/store/catalog/PA45-Tube (1).jpg. With use of splitters and wires with the same contacts, or necessary sockets. It will be necessary to check how such way of prototyping it is convenient.
Ops, “hinged installation” means point-to-point construction – http://en.wikipedia.org/wiki/Point-to-point_construction
My shop has limited space, so I organize my resistors into two drawers: less than or equal to 1kohm, and above that. That seems to work well for simple projects. I’m sure if I need to buy more resistors, I’ll try out smaller intervals.
It’s a bit exy, but I use sortimo t-boxxes. They have a variety of sizes of inserts, and you can tip them up and carry them like a suitcase without stuff falling between compartments. I was thrilled to bits to see Adam savage using them as well. All my cordless drills etc are in sortimo L-Boxxes, which stack and snap together too. Both the L and T boxxes are the same width, so I built up a wooden box that was the right width for them, with aluminium rails, then you just slide them in like drawers.
http://www.sortimo-shop.com.au/t-boxx.html
http://www.tested.com/art/makers/45036-inside-adam-savages-man-cave-the-tool-boxes/
Isn’t a 0 Ohm resistor just piece of wire? (top left drawer)
I need to blog my dad’s storage medium. he started about 30 years ago, by cutting the tops off of 2 letre bottles and prying off the plastic bases, and using the containers made via that for pretty much everything.(nowdays there are not plastic bottoms, so his containers nolonger get lids, but aside from a little dust, its been no biggie. ) then when he needs a nut or a bolt, or a component, he dumps the container out into a plastic dishpan tub sorts finds the ones he needs, then the tub has a corner cut out to dump it all back in the cokebottle container.. His electronics shop and his workshop has shelving nailed into the studs, just big enough to store them all one container deep.
you quickly scan the wall select container with the right type of parts. dump sort, pour put back!