“Dammit Jim, I’m a hacker, not a musician!”, to paraphrase McCoy Scotty from the original Star Trek series. Well, some of us are also musicians, some, like me, are also hack-musicians, and some wouldn’t know a whole note from a treble clef. But every now and then the music you want is in the form of sheet music and you need to convert that to something your hack can play. If you’re lucky, you can find software that will read the sheet music for you and spit out a MIDI or WAV file. Or, as with my hand-cranked music player, you may have to read just enough of the music yourself to convert musical notes to frequencies for something like a 555 timer chip. We’ll dive into both cases here.
If you can’t read music then you should still be able to get the gist of what we’re saying. But in case you get confused, we’ve included a very quick introduction near the end of this article.
Optical Music Recognition (OMR)
You’ve probably heard of OCR, Optical Character Recognition software, that converts words on paper to a digital form. Well there’s also music OCR, or more precisely OMR, Optical Music Recognition software. You point a camera at a page of sheet music to capture an image, or give the software an image file or a PDF containing the sheet music, and it converts that to music that you can hear at the press of a button, or save to a MIDI or WAV file for playback from elsewhere.
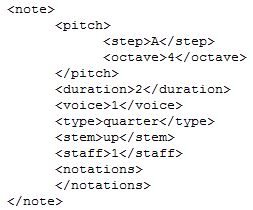
To try it out, I found a high quality one called SharpEye 2.68 that had a 30-day, free trial period. It’s able to save the music as a MIDI file, MusicXML, and in NIFF format. The snippet of MusicXML shown here is of the musical note, A, and is a quarter note. As you’ll see, SharpEye does an impressive job, given a clean, black and white image. It also provides the necessary editing tools to fix any recognition errors.
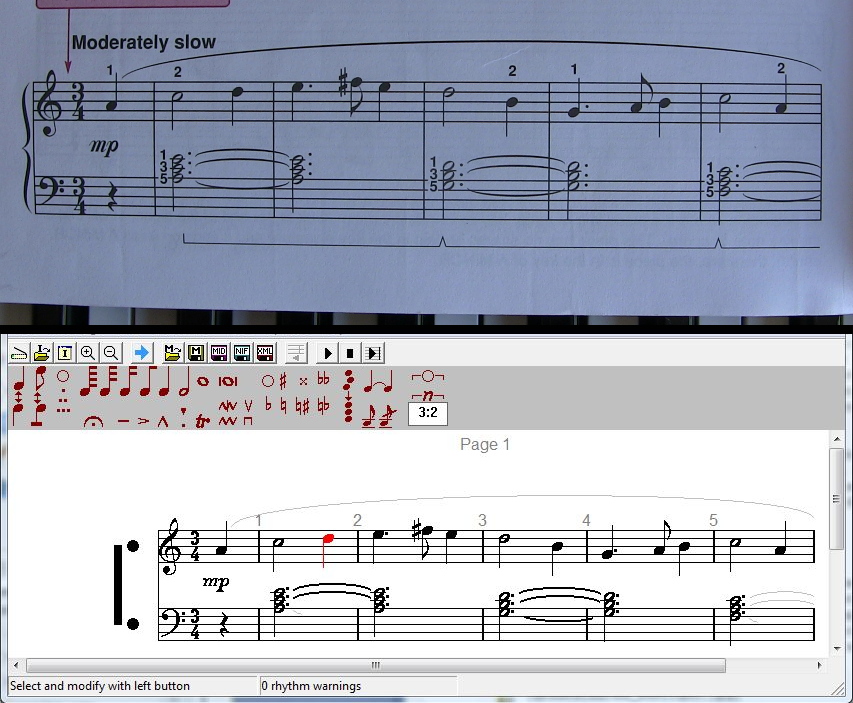
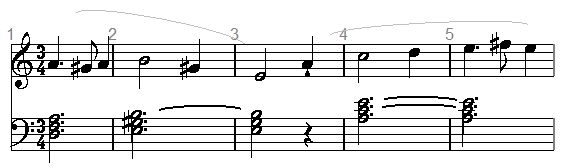
For my first test I took a photo in sunlight of the first line from the song Greensleeves. I then brought the photo into GIMP so that I could convert it to a TIFF file, since SparpEye reads in only BMP and TIFF files. But I did no enhancing. I then opened the image in SharpEye and told it to “Read image”. This is the optical music recognition step. The end result was just what you see in the snapshot here, flawless, and with only the relevant music. In the snapshot I’ve clicked on one of the notes, the one that’s red, to show that this is editable music and not just a static image. Clicking on the play button played it flawlessly.
I saved it as a MIDI file. However, MIDI files specify how to play the music, along with the notes, and do not contain the audio itself. So I converted it to an audio track using Anvil Studio before saving the music to a WAV file, which you can listen to below. For anyone who wants to do this in Anvil, at a minimum you can do File – Open Song and File – Export Mixed Audio.
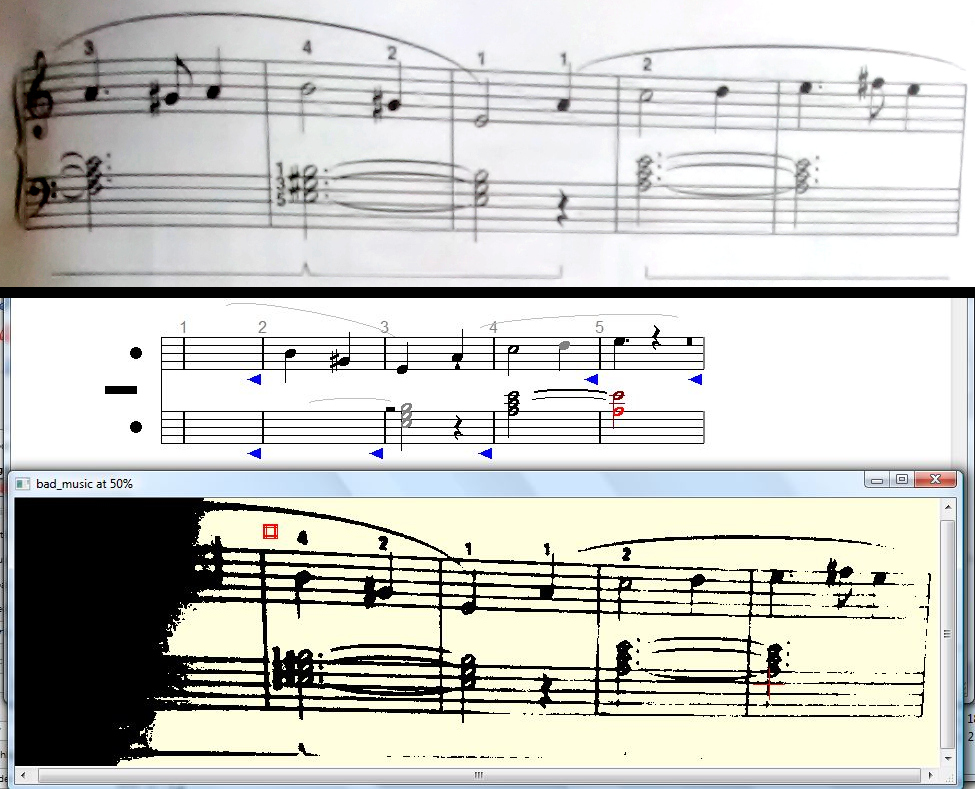
These OMR programs need clean images or PDFs of the music in order to recognize them well. For example, the example shown above has some shadowing on the left which made SharpEye unable to read that part. The image is also poorly focused, which caused it to get a lot wrong in the bottom section. The music with the yellow background is SharpEye displaying how it sees the music before doing the recognition.
Like many OMR programs, SharpEye isn’t intended as a music notation tool. It doesn’t position notes for you, or adjust their positions when you add a clef. However, it does give you enough editing tools to correct recognition errors, and that’s what I did to add back the area that was shadowed, as well as add the notes it missed on the bottom. I also inserted the 3/4 time signatures, which weren’t in the original since it was an image taken of the middle of a score. With those fixes, it sounds just right.
At this point you can save it as a MIDI file and then convert it to a WAV or MP3 and transfer that to your hack. Or, if you want to further refine the music, save it as a MusicXML file and load it into your favorite music notation software, Sibelius for example, for further editing.
Experiments with Image Pre-Processing
I used a flatbed scanner to scan a full page of the song Scarborough Fair — which this time includes lyrics — to a PDF file. Since SharpEye doesn’t read PDF files I first loaded it into GIMP and saved it as a TIFF file. SharpEye had problems reading it, so I went back to GIMP, saved it as a high quality JPG instead, loaded that back into GIMP, and exported that as a TIFF file. For some unknown reason, SharpEye could read that one.
Even then, the recognition worked poorly, missing large chunks of the music. I suspected that was because the music was grey on white. I used the Levels tool in GIMP to convert it to black on white and the recognition worked far better this time.
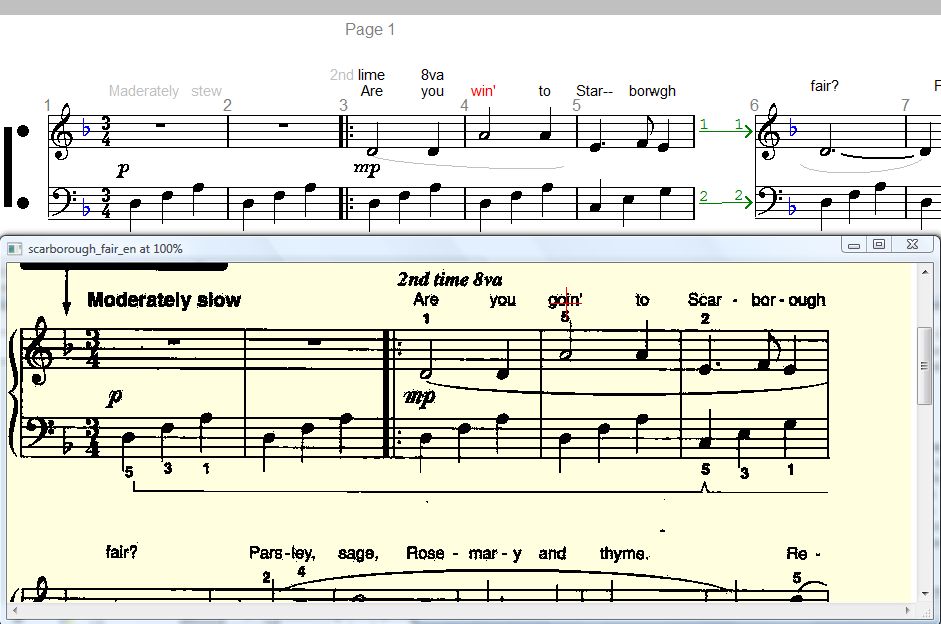
Before doing the recognition, I had to tell SharpEye that the lyrics could be found above the staves since by default it looks for them below. In the snapshot, the original image is the music with the yellow background. As you can see, there were some errors in the lyrics, but the text is editable. In the snapshot I’ve selected “win'”, which should be “goin'”. Notice also, that the lines of recognized music are laid out horizontally instead of vertically as you find on a normal sheet of paper and as they are in the original image. But the result sounds just fine.
You can find a list of other optical music recognition programs on Wikipedia, SmartScore being the one that has been around the longest in one form of another, starting in 1991. There’s also a SharpEye SDK which, from the list, is used by a few different products. There are even apps for iPads, iPhones and Android phones which you can find demos of on YouTube. Searching for “music scanner” seems to turn up a few good and bad ones.
Converting Notes to Frequencies
What if you have the sheet music in front of you and your hack is one that takes the individual notes and converts each directly to an appropriate sound? WAV and MP3 files won’t work since those contain already converted music.
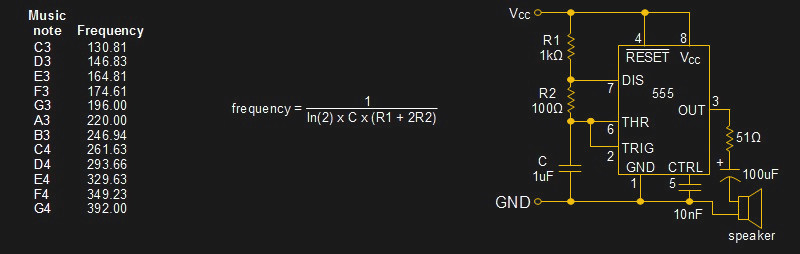
The way to do it is simple really. Each music note has a corresponding frequency. For a desired note, your circuit need only cycle a speaker at that note’s frequency. And a simple way to supply that frequency is using a 555 timer circuit in astable mode like the one shown. In the circuit, the output frequency is determined by capacitor C, and resistors R1 and R2. You can clearly see that dependency by looking at the frequency formula for the 555 timer’s output.
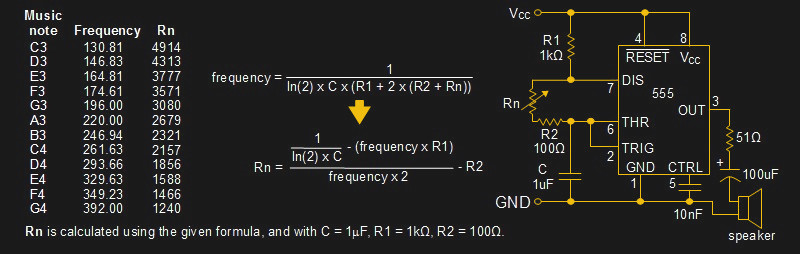
A typical way of manipulating that formula is to use a fixed value for R2, and then to add a different resistance to it for each desired frequency, as shown in the modified circuit. For now let’s insert a variable resistor Rn. In the diagram you can see that we first added Rn to the frequency formula, and that we then rearranged the formula to solve for Rn instead. Plug that formula into a spreadsheet and you can come up with the necessary resistor values for the desired music notes.
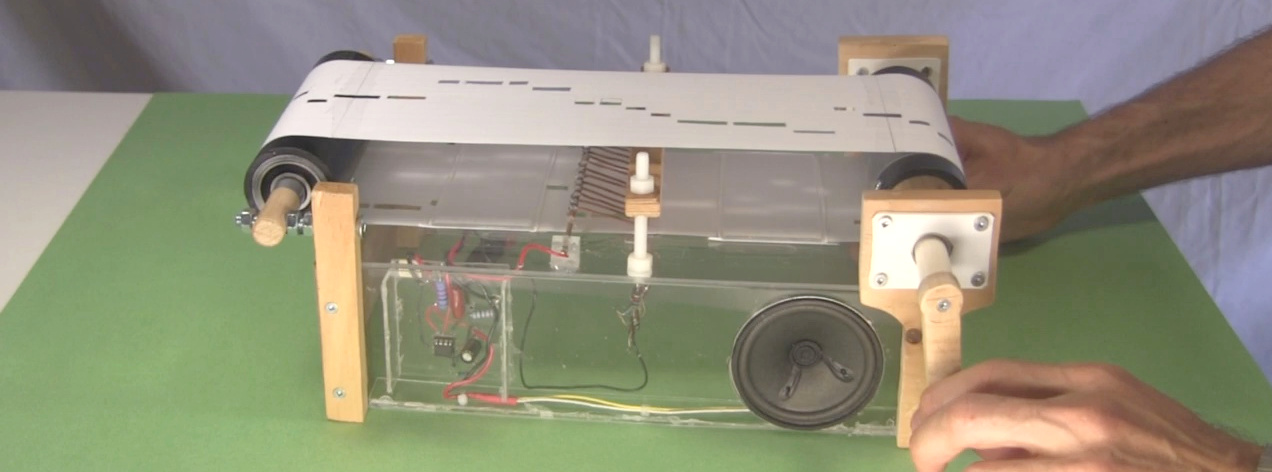
An example of this circuit being used is in this hand cranked music player. The musical notes are encoded as holes in a loop of paper. The position of the hole along the width of the paper determines which of 13 possible notes is played. The length of the hole controls the length of time the note is played.
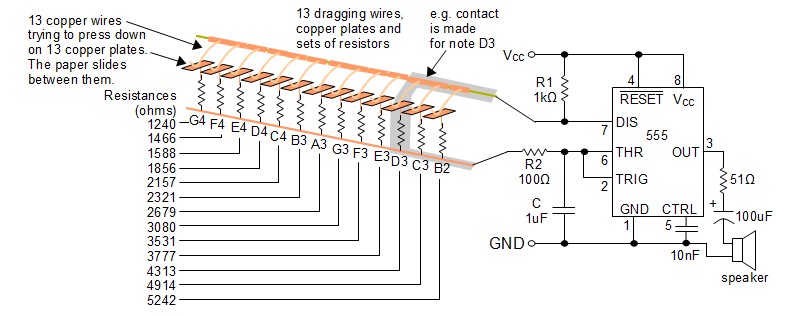
The circuit diagram for the music player shows the same 555 timer circuit but with Rn replaced by 13 different resistors whose values were calculated using the formula for Rn. However, only one resistor is used by the circuit at any time. How is that done?
Each of those 13 resistors is soldered to one of 13 copper plates. Sitting on top of each copper plate is a copper wire. The paper slides between the plate and the wire. Only when there’s a hole in the paper between the wire and the plate do they make electrical contact. That brings the corresponding resistor into the circuit, and the 555 outputs the correct frequency for the desired musical note. In the diagram we’re highlighting the electrical path if a hole is between D3’s wire and copper plate.
A Very Quick Intro To Reading Music
Before we end this article, here’s the promised minimal introduction to reading sheet music, just enough to understand this article.
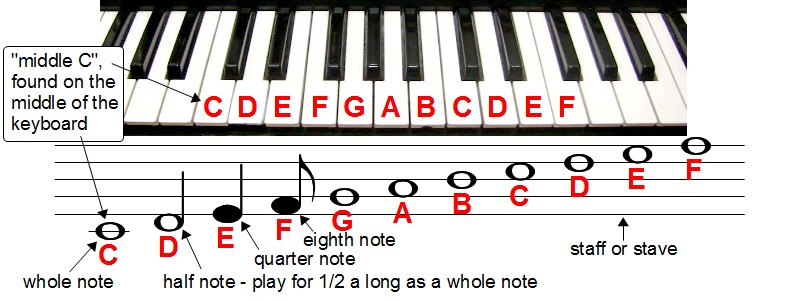
A simple way to start is by looking at the keys on a piano. Each key represents a musical note, denoted by a letter from A to G. You can always find C because it’s the white key to the left of any set of two black keys. There are only seven letters from A to G, but look closely at the keyboard and you’ll see that the pattern of black and white keys repeats after every seven white keys.
On paper, called sheet music, modern music notation consists of groups of horizontal lines called staves (the singular is staff or stave). Symbols represent the notes, and the circular part of the symbol is placed either on a line or between two lines. The vertical position of the symbol on the staff tells you which note it is. Which symbol it is tells you how long to hold the note.
There’s a lot more to it but now you can read enough sheet music to follow along with this article and at least hit the right keys on a piano. This reference looks like a decent one for if you want to dig deeper.
Endnote
We’ve encountered sheet music a few times here on Hackaday. [Dino] did the same type of musical-note-to-frequency conversion we covered but used the Arduino’s tone() function to play them to a speaker for his New Year’s eve mini ball drop machine. [Zulko] used Python and Fourier transformers to produce sheet music when he wanted to play what he found encoded on a perforated roll of paper.
And on that note (groan), what musical antics have you tried? Have you had to deal with sheet music in any hacks? Please share them with us in the comments below.


Your introductory paragraph paraphrases Dr. McCoy, not Scotty. Is it sad that this is what caught my eye?
Oops, we should be lined up against a wall and phasered for that one. Fixed.
““Dammit Jim, I’m a hacker, not a musician!”, to paraphrase Scotty from the original Star Trek series”
Sorry, I’m a Trek geek.
Bones was the one that did the “I’m a doctor not a …”. Scotty’s catch phrase was: “I’m giving her all she’s got Captain”
HaD’s version of “troll quotes” maybe?
Fixed. Now we need an article where we can paraphrase Scotty — some sort of high speed hack.
haha. yeah, I am ashamed that that was what caught my eye. you have a great project here!!!!!
So, what software package(s) will take an audio file and print out the sheet equivalent? (I’m not expecting audio (word) detection).
On Linux you would use two, waon and musescore, waon does the initial sound to midi conversion and musescore does the score layout.
Thanks!
Those music-reading demons needed taming…
> But every now and then the music you want is in the form of sheet music
Most times, however, the music is in the form of pre-recorded audio. What we really need is a neural network to analyze it and try to extract the notes (though I don’t know if that’s actually possible).
BTW, it would be fun to feed a neural network with SuicideSheep’s “Hello” (does anyone remember it?) and see what it outputs.
For Arduino users who have tone() available, there is my midi to tone generator, google for sparks midi to tone and you will find it (won’t post a link because this post will probably languish in the mod queue).
Great post!
What I’d love is a software brick that goes the other way — sort of. Whistle a tune, the software identifies the tune. I find myself constantly whistling a tune, but can’t remember what piece it’s from. I’d like to whistle into my cellphone or a mike, and have the computer tell me what the piece is.
A friend tells me that they already have such software, and we tried it on his iPhone, but it didn’t get a single piece right (andI do whistle pretty well, usually on key).
In the end, I guess the problem is more about the database than the algorithm. To be effective, a whistle-to-song ID would need a massive database, ideally of every pop song _AND_ classical piece ever written. A very tall order.
But I’d settle for one that begins with pop tunes. I think the problem we had was, the software only had hard rock songs in its database.
I ran into the problem of converting text documents which were taken with a digital camera, similar to the 2nd image above.
These suffered from variable brightness due to ambient lighting or when taking a picture of a page from a book which is curved. I ended up writing a GIMP plugin that turns these images into 2-level black/white, but does so based on the local background of each pixel.
For me these worked great, and produced images which were much easier to OCR.
https://github.com/udif/Gimp-clean-text-photos
Unfortunately, I haven’t uploaded any binaries, and my build system is Windows-only.
Thanks!
I want a player piano that reads sheet music, not the usual scrolls.