
I created a prototype 3D printer filament alarm that worked, but the process also brought some new problems and issues to the surface that I hadn’t foreseen when I first started. Today I’m going to dive further into the prototyping process to gain some insight on designing for a well-specified problem. What I came up with is an easy to build pendant that passively hangs from the filament and alerts you if anything about that changes.
I began with a need to know when my 3D printer was out of filament, so that I could drop whatever I was doing and insert a new spool of filament right up against the end of the previous spool. By doing this within four minutes of the filament running out, printing very large jobs could continue uninterrupted. The device I designed was called Mister Screamer.
The Basic Concept
The idea is that if a 3D printer is attended (but not under constant supervision) and the operator is prepared to swap filament rolls when needed, then there is no need for the printer to perform any “smart” duties such as pausing the print. As long as there is a means of triggering an alarm when filament has run out, the operator can do everything needed to keep the machine printing uninterrupted, and the printer itself doesn’t even need to know.
First Prototype
The previous prototype physically sensed filament with a roller switch that triggered a buzzer when filament ran out. It had a successful trial run, but revealed some new problems:
- When pulling filament through the device by hand there was little to no resistance felt, but once it was riding a roll of filament in the printer it created much more binding and friction than expected. Printing was successful but the printer’s extruder had to work much harder than usual. I had hoped the device would put a negligible strain on the feed system and filament. This was not the case.
- When filament ran out, the device fell some distance to the tabletop. This was expected. But the impact almost knocked the batteries completely loose from the friction-fit battery holder, which was not expected. Had the batteries popped completely out, the device would not have done its primary job. The device needed to be drop-resistant, but the prototype design did not reflect this.
Even though the previous prototype did the job it was supposed to do, it was clear there were problems and a design update was needed.
Design Goals Summary
The fundamental requirements for Mister Screamer haven’t changed much. The device’s duties are:
- If filament is present, nothing happens.
- If filament runs out, scream your fool head off to alert a nearby operator.
Other elements of the design worked out well enough to keep, and remain mostly unchanged:
- Enclosure can be 3D printed
- Self-contained (no external power or signals)
- Requires no modifications to the 3D printer to be monitored
- Electrically simple, and using a minimum of easy to source parts
- Long battery life, low power usage
- Easy to turn off when responding to an alarm
Lessons from building and testing the first prototype were used to add the following design goals:
- Must not interfere with the printer’s normal operation. Ideally, the printer should not even notice it.
- Device must be rugged and drop-resistant.
- Ability to easily add the device to the filament of a print already in progress.
The New Prototype
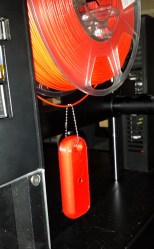
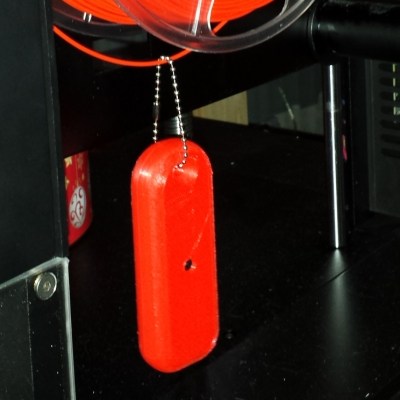 The new prototype keeps the same basic function, but with an entirely different approach. The device is now sensitive to orientation, and senses the actual filament only indirectly. It is designed to hang by a ball-link chain like a pendant.
While the device hangs down it is silent. If it falls, the alarm sounds until it is picked back up. Therefore in operation it hangs passively from the filament like a pendant or keychain as long as filament feeds into the printer. As soon as the spool of filament has emptied, the device falls to the tabletop and triggers the alarm.
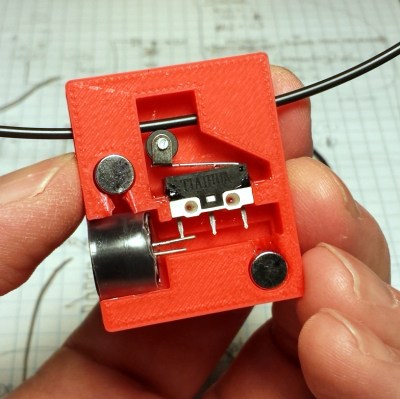
The new system changes technologies. I did away with the roller switch and replaced it with a reed switch. Inside the 3D printed enclosure is a void that captures a small disc magnet. The void has been engineered to use a shape that keeps the magnet away from the reed switch when hanging from the ball chain, but lay Mister Screamer on a flat surface and the magnet will settle near enough the switch to actuate it.


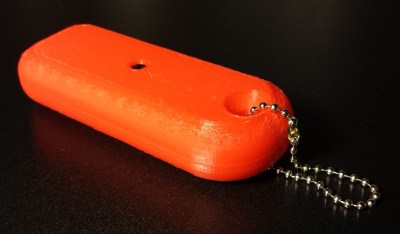
While hanging vertically from its chain (either for storage or when hanging from a filament line) the device is completely inert and uses no power. The enclosure is designed with flat sides and rounded edges, so that the unit always settles to one side or the other when it falls.
Other Design Notes
There are a few other things to mention about the design:
- The ball chain can be opened and closed. This means the device can be installed around filament while the printer is in use. No need to unload filament and thread it through the device like with the previous version.
- The ball chain has another advantage: the smooth balls roll like little bearings on the filament itself. There is no perceptible wear or contamination risk.
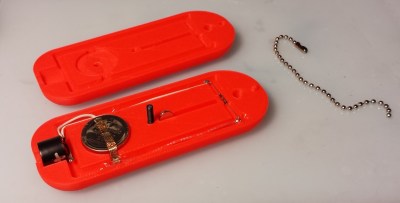
- Wiring all the parts — especially both battery contacts — into a single side of the enclosure meant no flying wires between the two shells. This allowed me to glue wires in place, which in turn meant easier assembly (no pinched wires!) and a more robust device overall.
- There is a small amount of hysteresis from the attraction of the magnet to the ball link chain. The device requires a slight “tap” to shut off once it has turned on. This was pleasing but unintentional, and illustrates how closely physical design choices can affect operation.
- Before designing the prototype I did a small proof-of-concept for a different idea: using a rolling ball tilt switch to sense orientation and trigger the buzzer. These small devices use two metal balls inside a case to either close or open an electrical connection depending on orientation. Unfortunately the connection made is small, and they do not carry current very well. The buzzer emits only a faint, strangled sound with the power flowing directly through a rolling ball switch. This problem could be solved by adding more components to the design, but the rolling magnet and reed switch approach was chosen instead.
Video Tour
Warning: Audio contains loud beeping
[wpvideo 1iGiCldF]
Results
The new prototype was a success, and not just because it performed its intended job in the expected way. It was a successful process because:
- It continued to validate the basic premise: the printer itself doesn’t need to know it’s out of filament, so long as an operator is notified and has time to act.
- It was able to be created cheaply and quickly.
- Design changes due to lessons learned from the original prototype were successfully integrated.
Using the Iterative Prototyping Process
In prototyping Mister Screamer, I did the following to get the best results from an iterative approach:
- Define the problem and the scope carefully. Make sure that the problem you think you have is the same one that actually exists. In part one of this project, I determined that my problem wasn’t really that my printer didn’t have a filament monitor. My problem was that filament could run out unnoticed even if I was in the same room.
- Design something that solves the observed problem, no more and no less.
- Test specific ideas with a proof-of-concept before committing them to a prototype.
- Make the prototype as quickly and cheaply as you feasibly can.
- Test in real-world conditions. The prototype will probably fail or fall short in at least one way, and hidden problems will be forced to the surface. Make sure failure results in something being learned.
- Use what was learned to refine the design.
Mister Screamer V2 satisfied all the requirements, but still yielded discoveries that could be used to improve a subsequent version. The biggest lesson learned was that this design is highly dependent on the layout of the 3D printer being used.
In my particular printer (a Raise3D N2) the filament spool is well away from the print area. Not only is there room for the device to hang from a spool, there isn’t any risk of the unit ending up somewhere troublesome when it falls. Other 3D printers may have physical layouts that don’t allow Mister Screamer to work well. If the device dangles in the way of the print head, or can fall into the print area once filament runs out, that’s asking for trouble.
As it stands, Mister Screamer V2 does its job well enough to be reliably used for real work, even if its scope is focused mainly on my own printer and needs. Ever-increasing improvements can be tempting to chase, but it’s rarely necessary to iterate until a solution is perfect. If a problem has been correctly identified and understood, it becomes much easier to judge when the solution is done.
The enclosure design for this version of Mister Screamer is available on GitHub.


Dumb question, why not use the ball switch like you said originally, but instead of driving the buzzer directly, drive the gate of a FET. the FET can drive the buzzer with as much current as you need.
He said it was simpler to just use a reed switch.
Good question! I did try exactly that and it worked just fine. As long as current consumption was kept tiny or negligible when idle, it would be every bit as good.
Ultimately I stuck with the reed switch and falling magnet approach. Partly because it’s simple as well as 100% off when not in use, but mostly because something about how “what you see is what you get” it is appealed to me with how visual and physical the operation is. It’s easy to see how and why it works, even if you don’t know much about electronics. There’s a limit to how small this design can get because it involves a magnet sliding up/down a ramp, however.
In order to make it way smaller you could use a small mercury switch and design it as an hook.
It would make it very easy to mount on a running spool and it could still incorporate part of the ball chain as a bushing, but it would be even better to use a section (eg 4/5) of teflon “o” ring perhaps as the whole hook part itself. That you can even “rotate” within the enclosure to make it a closed ring, if need be.
Why must you overcomplicate things?? This could easily have been solved with a Raspbery PI and sense hat running a simple MQTT infrastructure.
Love seeing innovative solutions to things like this. Great writeup, thanks!
No, the correct solution, as always, is to use a 555 timer
I though the correct solution was to use a webcam and image processing on a cloud learning platform.
Technically, the only way to correctly solve this is with the filament roll on a beam that winds a coil, then, when the roll is depleted, the coil releases its energy to launch a bowling ball over some downward spiraling rails (about 2 meters high), into a group of bottles lined up like bowling pins. That sound would be the first cue the filament is depleted, but for extra security, you could like up some mirrors to reflect sunlight around and through the bottles. This way, the bottles breaking would scatter the sunlight, also providing a visual cue. To increase this, the bottles may also be coated in a reflective paint.
Then of course put a 360 cam and/or a Kinect in the room and hook it up to TensorFlow to analyze the spread and synthesizing an alarm sound with that data to be played on an app, signaled via MQTT through Adafruit IO (while continuously graphing particle size and count).
Like up should be line up, of course. Damn Facebook lingo. Which reminds me; have it auto-tweet, stream the bowling ball action to Facebook, and Instagram the biggest detected particle.
No, an Arduino!
An Arduino to controll a 555 which clocks another Arduino.
You forgot quite a lot of buzzwords: Arduino, AVR, ESP8266, ESP32, IoT, IFTTT, Blynk, Alexa, and many others.
The only buzzword you listed was IoT. All the others are products or services.
+1
Put an hook screw into the end of a handbell handle, hook bell over filament, when filament runs out, bell falls to floor making a clanging noise.
Nice! Failure mode “empty battery” avoided.
It only makes a noise once, at the instant it hits the ground. And it’s not very loud.
The string could unpin a gate on a tray of ball bearings that can then one by one hit a chime.
Hang it over a sleeping dog, and the dog will come and find you wherever you are in the house.
This is a very nice post.
1. It has many points.
Summary is categorized so that different facts don’t mix.
2. We learn from it.
From this post we learned that iterative design is good.
3. We learn about learning
Iterative design is only good when you learn from previous steps.
4. Results
We learned a lot from this post.
Other readers may not learn as much as I did due to varying mileage, but this post helped me to learn about iterative design and choices made during designing of Mr Screamer.
This post satisfied all requirements for a nice post.
Haven’t built something like this yet, not printing enough apparently. Cool to see the iteration on the design. I wouldn’t have thought the roller bat would cause sufficient friction on the filament.
I like the way you integrated the reed switch and magnet. A mercury switch would have been my first choice. Any reason that wasn’t used?
The drag was probably from the filament running through the two holes, it comes off and wants to stay curved where the design may have forced it through a straight path (admittedly haven’t looked at the geometry to see if I’m right). That would make it drag a bit.
A mercury switch would be a perfect fit, but I couldn’t find any – I guess they are harder to find nowadays. They’re still out there, but I decided it was better to stick to parts that could be found fairly easily online.
Tip switches can be sometimes be found in older vehicles. The hood light usually uses one.
Should just let the scrap yards properly recover them IMO though.
My old jeep had one… I noticed a funny light under my car after parking on a very steep slope in the mountains and sure enough the hood thought it was open. Glad I caught it before it drained too low.
Dumb Question.
Why does it look like a photon torpedo in red?
Because kid Spock.
^That.
Why not stick it to the spool and time how long it is between state change of horizontal to vertical.
If orientation doesn’t change for x seconds, scream head off. This way you detect jams too.
That would require a timer, and would also subtract x seconds from the time you have to get a new spool of filament ready to continue your print. Good point about detecting jams/stripped filament, though.
Humm probably there is a way to convert a COTS personal alarm (http://s.click.aliexpress.com/e/eaEUzvV ) with advertised 120dB for this purpose
What we really need is an alarm that alerts us about spam like your affiliate-links.
My father used to use this same trick on automated mig welders in the african mines, except it was a spanner and below it a bucket or steel sheet.when the mig spool ran out you put a new one. there was a automated alarm but that broke and this is africa so we “maka plan”, So for me I love the whole KISS ideal of it. don’t over complicate it.
Good job. I love how simple this is. However, for a couple more resistors you could add a voltage divider that could be used as an output pin to deliver a signal to the controller and have the printer also implement a software pause in case you’re not around to hear the buzz. Most printer firmwares can support this functionality with very little configuration.
If you’re going that far, put an idler with an encoder on the filament and let the micro pause if the filament is out or if it’s jamming excessively.
So how do you store it when not in use, without it screaming its fool head off?
On a key hook, I’d guess.
Yep, pretty much!
http://i.imgur.com/PgNDVdo.jpg?1
Good possibility. I thought about putting it into a (empty) liquor glass or other similar stand to keep it upright.
I just got one of these from Kickstarter, but they should be shipping from their website now also.
https://dyzedesign.com/shop/filament-detector/filament-sentinel/
It will actually pause the print when it runs out of filament rather than just making a loud noise.
you could mount the spool upon a weight sensor and send a text message when its getting low. since filament seems to be sold by weight commonly, seems like an elegant solution. would be pretty easy to adjuts for differences in weight of empty spools too (Zero weight = user-specified product weight minus measured weight)
much more complicated and more difficult to use (and more chance of malfunction).
Have you seen how a Tesla warns there is about to be an accident? Polite modest beep-beep.
So it’s funny that a filament running out would need 80dB.
Maybe make it wireless and carry a receiver?
I just want to say this is the best write-up I have seen on H-aday. Your thesis statement is short and descriptive and includes clearly defined objectives. You give good coverage of your iterations with clear demarcation of sections. And most importantly you have a visual element which complements each section. I read alot of white papers which means reading the first part then skipping ahead and trying to pick out the most important information. You are an artist, thank you.
Thank you for the kind words, I’m happy it was useful!
Love seeing projects like this!!!