Automotive Radar And The Doppler Effect

With more and more cars driving themselves, there is an increasing demand for precise environment aware sensors. From collision avoidance to smooth driving, environmental awareness is a must have for any self-driving cars. Enter automotive radar: cool, precise and relatively cheap. Thanks to a donated automotive radar module, [Shahriar] gifts us with a “tutorial, experiment and teardown.”

Before digging into the PCB, [Shahriar] explains the theory. With just enough math for the mathmagically inclined and not too much for the math adverse, [Shahriar] goes into the details of how automotive radar is different from normal stationary radar.

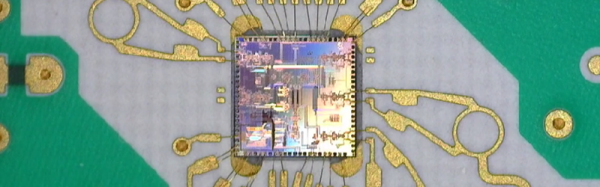
Only after a brief overview of the Doppler effect, [Shahriar] digs into the PCB which reveals three die-on-PCB ASICs responsible for generating and receiving 77GHz FMCW signals coupled to a 2D array of antennas. Moreover, [Shahriar] points out the several microwave components such as “rat-race couplers” and “branchline couplers.” Additionally, [Shahriar] shows off his cool PCB rulers from SV1AFN Design Lab that he uses as a reference for these microwave components. Finally, a physical embodiment of the Doppler effect radar is demonstrated with a pair of Vivaldi horn antennas and a copper sheet.

We really like how [Shahriar] structures his video: theory, followed by a teardown and then a physical experiment to drive his lesson home. If he didn’t already have a job, we’d say he might want to consider teaching. If the video after the break isn’t enough radar for the day, we’ve got you covered.

Continue reading “Automotive Radar And The Doppler Effect”

Solar Bulldozer Gets Dirty

As the threat of climate change looms, more and more industries are starting to electrify rather than using traditional fuel sources like gasoline and diesel. It almost all cases, the efficiency gains turn out to be environmentally and economically beneficial. Obviously we have seen more electric cars on the roads, but this trend extends far beyond automobiles to things like lawn equipment, bicycles, boats, and even airplanes. The latest in this trend of electrified machines comes to us from YouTube user [J Mantzel] who has built his own solar-powered bulldozer.

The fact that this bulldozer is completely solar-powered is only the tip of the iceberg, however. The even more impressive part is that this bulldozer was built completely from scratch. The solar panel on the roof charges a set of batteries that drive the motors, and even though the bulldozer is slow it’s incredibly strong for its small size. It’s also possible for it to operate on solar alone if it’s sunny enough, which almost eliminates the need for the batteries entirely. It’s also built out of stainless steel and aluminum, which makes it mostly rust-proof.

This is an impressive build that goes along well with [J Mantzel]’s other projects, most of which center around an off-grid lifestyle. If that’s up your alley, there is a lot of inspiration to be had from his various projects. Be sure to check out the video of his bulldozer below as well. You don’t have to build an off-grid bulldozer to get started in the world of living off-the-grid, though, and it’s easy to start small with just one solar panel and a truck.

Thanks to [Darko] for the tip!

Continue reading “Solar Bulldozer Gets Dirty”

Helix Display Brings Snake Into Three Dimensions

Any time anyone finds a cool way to display in 3D — is there an uncool way? — we’re on board. Instructables user [Gelstronic]’s method involves an array of spinning props to play the game Snake in 3D.

The helix display consists of twelve props, precisely spaced and angled using 3D-printed parts, each with twelve individually addressable LEDs. Four control groups of 36 LEDs are controlled by the P8XBlade2 propeller microcontroller, and the resultant 17280 voxels per rotation are plenty to produce an identifiable image.

In order to power the LEDs, [Gelstronic] used wireless charging coils normally used for cell phones, transferring 10 W of power to the helix array.  A brushless motor keeps things spinning, while an Arduino controls speed and position via an encoder. All the links to the code used are found on the project page, but we have the video of the display in action is after the break.

Continue reading “Helix Display Brings Snake Into Three Dimensions”

Robotic Arms Controlled By Your….. Feet?

The days of the third hand’s dominance of workshops the world over is soon coming to an end. For those moments when only a third hand is not enough, a fourth is there to save the day.

Dubbed MetaLimbs and developed by a team from the [Inami Hiyama Laboratory] at the University of Tokyo and the [Graduate School of Media Design] at Keio University, the device is designed to be worn while sitting — strapped to your back like a knapsack — but use while standing stationary is possible, if perhaps a little un-intuitive. Basic motion is controlled by the position of the leg — specifically, sensors attached to the foot and knee — and flexing one’s toes actuates the robotic hand’s fingers. There’s even some haptic feedback built-in to assist anyone who isn’t used to using their legs as arms.

The team touts the option of customizeable hands, though a soldering iron attachment may not be as precise as needed at this stage. Still, it would be nice to be able to chug your coffee without interrupting your work.

Continue reading “Robotic Arms Controlled By Your….. Feet?”

Hackaday Prize Entry: DIY LCD Based SLA 3D Printer

Resin-based SLA 3D printers are seen more and more nowadays but remain relatively uncommon. This Low Cost, Open Source, LCD based SLA 3D Printer design by [Dylan Reynolds] is a concept that aims to make DIY SLA 3D printing more accessible. The idea is to use hardware and manufacturing methods that are more readily available to hobbyists to create a reliable and consistent DIY platform.

[Dylan]’s goal isn’t really to compete with any of the hobbyist or prosumer options on the market; it’s more a test bed for himself and others, to show that a low-cost design that takes full advantage of modern hardware like the Raspberry Pi can be made. The result would be a hackable platform to let people more easily develop, experiment, or simply tamper with whatever part or parts they wish.

Improving Mister Screamer; An 80 Decibel Filament Alarm

I created a prototype 3D printer filament alarm that worked, but the process also brought some new problems and issues to the surface that I hadn’t foreseen when I first started. Today I’m going to dive further into the prototyping process to gain some insight on designing for a well-specified problem. What I came up with is an easy to build pendant that passively hangs from the filament and alerts you if anything about that changes.

I began with a need to know when my 3D printer was out of filament, so that I could drop whatever I was doing and insert a new spool of filament right up against the end of the previous spool. By doing this within four minutes of the filament running out, printing very large jobs could continue uninterrupted. The device I designed was called Mister Screamer.

Continue reading “Improving Mister Screamer; An 80 Decibel Filament Alarm”

Friday Hack Chat: 8-Bit Micros With Microchip

A few years ago, Microchip acquired Atmel for $3.56 Billion. There are plenty of manufacturers of 8-bit microcontrollers, but everyone makes 8051s, and the MSP430 isn’t as popular as it should be. Microchip’s acquisition of Atmel created what is probably the largest manufacturer of 8-bit micros, with a portfolio ranging from ATtinys smaller than a grain of rice to gigantic PICs.

This Friday, we’re hosting a Hack Chat with the Technical Marketing Engineer of 8-bitters at Microchip. If you love AVR, this is the guy to talk to. If you’re still rocking the vintage 1993 PICkit, this is the guy to talk to.

On the docket for this Hack Chat are some new PICs and some very interesting peripherals coming down the line. ADCC — A2D with computation — is on the table, along with configurable logic cells. This Hack Chat is also going to go over Microchip design tools like MP Lab Xpress.

Of course, these Hack Chats are a question and answer session for the community. We’re encouraging everyone to ask a few questions about what Microchip is doing. We’ve opened up a discussion guide for this Hack Chat. If you have a question, just add it to the list.

If you can’t make the Hack Chat, don’t worry. We’re going to have a transcript of the entire chat. That should be available here shortly after the chat concludes.

Here’s How To Take Part:

join-hack-chatOur Hack Chats are live community events on the Hackaday.io Hack Chat group messaging. This hack chat will take place at noon Pacific time on Friday, June 9th. Here’s a fancy time and date converter if you need timezone help.

Log into Hackaday.io, visit that page, and look for the ‘Join this Project’ Button. Once you’re part of the project, the button will change to ‘Team Messaging’, which takes you directly to the Hack Chat.

You don’t have to wait until Friday; join whenever you want and you can see what the community is talking about