A Complete Raspberry Pi Power Monitoring System

As the world has become more environmentally conscious, we’ve seen an uptick in projects that monitor or control home energy use. At a minimum one of these setups involves a microcontroller and some kind of clamp-on current sensor, but if you’re looking for resources to take things a bit farther, this Raspberry Pi energy monitoring system created by [David00] would be a great place to start.

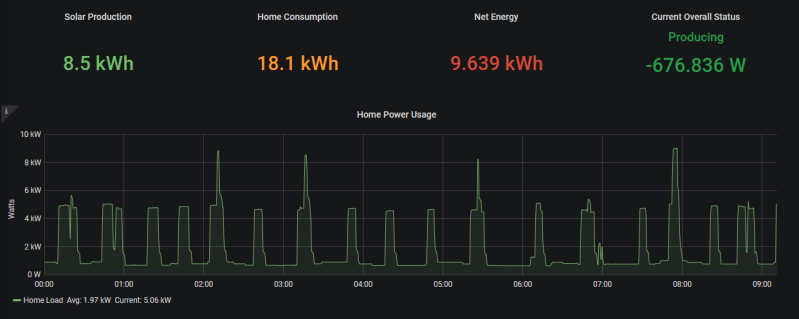
This project includes provides software and hardware to be used in conjunction with the Raspberry Pi to keep tabs on not just home energy consumption, but also production if your home has a solar array or other method of generating its own power. Data is pulled every 0.5 seconds from a MCP3008 ADC connected to up to five six current sensors to provide real-time utilization statistics, and visualized with Grafana so you can see all of the information at a glance.

While [David00] has already done the community a great service by releasing the hardware and software under an open source license, he’s also produced some absolutely phenomenal documentation for the project that’s really a valuable resource for anyone who wants to roll their own monitoring system. He’s even offering hardware kits for anyone who’s more interested in experimenting with the software side of things than building the PCB.

Home energy monitoring projects are certainly nothing new, but the incredible advances we’ve seen in the type of hardware and software available for DIY projects over the last decade has really pushed the state-of-the-art forward. With so many fantastic resources available now, the only thing standing between you and your own home energy monitoring dashboard is desire and a long weekend.

Monitoring blinking LED for home power usage

Monitoring Power By Counting Blinks

What do you do when you want to add a new feature to some electronics but you can’t or don’t want to tear into the guts? You look for something external with which you can interface. We like these hacks because they take some thinking outside the box, literally and figuratively, and often involve an Aha! moment.

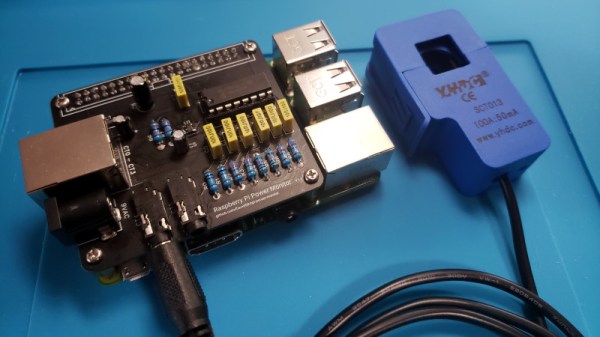
[Simon Aubury’s] big household load was electric heating and his ancient heaters didn’t provide any way to monitor their usage. His power meters weren’t smart meters and he didn’t want to open them up. But the power meters did have an external LED which blinked each time 1 Wh was consumed. Aha! He could monitor the blinks.

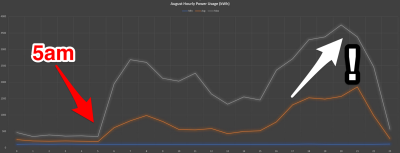
Home power usage graph
Maximum is white, average is orange, and minimum is blue.

Doing so was simple enough. Just point photoresistors at the two meter’s LEDs and connect them and capacitors to a Raspberry Pi’s GPIO pins. Every time a pulse is detected, his Python code increments the LED’s counter and every fifteen minutes he writes the counters to an SQL database. Analysing his data he saw that nothing much happens before 5 AM and that the lowest daytime usage is around noon. The maximum recorded value was due to a heater accidentally being left on and the minimum is due to a mini holiday. Pretty good info given that all he had to go on was a blinking light.

Where else are there LED indicators which you can tap into? Here’s an only slightly more invasive usage where a washing machine’s “end of cycle” LED  was removed and the power going to it was rerouted to an Arduino for remote monitoring.

Smart AC Monitoring: Without The $500 Price Tag

[Tisham Dhar] has been interested in monitoring AC power and previously built a breakout board for the ADE7763. He wanted to find something cheaper and more modern. The ATM90E26 fit the bill. It can communicate via a UART or SPI, and has multiple metering modes. The problem? The evaluation module from Atmel costs about $500 (and for [Dhar] $800 Australian), although the part itself can be had for under a buck in bulk. (Atmel even sent him three samples for free.)

[Dhar] put the low voltage components from the reference design on a PCB and pocketed the difference in cost. So far, he’s tested the setup with a Teensy and low voltage measurements only. He plans to do a full test soon.

The test setup uses SPI mode 3 to talk to the processor. You can find the relevant code on GitHub.

We see a lot of energy monitoring projects go by. Of course, working on household wiring current can be dangerous, so be careful out there.