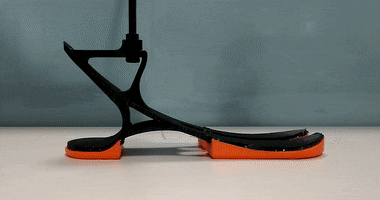
We’ve been 3D-printing parts for self-replicating machines before, but we’ve been working on the wrong machines. Software and robotics engineer [David Sanchez Falero] is about to set it right with his Hackaday Prize entry, a 3D-printable, open source, robotic prosthetic leg for humans.
[David] could not find a suitable, 3D-printable and customizable prosthetic leg out there, and given the high price of commercial ones he started his own prosthesis project named Drakkar. The “bones” of his design are made of M8 steel threaded rods, which help to keep the cost low, but are also highly available all over the world. The knee is actively bent by a DC-motor and, according to the source code, a potentiometer reads back the position of the knee to a PID loop.
While working on his first prototype, [David] quickly found that replicating the shape and complex mechanics of a human foot would be too fragile when replicated from 3D-printed parts. Instead, he looked at how goat hooves managed to adapt to uneven terrain with only two larger toes. All results and learnings then went into a second version, which now also adapts to the user’s height. The design, which has been done entirely in FreeCAD, indeed looks promising and might one day compete with the high-priced commercial prosthesis.
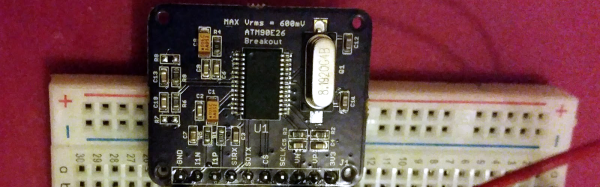
[Tisham Dhar] has been interested in monitoring AC power and previously built a breakout board for the ADE7763. He wanted to find something cheaper and more modern. The ATM90E26 fit the bill. It can communicate via a UART or SPI, and has multiple metering modes. The problem? The evaluation module from Atmel costs about $500 (and for [Dhar] $800 Australian), although the part itself can be had for under a buck in bulk. (Atmel even sent him three samples for free.)
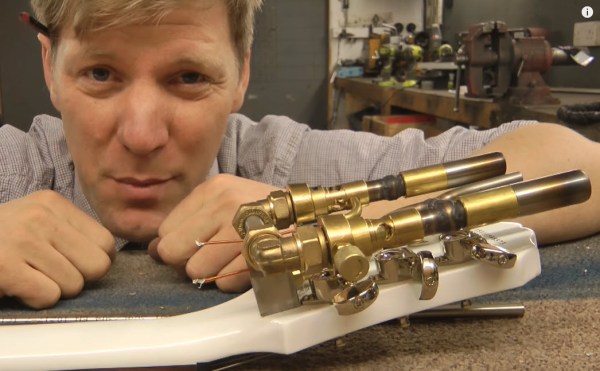
Everyone’s favorite safety-tie-wearing-eccentric-inventor, [Colin Furze], is back at it again, this time making a flamethrower guitar — sponsored by Intel!?
As an ex-plumber, [Furze] is a master fabricator, and he’s brought many amazing mechanical inventions to life. In this video, perhaps for the first time, he’s integrated an Intel Curie Arduino in it, for a bit more fine control.
He’s hacked apart a couple of propane blow-torches, milled and lathed his own fittings and manifolds, and even TIG welded together a pressure vessel for the fuel — kids, do not try this at home!
The two blowtorches act as pilot lights for a third gas supply line to make the big firing explosion — the plan for the Arduino? To blast off the fire at certain parts during the song, add timing, or even just set up some cool patterns.
Did we mention he’s also got his own custom propane fueled guitar amp to go with it??
Everyone loves learning a new programming language, right? Well, even if you don’t like it, you should do it anyway, because thinking about problems from different perspectives is great for the imagination.
Juniper is a functional reactive programming language for the Arduino platform. What that means is that you’ll be writing your code using anonymous functions, map/fold operations, recursion, and signals. It’s like taking the event-driven style that you should be programming in one step further; you write a=b+3 and when b changes, the compiler takes care of changing a automatically for you. (That’s the “reactive” part.)
If you’re used to the first-do-this-then-do-that style of Arduino (and most C/C++) programming, this is going to be mind expanding. But we do notice that a lot of microcontroller code looks for changes in the environment, and then acts (more or less asynchronously) on that data. At that level of abstraction, something like Juniper looks like a good fit.
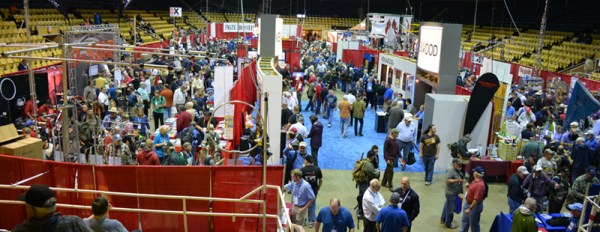
This has got to be the ultimate name-dropping post. I’m tempted just to make a list. Or perhaps it should be like Jeopardy, I’ll list the products or companies and you guess who was there. I am of course talking about the Hackaday Bay Area Maker Faire Meetup last Saturday which started off as a steady stream of Faire-weary exhibitors and suddenly the place was packed to the gills. Luckily we have some photographic evidence of the awesome.
Peter Jansen seen on the right
If you do something three times you can start saying “always”, right? We always host a meetup on the Saturday night of Bay Area Maker Faire at O’Neill’s Irish Pub in San Mateo. It’s our kind of atmosphere: just enough room to set up hacks you tote along with you, they have Guinness, Lagunitas, and a few in-betweens on tap, you can bring in food from the various eateries that border the bar, and the staff is beyond awesome.
Despite my threat to call-out everyone by name, I’ll keep it to a minimum. It was most excellent meeting Peter Jansen who created the Open Source Science Tricorder, fourth place winner of the Hackaday Prize in 2014. I was glad to see Windell Oskay of Evil Mad Scientist Laboratories there since both Windell and Peter are Ph.D. Physicists. Of course it ended up they are able to converse with regular people too.
Eric Schlaepfer (left) and Caleb Kraft (right) with Monster 6502
Amp Hour Elite: Karl Bowers, Tony Long, Alan Yates, Jeff Keyzer
In the back Erick Schlaepfer was showing off his MOnSter6502 — check out the interview I did with him about it the day before. Astute readers will recognize who he’s showing that to: Hackaday Editor Emeritus Caleb Kraft stopped by on his way to the MAKE staff party. Somehow, although we shared a beer, neither of us thought of taking a picture together — perpetuating the mythos that Caleb is the Tyler Durden to my Tyler Durden. Incidentally, if anyone knows Chuck Palahniuk (or if he reads Hackaday which would be killer) we’d love to have him speak at SuperCon. Email me.
Also on the ‘didn’t get pictures of’ list is Anouk Wipprecht who stopped by later in the evening. I love her work and it was really great to meet her. Oops, and I’m not supposed to be dropping names. Paul Stoffregen (talking to Gerrit Coetzee and me in the bottom left corner of the image at the top of this post). Okay, enough of that.
There seemed to be a critical mass of Amp Hour elites on the scene. I grabbed this image from Chris Gammell’s Twitter. He snapped a still of Tony Long, Alan Yates, and Jeff Keyzer who have all been on the show (or hosted it). Karl Bowers, host of The Spark Gap podcast, photobombs on the left.
This barely brushes the tip of the iceberg. But I figure you get tired of hearing me prattle on. If you attended I’d love to see the photos you snapped, please link them in the comments below. And of course, if you do still want to play name-that-geek-celeb the comments are the place for it.
Thanks to Rich Hogben for taking all of these great photos and posting them up on Hackaday.io. I’d also like to thank Supplyframe for picking up everyone’s first round of drinks that night. Maker Faire has ended, but this evening will always have a special place in my heart. We look forward to seeing everyone there next year!
The modern office has become a sea of LCD monitors. It’s hard to believe that only a few years ago we were sitting behind Cathode Ray Tubes (CRTs). People have already forgotten the heat, the dust, and the lovely high frequency squeal from their flyback transformers.
Image by Søren Peo Pedersen via wikipedia
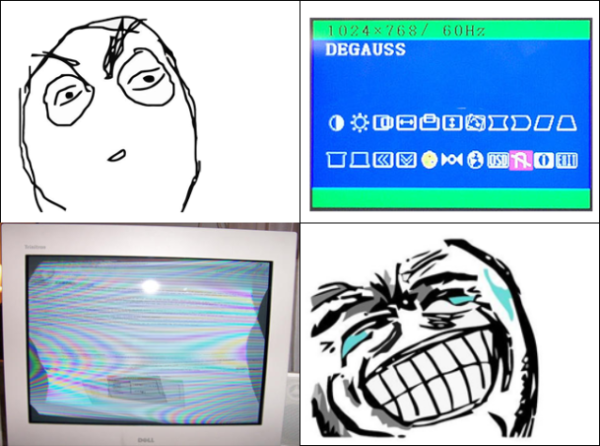
There was one feature of those old monitors which seems to be poorly understood. The lowly degauss button. On some monitors it was a physical button. On others, it was a magnet icon on the On Screen Display (OSD). Pressing it rewarded the user with around 5 seconds of a wavy display accompanied by a loud hum.
But what exactly did this button do? It seems that many never knew the purpose of that silly little button, beyond the light-and-sound show. The truth is that degaussing is rather important. Not only to CRTs, but in many other electronic and industrial applications.
Of Shadow Masks and Aperture Grilles
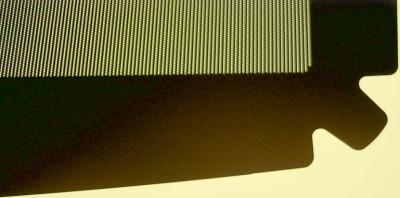
Close up of a shadow mask by Rauenstein via Wikipedia
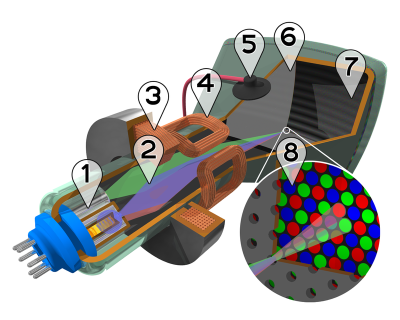
A CRT has quite a few components. There are three electron guns as well as steering and convergence coils at the rear (yoke) of the tube. The front of the tube has a phosphor-coated glass plate which forms the screen. Just behind that glass is a metal grid called the shadow mask. If you had enough money for a Sony screen, the shadow mask was replaced by the famous Trinitron aperture grille, a fine mesh of wires which performed a similar function. The shadow mask or aperture grille’s job is to ensure that the right beams of electrons hit the red, green, or blue phosphor coatings on the front of the screen.
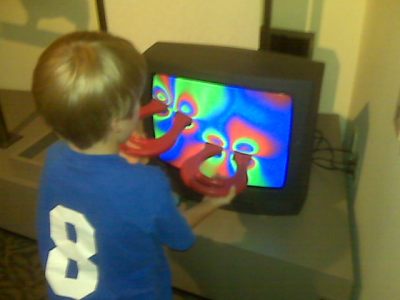
This all required a very precise alignment. Any stray magnetic fields imprinted on the mask would cause the electron beams to bend as they flew through the tube. Too strong a magnetic field, and your TV or monitor would start showing rainbows like something out of a 1960’s acid trip movie. Even the Earth’s own magnetic field could become imprinted on the shadow mask. Simply turning a TV from North to East could cause problems. The official term for it was “Color Purity”.
These issues were well known from the early days of color TV sets. To combat this, manufacturers added a degaussing coil to their sets. A coil of wire wrapped around the front of the tube, just behind the bezel of the set. When the set was powered on, the coil would be fed with mains voltage. This is the well-known ‘fwoomp and buzz’ those old TV sets and monitors would make when you first turned them on. The 50 Hz or 60 Hz AC would create a strong moving magnetic field. This field would effectively erase the imprinted magnetic fields on the shadow mask or aperture grille.
Running high current through the thin degaussing coil would quickly lead to a fire. Sets avoided this by using a Positive Temperature Coefficient (PTC) thermistor in-line with the coil. The current itself (or a small heating coil) would heat up the PTC, causing resistance to increase, and current through the coil to drop. After about 5 seconds, the coil was completely shut down, and the screen was (hopefully) degaussed.
As time went on monitors became embedded systems. The PTC devices were replaced by transistors controlled by the monitor’s main microcontroller. Monitor manufacturers knew that their sets were higher resolution than the average TV set, and thus even more sensitive to magnetic fields. Users are also more likely to move a monitor while using it. This lead the manufacturers to add a degauss button to the front of their sets. A push of the button would energize the coil for a few seconds under software control. Some monitors would also limit the number of times a user could push the button, ensuring the coil didn’t get too hot.
Holding a magnet near the front of a black and white (or a monochrome ‘green screen’) CRT created visible distortion, but no lasting damage. Mid-century hackers who tried the same trick with their first color TV quickly learned that the rainbow effect stayed long after the magnet was moved away. In extreme cases like these, the internal degaussing coil wouldn’t be strong enough to clear the shadow mask.
Commercial degaussing coil
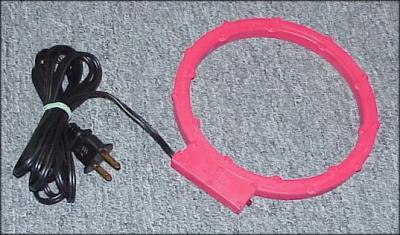
When all else failed, a handheld degaussing coil or wand could be used. Literally waving the magic wand in front of the screen would usually clear things up. It was of course possible to permanently damage the shadow mask. Back in 2007, I was working for a radar company which had been slow to switch to LCD monitors. Being a radar shop, we had a few strong magnetron magnets lying around. One of these magnets was passed around among the engineers. Leaving the magnet under your monitor overnight would guarantee rainbows in the morning, and a shiny new LCD within a few days.
Queen Mary, showing her degaussing coil
CRTs aren’t the only devices which use degaussing coils. The term was originally coined in 1945 by Charles F. Goodeve of the Royal Canadian Naval Volunteer Reserve (RCNVR). German mines were capable of detecting the magnetic fields in a naval ship’s steel hull. Coils were used to mask this field. The Queen Mary is one of the more famous ships fitted with a degaussing coil to avoid the deadly mines.
Even mechanical wristwatches can benefit from a bit of degaussing. A watch which has been magnetized will typically run fast. Typically this is due to the steel balance spring becoming a weak magnet. The coils of the spring stick together as the balance wheel winds and unwinds each second. A degaussing coil (or in this case, more properly a demagnetizer) can quickly eliminate the problem.
A story on degaussing wouldn’t be complete without mentioning magnetic media. Handheld or tabletop degaussing coils can be used to bulk erase floppy disks, magnetic tape, even hard disks. One has to wonder if the degaussing coils in monitors were responsible for floppy disks becoming corrupted back in the old days.
So there you have it. The magic degaussing button demystified!
Hamvention was last weekend in Dayton, Ohio. Last weekend was also the Bay Area Maker Faire, and if you want tens of thousands of people who actually make stuff there’s really only one place to be. Bonus: you can also check out the US Air Force Museum at Wright-Patterson AFB. The ‘Space’ hangar was closed, so that’ll be another trip next year.
The biggest draw for Hamvention is the swap meet. Every year, thousands of cars pull up, set up a few tables and tents, and hock their wares. Everything from radios from the 1920s to computers from the 1980s can be found at the swap meet. This post is not about the swap meet; I still have several hundred pictures to go through, organize, label, and upload. Instead, this post is about the booths of Hamvention. Everything imaginable could be found at Hamvention, from the usual ARRL folks, to the preppers selling expired MREs, and even a few heros of Open Hardware.

 While working on his first prototype, [David] quickly found that replicating the shape and complex mechanics of a human foot would be too fragile when replicated from 3D-printed parts. Instead, he looked at how goat hooves managed to adapt to uneven terrain with only two larger toes. All results and learnings then went into a second version, which now also adapts to the user’s height. The design, which has been done entirely in FreeCAD, indeed looks promising and might one day compete with the high-priced commercial prosthesis.


 These issues were well known from the early days of color TV sets. To combat this, manufacturers added a degaussing coil to their sets. A coil of wire wrapped around the front of the tube, just behind the bezel of the set. When the set was powered on, the coil would be fed with mains voltage. This is the well-known ‘fwoomp and buzz’ those old TV sets and monitors would make when you first turned them on. The 50 Hz or 60 Hz AC would create a strong moving magnetic field. This field would effectively erase the imprinted magnetic fields on the shadow mask or aperture grille.