Photoresistors Provide Air Gap Data Transfer, Slowly

One of the simplest ways of keeping a computer system secure is by using an air gap — that is, never actually connecting the system to the network. This can often include other peripherals like USB drives and other removable storage as well, so getting information to and from secure (or compromised) systems behind air gaps can often present a challenge. But assuming you have local access to the computer and your parts bin handy, these optical solutions from [Nikolay] can allow  data transfer to or from such off-line computers.

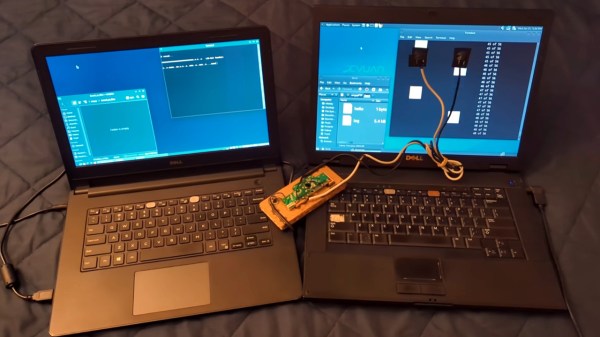
[Nikolay]’s specific use case for this project is to transfer small amounts of information to or from computers that may be compromised in some way, or computers that might otherwise be dangerous to connect to other equipment. There’s actually several methods described in the project, the first involves temporarily attaching a photoresistor to the computer’s screen which has been wired into the remains of a USB keyboard. A script running on the compromised machine translates data into a series of white and black squares. The sensors can detect these patterns much like playing Duck Hunt on an old CRT television and transmit the data across the air gap with reasonable certainty nothing harmful crossed with it.

Continue reading “Photoresistors Provide Air Gap Data Transfer, Slowly”

Rotary Time Tracker Puts A New Spin On Productivity

Like many of us, [quincy] feels the distracting pull of non-work programs on what has become a mixed-use computer. So what’s the answer to the puzzle of work-life balance? We’re not sure, but time management and keeping track of tasks will probably get you most of the way there. The only problem is that keeping track of these things is boring and tedious and way too easy to forget, even for the fun tasks.

Similar commercial gadgets exist to serve this time-tracking purpose, but [quincy] wanted something much cooler that would work the same way: turn the indicator to the current task, and the status gets recorded on a computer. Rather than some smart polygon with informative stickers on each face à la the Timeflip2, [quincy] built a rotary task manager that serves the same purpose, but does it with magnets.

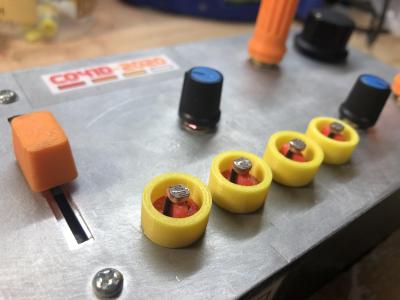
Our favorite part aside from the magnets has to be the clever binary encoding work. [quincy] is using three photoresistors and a single green LED to create a 3D-printed gray encoder that sidesteps the need to ever flip two bits at once. An Arduino takes care of reading the 3-bit code and converting it back into a decimal. There are more updates to come, including the main .ino file, but you can start printing the pieces while you wait.

If you have trouble staying on task, maybe you need a Pomodoro timer. We’ve seen a few over the years, ranging from the minimal to the sculptural.

Co41D 2020 MIDI Theremin Sounds Pretty Sick

As the pandemic rages on, so does the desire to spend the idle hours tinkering. [knaylor1] spent the second UK lockdown making a sweet Theremin-inspired noise machine with a low parts count that looks like a ton of fun.

It works like this: either shine some light on the photocells, cover them up, or find some middle ground between the two. No matter what you do, you’re going to get cool sounds out of this thing.

The photocells behave like potentiometers that are set up in a voltage divider. An Arduino UNO takes readings in from the photocells, does some MIDI math, and sends the serial data to a program called Hairless MIDI, which in turn sends it to Ableton live.

[knaylor1] is using a plugin called TAL Noisemaker on top of that to produce the dulcet acid house tones that you can hear in the video after the break.

If you’ve never played with light-dependent resistors before, do yourself a favor and spend a little bit of that Christmas cash on a variety pack of these things. You don’t even need an Arduino to make noise, you can use them as the pots in an Atari Punk console or make farty square waves with a hex inverting oscillator chip like the CD40106. Our own [Elliot Williams] once devoted an entire column to making chiptunes.

Continue reading “Co41D 2020 MIDI Theremin Sounds Pretty Sick”

Bolt-On Clog Detection For Your 3D Printer

Desktop 3D printing technology has improved by leaps and bounds over the last few years, but they can still be finicky beasts. Part of this is because the consumer-level machines generally don’t offer much in the way of instrumentation. If the filament runs out or the hotend clogs up and stops extruding, the vast majority of printers will keep humming along with nothing to show for it.

Looking to prevent the heartache of a half-finished print, [Elite Worm] has been working on a very clever filament detector that can be retrofitted to your 3D printer with a minimum of fuss. The design, at least in its current form, doesn’t actually interface with the printer beyond latching onto the part cooling fan as a convenient source of DC power. Filament simply passes through it on the way to the extruder, and should it stop moving while the fan is still running (indicating that the machine should be printing), it will sound the alarm.

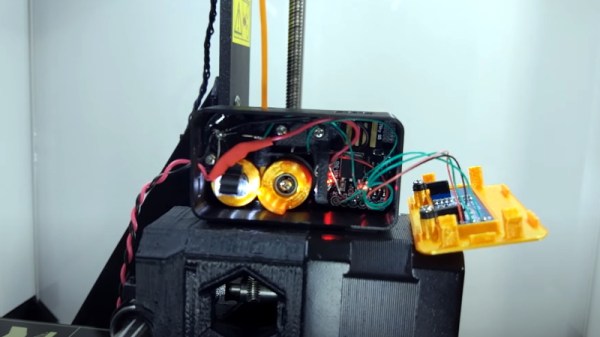
Inside the handy device is a Digispark ATtiny85 microcontroller, a 128 x 32  I2C OLED display, a buzzer, an LED, and a photoresistor. An ingenious 3D printed mechanism grabs the filament on its way through to the extruder, and uses this movement to alternately block and unblock the path between the LED and photoresistor. If the microcontroller doesn’t see the telltale pulse after a few minutes, it knows that something has gone wrong.

In the video after the break, [Elite Worm] fits the device to his Prusa i3 MK2, but it should work on essentially any 3D printer if you can find a convenient place to mount it. Keep a close eye out during the video for our favorite part of the whole build, using the neck of a latex party balloon to add a little traction to the wheels of the filament sensor. Brilliant.

Incidentally, Prusa tried to tackle jam detection optically on the i3 MK3 but ended up deleting the feature on the subsequent MK3S since the system proved unreliable with some filaments. The official line is that jams are so infrequent with high-quality filament that the printer doesn’t need it, but it does seem like an odd omission when even the cheapest paper printer on the market still beeps at you when things have run afoul.

Continue reading “Bolt-On Clog Detection For Your 3D Printer”

Light Emitting Logic Gates Built From Scratch

What’s the weirdest computer you can think of? This one’s weirder.

[Dr. Cockroach] figured out a way to create an inverting NOT gate from just one LED and two resistors (one being a photo-resistor). The Dr. has since built AND, NAND, OR, NOR, XOR and XNOR gates, as well as a buffer, incorporating light into every logic gate.

Traditional inverters – NOT gates – are already made with diodes (typically not light-emitting), resistors (typically not light-dependent), and bipolar transistors. The challenge was to reduce the number of transistors. The schematic from the very first test shows the slight modifications [Dr. Cockroach] made to incorporate light into the logic gate using a 910 Ohm, output LED, and an LED and LDR in parallel.

The output is initially 4.5V for logic 1 and 1.5V for logic 0. Adding two 1N914 diodes and an AND gate ahead of the inverter create a two-input NAND gate. With the two diodes reversed and a 910 Ohm resistor removed, a NOR gate is created.

The next step was to build a S-R latch using the NAND gates and inverters, which holds some basic memory. From there, with some size reductions, a Master-Slave J-K Flip Flop, similarly using NAND gates and inverters, can be built. The current state of the project is a working sequencer and counter. You can even see a smooth sine wave propagating through the LED chaser, which is typically built with ICs or transistors but in this case is built simply with LEDs, LDRs, resistors, and capacitors.

The upcoming plan is to use the gates to build a processor that only uses diodes, resistors, and capacitors. While it’s probably not going to be nearly as fast as any processors we have today, it should be interesting (and educational!) to be able to visually track the flow of data from one logic gate over to the next. Continue reading “Light Emitting Logic Gates Built From Scratch”

DIY Vactrols Give MIDI-Controlled Video Distortion

It’s one thing to assemble your own circuits from scratch using off the shelf components. It’s quite another to build the components first, and then build the circuit.

That’s the path [Joris Wegner] took with this video distortion effects box, dubbed PHOSPHOR. One might wonder why you’d want a box that makes a video stream look like playback from a 1980s VHS player with tracking problems, but then again, audio distortion for artistic effect is a thing, so why not video? PHOSPHOR is a USB MIDI device, and therein lies the need for custom components. [Joris] had a tough time finding resistive optoisolators, commonly known as Vactrols and which are used to control the distortion effects. He needed something with a wide dynamic range, so he paired up a bright white LED and a cadmium sulfide photoresistor inside a piece of heat shrink tubing. A total of 20 Vactrols were fabricated and installed on a PCB with one of the coolest silkscreens we’ve ever seen, along with the Sparkfun Pro Micro that takes care of MIDI chores. Now, distortions of the video can be saved as presets and played back in sync with music for artistic effects.

This isn’t the first time Vactrols have made an appearance here, of course. We saw them a while back with this Arduinofied electric guitar, and more recently with a triple-555 timer synth.

Continue reading “DIY Vactrols Give MIDI-Controlled Video Distortion”

Monitoring blinking LED for home power usage

Monitoring Power By Counting Blinks

What do you do when you want to add a new feature to some electronics but you can’t or don’t want to tear into the guts? You look for something external with which you can interface. We like these hacks because they take some thinking outside the box, literally and figuratively, and often involve an Aha! moment.

[Simon Aubury’s] big household load was electric heating and his ancient heaters didn’t provide any way to monitor their usage. His power meters weren’t smart meters and he didn’t want to open them up. But the power meters did have an external LED which blinked each time 1 Wh was consumed. Aha! He could monitor the blinks.

Home power usage graph
Maximum is white, average is orange, and minimum is blue.

Doing so was simple enough. Just point photoresistors at the two meter’s LEDs and connect them and capacitors to a Raspberry Pi’s GPIO pins. Every time a pulse is detected, his Python code increments the LED’s counter and every fifteen minutes he writes the counters to an SQL database. Analysing his data he saw that nothing much happens before 5 AM and that the lowest daytime usage is around noon. The maximum recorded value was due to a heater accidentally being left on and the minimum is due to a mini holiday. Pretty good info given that all he had to go on was a blinking light.

Where else are there LED indicators which you can tap into? Here’s an only slightly more invasive usage where a washing machine’s “end of cycle” LED  was removed and the power going to it was rerouted to an Arduino for remote monitoring.