It’s been a while since we’ve had a fresh How-To on the Hack-A-Day, and frankly we’ve missed them. To get things rolling, [Eliot] and I wanted to build a good knowledge base to help you hack your own stuff. I know that soldering won’t be new to many of our readers, but everyone has to start sometime. Our hope is simple: that this new series of How-To’s will help inspire new and experienced hackers alike.
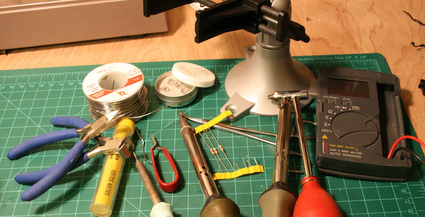
Having the right tools and workspace are key to successful soldering. The actual technique is pretty simple. We will cover all the basic tools you need, the key to good soldering, and how to undo your mistakes or harvest components from old hardware.
The first thing you’ll need is a decent soldering iron. Weller makes a decent product, but RadioShack’s are dirt cheap if you’re in a hurry. My favorite iron was a temperature controlled Tenma with LED temp display (sadly lost from a crappy storage unit along with my oscilloscope).
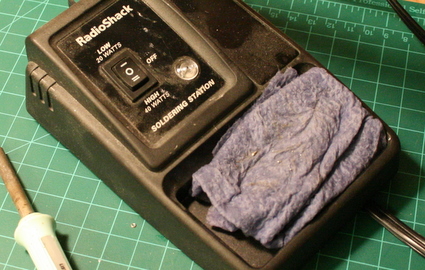
Most soldering stations come with a sponge; they get lost and they tend to hold onto bits of solder. I actually prefer to use a paper towel instead. Either way, wet it down and give it a squeeze so it’s not sopping wet. If it dries out, it’ll burn when you wipe your iron on it.
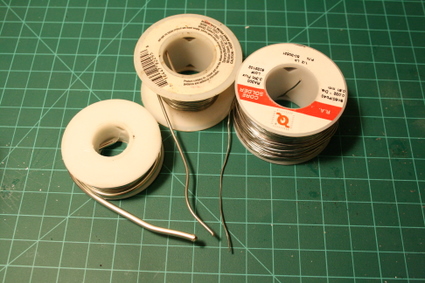
Buying the right kind of solder is just as important. It comes in various thicknesses, metal alloys, and core types. I won’t get very deep into the alloys. Generally, you want 60/40 (60% tin, 40% lead). Most modern electronics are lead free, but for hobby work lead is fine. Just wash your hands when you’re done! The solder produced for plumbing work is usually very thick (left hand side) and has a solid metal core (or worse: acid core). For electronics work, you’ll definitely need rosin core. The rosin acts as flux for the solder, allowing it to flow onto and attach to the metal. You can certainly use liquid flux/rosin, but it’s usually not easy to find locally. For thickness, I always buy the thinnest rosin core I can find. To sum up: you want thin, rosin core, 60/40 solder.
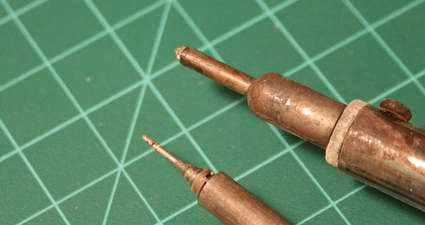
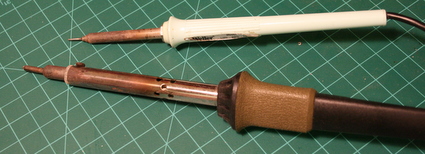
Not all iron tips are created equal. For fine work, I always reach for my 15 watt Weller pencil iron. It has the smallest tip I could find, and I ground an even finer point on the tip with my rotary tool. The bigger iron is an inexpensive RadioShack station that I keep in my office to handle favors for coworkers.
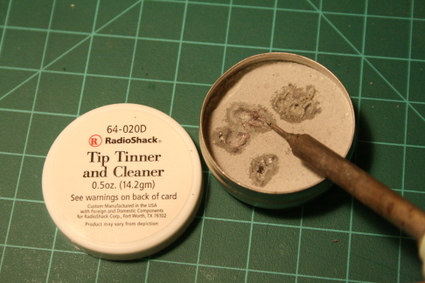
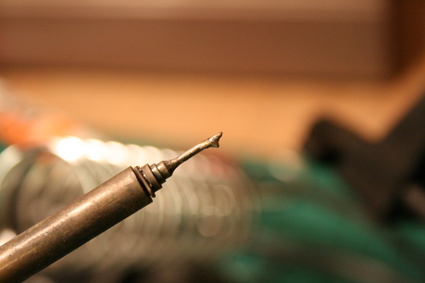
Every so often, the tip of a soldering iron needs a little maintenance. If the end of the iron isn’t tinned, as in bright and shiny when you wipe it down, you’ll have a hard time getting solder to melt. Think of this stuff as a sort of pumice stone for your iron. Heat the iron up and rub the tip in the cleaner. The cleaner will melt a bit and your soldering iron should work better than ever.
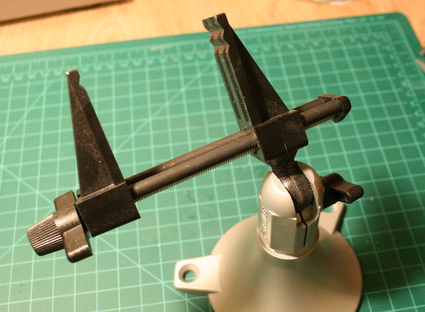
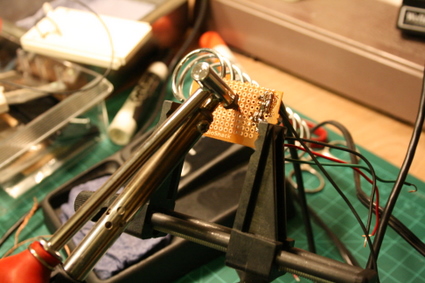
Securely holding the work piece is important, but your hands will be busy with the iron and solder. My current favorite tool is this Panavise Jr. which runs about $25. Props to Ladyada for unknowingly turning me onto Panavise products. If you need something cheaper, you can score a set of helping hands – it’s set of alligator clips connected to a weighted base. They work great and I still use them for smaller soldering projects.
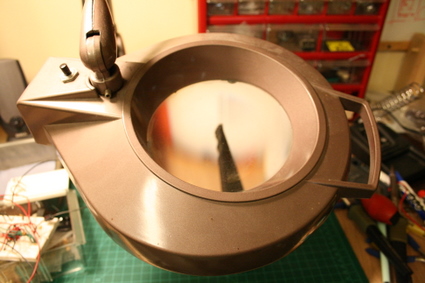
Some projects require extra fine attention to detail. A giant magnifying glass lamp comes in handy when visually inspecting for shorts and dealing with surface mount problems (I inherited this one one from my grandmother). You’ll be fine without one, but they’re great when you need to work on really small components or when your eyes are getting tired.
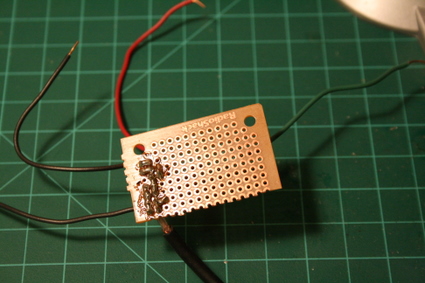
For one-off projects, prototyping boards from RadioShack are handy. They’re cheap, easy to get, and making a connection is as simple as bridging your solder across the copper pads.
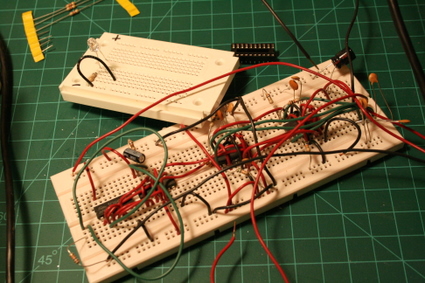
Before investing your time soldering parts together, it’s a good idea to prototype your circuit. Breadboards like these are great for preventing frustration later on. When I tried to buy my first one, I was about 10 years old. Nobody knew what the hell I was talking about and the local RadioShack apparently didn’t keep them in stock. People at RadioShack kept trying to sell me kitchen cutting boards. After about a year of wondering if [Forrest Mims] was insane, I finally visited another RadioShack that actually had them.
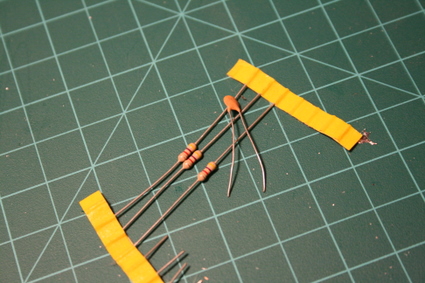
Don’t bake your bits. Passive components like resistors or small ceramic capacitors don’t usually suffer any problems from being heated up, but you should still pay attention to how long you’ve been cooking them with your soldering iron. If you’re having problems getting a solder joint just right, let the parts rest for a few minutes so they have a chance to cool off between soldering rounds.
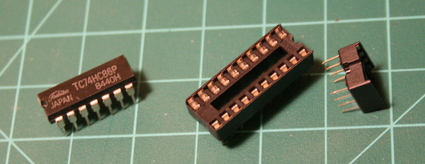
Integrated circuits like this logic chip are usually far more sensitive to heat and static than passive components. Sockets are cheap insurance against blowing a chip.
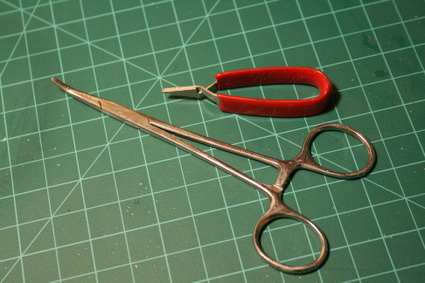
RadioShack sells the small red handled clip as a heat sink. It’s okay, but a generic hemostat like the one above works and holds on even better. They’re also great for saving your finger tips from burns by holding wires in place while you solder them.

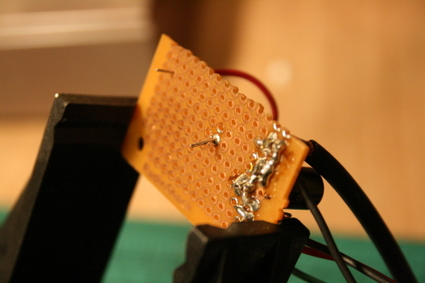
To successfully solder a component, don’t melt the solder on the iron. Put the iron against the copper on the board (solder pad) and the component you want to attach. Give the iron a moment to heat up both of them. Then melt the solder on the component and, if needed the copper pad.
Do not melt the solder on the tip of the iron. Sometimes it’s necessary to melt a small amount on the iron to facilitate heat transfer, but to achieve a good connection, you want the solder to melt and flow onto the component leads.

Heat up the component with the iron just before applying solder!
Once the joint is good, the soldering iron can be used to remove small amou
nts of excess solder from the joint.

Wipe the solder and burn rosin off by pulling the tip across your wet sponge or paper towel.
The joint should be good if the solder flowed onto both the copper pad and the wire lead of the component.
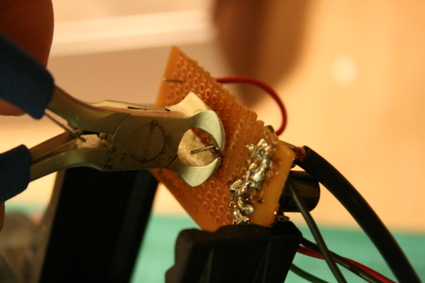
Now you’ll need to trim down the excess wire lead of the component. If you use diagonal cutters, the piece you cut off will probably fly through the air. These flat cutters are my favorite: the metal wire stays still and the resulting edge isn’t nearly as sharp.
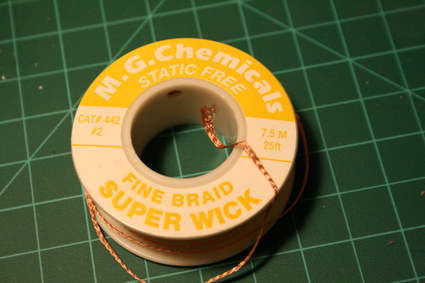
Nobody’s perfect. Sometimes we need to remove a bad component or undo a mistake. Desoldering braid works sort of like a sponge for excess solder.
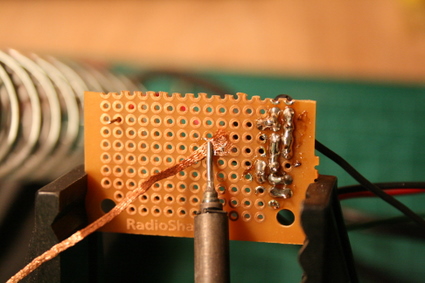
To desolder something, just place the braid over the target and apply your soldering iron over the top. The heat should transfer through the braid and the melted solder will flow onto the the copper like oil though a wick. For larger amounts of solder, I normally pull out my bigger iron. For small amounts, even the pencil iron does the trick.
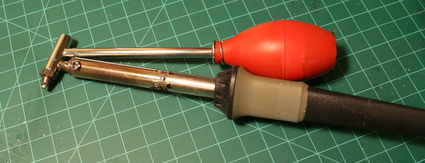
For larger desoldering jobs, like recovering components, a desoldering iron works wonders. The hotter the better, so let it warm up for a while before using it.
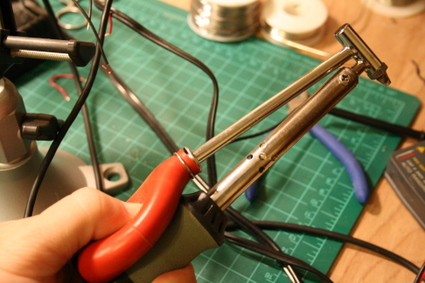
Compress the bulb with your thumb before you touch the board with the iron.
Once it’s in position, give it a moment the heat the solder and release the bulb. The bulb with suck up the solder through the hollow tip. Larger components might take a few hits, but smaller ones usually only take a single pull.

We’ve covered all the basics: the tools, soldering and desoldering. If you’re looking for a good starter project, I highly suggest taking a shot at making your own headphone amplifier. I built this one from RadioShack parts (I had some high end opamps in my parts bin). It’s a rewarding, low cost project. If you want an even more illustrated guide, check out these basic videos from NASA or even this collection of videos from Solder.net.


If you can’t get something decent to hold the PCB / things keep dropping out when you’re trying to solder them in place I recommend using blue tack to hold the components in place.
Just put the component in the board and form the blue tack over it so that it sticks it in place.
It wont usually melt enough to cause problems unless you really overheat the components.
If it does melt just use the rest of the wad to pull the rest off.
Nice to see with all the high end stuff you havent forgotten about the noobies, nice work!
One other thing to point out is that it is cheaper to buy a really good iron than to buy a bunch of crappy ones… but you need practice, and cheap irons are cheaper to replace than expensive irons if you break them.
Catch-22, but you get my idea.
Excellent write-up! It’s always nice to see these, even when you have some experience soldering.
The one thing I would say you left off would be the typical wattage iron you would want to use (since I’m honestly not sure). Right now my iron is a crappy one from Radio Shack – I want to get a nicer one, but I don’t know quite what I’m looking for.
Also, thanks for the tip cleaner – I’ve never seen that before! You can pick it up here: http://www.radioshack.com/sm-tip-tinner-cleaner-compound0-5-oz–pi-2062721.html
Nicely-done tutorial.
Now, once you’ve gotten hooked and you’re ready to graduate to a temperature controlled (T/C) soldering station, I HIGHLY recommend the Hakko 936.
http://www.hakko.com/english/products/hakko_936.html
Arguably the best value in T/C stations right now. And there are plenty of tips available and reasonably priced (unlike many stations). Should be able to find these guys for ~US $90.
-Josh
(and apologies if this shows up twice – stupid noscript)
Wattage: depends on what you’re doing. The Hakko 936 in the medium kit comes with a 50 watt iron, which is PLENTY for all but my antenna work (for which I actually use a portable butane-powered iron/torch from the shack). But, it’s a T/C so you can always dial it down to the 15-20 watt range for small stuff.
15 watts is good for small printed-circuit work, prototyping, etc. Heavy power or audio cables need a bit more. I used to use a “shack” 35 watt iron before I got my Hakko. If you’ve got the bucks, buy one – you’ll never regret it.
This reminded me of a how-to on soldering that was featured by the make weekend podcast earlier this year –
http://www.makezine.com/blog/archive/2007/01/soldering_tutor_1.html
Great write up. I would just add that while you can get a long way without one, a flux pen is a huge help. I’d reccomend everyone throw one in the next time they order from digikey/mouser/wherever.
sweeet ill show my noob friend cause he sucks at sodering
Great soldering post!
I taught my son Eric to solder when he was 4 years old, so I always insert safety info in articles and books that require soldering.
Don’t forget surface mount projects that use no solder. I’ve published a fair amount on soldering surface mount components PLUS how to build SMT projects using conductive ink. One project was a multi-tone “organ” build on the back of a business card, including piezo speaker.
Forrest M. Mims III
http://www.forrestmims.org
http://www.sunandsky.org
I second the Hakko 936. I got mine off ebay for about $60 and its awesome. Heats up in like 20 seconds and maintains temp very well.
Two added notes.
For a replacement sponge for soldering get the flat sponges that expand when you add water. While it is still flat, use a paper punch to punch 4-5 holes. Then add water. The resulting sponge has holes to wipe off the solder.
Another handy thing is to buy or make a fume fan. Just run a PC fan with an air filter with the inlet close to your work to suck out all the rosin fumes (not good for you).
I used to us a wet sponge too to clean my iron. Then I found this:
http://www.edsyn.com/main.asp?inc=view_product&id=1890
It’s a lot like those commercial grade scour pads for pots and pans in restaurants. It works amazingly well. It’s also nicely weighted so it stays put.
im glad everyone seems to agree with me on the hakkos..
they are possibly the best irons in the quality / price ratio department.
something to add would be if your having problems making a clean joint (usually important) then use nice flux to keep everything clean and the solder just flows into place. also, when your gonna go work on something a good way to prep the board (especially old things) is to use some everclear or something with the highest pure alchohol content available (rubbing alcohol as we all know leaves residue) and clean the whole thing down using an old clean toothbrush.
and make sure you clean off your extra flux.. it can conduct and cause shorts (not often but its always fun when someone forgets and it does)
Some good videos running through soldering and soldering of SMT parts – http://tangentsoft.net/elec/movies/ :)
If you live near a University with an engineering department, you may want to see if they sell electronic components too. They are usually much cheaper than Ratshack.
I made a simple short video just about soldering and how to avoid cold joints. Here is the link.
http://www.metacafe.com/watch/797868/soldering_tutorial/
Usually I like the stuff here on hackaday but come on radio shack soldering irons and radio shack tip cleaner? Lets get some better stuff than that.
I was using a 200gx thermally balanced soldering iron which you should be able to pick up for 20 bucks or so. It is made by Xytronic and works very well for projects.
I’m glad everyone seems to like the post. Everyone hates on the RadioShack, but for many it’s the only way to get parts in person.
Digg it! http://digg.com/hardware/Introduction_to_soldering/
+1 to xrazorwirex on using extra flux and isopropyl alcohol. iso disolves flux which is otherwise corrosive.
also i would just like to add ‘cut THEN solder’ probably not a big deal for home made one offs. if you solder then cut the excess off the component legs you are leaving the tip of the leg untinned with solder. this can also lead to corrosion problems.
I
Excellent guide. I am glad that, even though hack-a-day typically caters to the more experienced hackers, they are willing to bring newlings into the brood.
I think I am going to print this out, and convince my younger brother that the headphone amp is a cool project to try…
Never knew about desoldering braid. How useful looking.
hack a day you are the best
I’m 41 and have been soldering for 30 years and _still_ read and enjoyed the post!
This is a great resource.
what’s wrong with the weller wtpc11 ? It’s temp controlled, I got it for $100 and it works *great*. If you’re asking me about high-quality pro-grade equipment? Metcal. Hands-down.
A how-to video with good slow motion shots: http://www.curiousinventor.com/guides/How_To_Solder
Awesome guide. I’ve missed the how-to stuff here, and since I’ve been trying to get into electronics lately, it’s nice to see stuff catered more towards me.
And yeah, the CMoy pocket amp is an awesome beginner project. Another good, basic how-to solder project is the Digg Button by ladyada (http://www.adafruit.com/index.php?main_page=index&cPath=15).
It’s not as advanced as the CMoy, but if you’ve never done much soldering, it’s a fun, small project
I don’t like subsituting kitchen sponges for soldering sponges. The soldering sponges don’t have any junk on them to destroy the plating. Can’t say that about kitchen sponges.
I hate the thought of ruining a nice tip on a temp-controlled iron, or a butane iron tip (not cheap!) just because the coloring in the sponge got all goopy and destroyed whatever it melted upon.
MCM (mcminone.com) has 5-packs of sponges, with holes, reasonably priced at $5 per pack. Just get a few packs when you order. (I’m assuming when you order from them, you’re ready to graduate from Radio Shack.)
BTW, MCM is offering their Tenma temp-controlled iron at a discount. Got mine for $40.
Yeah, the hakkos are great irons, i like wellers too. I would not advise anyone to buy the raidoshack digital soldering station. They no longer manufacture tips for them and i think maybe they have been discontinued. In terms of “cut then solder”, its up to you, but matts is right about the possibility of corrosion. Also, when you leave the large leads on while soldering you leave the hot joint open to the possibility of mechanical shock, which could form a cold joint and cause it to fail.
Nice write up, one for us who salivate over all these neat projects, but don’t know where to start. Hopefully you’ve got a whole syllabus of training lined up for us!
tip for using desoldering braid:
since copper corrodes over time, you may find that your desoldering braid does not work as well as it once did. quick solution is to dip the tip of the desoldering braid in some flux and it’ll work better than new.
This learn to solder kit is one of the best that we have seen. http://www.circuithut.com/index.php?/circuit/content/view/full/258
forrest m mimms…. you and robert grossblatt are probably the two people responsible for my career in electronics today! I have *all* of your engineer’s mini notebooks, and two copies of your green “getting started in electronics” texts… one full of burn marks, no covers, scribbles and tears, and the other in perfect condition, bought many years later. :-)
You have such a clear and approachable writing style, thank you so much for all your work over the years!
Any special advice about soldering on batteries?
Great tip! I’m a fix it guy but the tips are always welcome to fine tune or maybe give direction!
If your looking for a really really cheap soldering iron I would look at a local dollar store. I went to a dollar and plastic flower place last week and picked up a spare one for a dollar, It comes with tip and even a two tiny pieces of solder. I tested it out and it worked, but it was made out of really really cheap plastic from china, I kept thinking, man this things gonna blow up in my face, or its gonna melt in my hand, (seeing how china seems to love lead) yeah and the cord is a definite fire hazard. I think they used melted rubber bands to make the thin covering over the electrical wires. I also thought it was gonna get yanked out or just fall out its nutzy how flimsy it is. But it was a buck so you can buy like 30 of them before you realize you should’ve just stuck with your dad’s circa 1970s soldering iron.
There are several major problems with this guide:
* First of all, YOU NEVER EVER grind a longlife tip! it destroys the iron layer and it will corrode quickly.
* Always select as large a tip as possible, because a larger tip means better heat transfer and a better joint.
* Don’t get a 15W iron, it’s too weak to keep a constant temperature, I’d suggest at least 50W, I can recommend the Ersa RDS 80.
By using a powerful iron with a large tip you can complete the joint faster and that leads to less risk of damaging the components, than with a small iron and a weedy tip.
Nice article, but as always there is something missing, I get a hard time getting components, guys how about some references from were to order if you live in europe (Portugal).
The single best thing you can do for yourself is to get a temperature controlled iron. I’ve seen cheap ones going for ~$40 at mpja.com. My current one is a Xytronic 137ESD and has an LED temp readout. Runs about $80 from howardelectronics.com. The Xytronic 379 is essentially the same thing without the LED readout and goes for $50. It doesn’t matter if the wattage is high because a t/c iron will throttle the power going to the heating element depending on what the thermocouple or thermistor is reading.
The reason this is such a worthwhile upgrade has to do with tip corrosion. Unregulated irons, even 10W irons, will eventually heat up to 750-800F which will cause the tip to oxidize in no time at all. That oxidation prevents good metal-to-metal contact which prevents decent heat flow into the joint. Being able to maintain the tip at 500F or so will put off this oxidation for a half-hour or more.
Also, the previous tip on the bronze-wool cleaner is great. I’ve got one now, but before I had it, I used copper-wool from the grocery store. Those Xytronic irons I mentioned above actually come with one. The abrasive surfaces help to clean any oxidation and excess solder from the tip more efficiently than a sponge and it has much less thermal mass than a wet sponge which means you’re not putting as much thermal stress on the tip. The rapid cooling from the water in the sponge will stress and potentially crack your tip over time.
I second the bronze/copper wool for cleaning – it works better with less hassle. I’m currently using stainless steel wool that I got for about a buck at the grocery store. No water, no mess, no heat loss on low-wattage irons.
Excellent tutorial, just thought I’d drop a couple of my own tips in, gleaned from 10 years of wiring to military/space specs and 10 years to commercial specs.
I’d advise against filing or grinding down any but the cheapest of soldering iron tips, as most only have a thin layer of white metal coating a copper core, and removing too much of that can result in cold spots at best and complete failure of the tip at worst.
On choosing an iron – go for the best iron you can afford, with temperature controlled tips and, for preference, a temperature/current control dial on the base unit. In the UK, the most commonly used make in the commercial sector is Weller, who make a great range of irons and soldering stations.
On cut/solder v. solder/cut – A quick squirt of insulating spray-varnish means you can use the “easy but untidy” method of bend/solder/cut over the “fiddly but neat” method of tack/cut/solder
On solder types – for non-experienced solderers, I would stick with good old rosin multicored 60/40 tin/lead solder (in the UK, this comes on a red bobbin as standard) rather than any of the new eco-friendly tin/silver solders with water based flux (blue or green bobbind in the UK). The old stuff just flows better, in my opinion, and it takes a LOT of patience to solder a decent joint with any of the other types of solder.
guys, can you please post pictures on your replies. it would be of great help. really good basic tutorial about soldering! :) thanks!
I’ve done some soldering in the past, not much, and I’m not that great. I think this is a great tutorial and it would be awesome to see more like it in the future.
Does any of this change when it comes to joining copper tubing? I’m a homebrewer and I’m looking to join some copper tubing for cooling purposes. Is a gun sufficient for this sort of thing? Or am I going to have to break down and get a blow torch?
The hardest part of soldering for newbies is not cooking components. A solering project I always used with my trainees is as follows.
Cut 12 bits of wire about 1 1/2 to 2 inches long and solder them all together to form a cube.
Sounds simple but if not enough heat is applied, the solder doesnt flow. If too much heat is applied, the nearby joint melts. When that is mastered, use 1 inch wire and repeat the process.
BTW. In comment 3 broken soldering irons are mentioned. If irons get broken while soldering then another hobby/trade should be looked at.
A test that was used to see if you could competently solder was to make a wire-frame cube out of solder. And the cube had to be a cube too.
to #23 soldering braid.
Sometimes you can recycle the length of woven copper braid found around the crt screen of old tv’s as desoldering braid.
I taught myself to solder with the help of written instructions. The usual advice to put the solder on the joint rather than the iron was included. I had terrible problems getting anything soldered together. Then I discovered that if you put some solder on the iron tip, you get heat transfer to the joint so that the solder will melt when it is applied to the joint.
I applaud you for the above lessons. It looks like you spent took a lot of time to prepare and post it. It is great training for those who have no experience with soldering.
I would like to make a few suggestions if you donât mind:
When purchasing soldering irons, select one that has variable temperature capability and different size tips. This allows you to 1) extend the life of the tips by controlling the iron temperature 2) saves money on having to purchase different irons for different jobs by changing tip sizes and shapes instead.
When soldering be sure to melt some solder on the tip prior to placing into the iron stand. This will extend the life of your tip by preventing the hot tip from oxidizing, and ultimately, melting away! If the solder keeps falling off of the tip when placing back in to the iron holder, try touching the tip with melted solder on a piece of kim wipe or paper towell. This will remove the excess flux from the core of the solder…
Use the sponge to âshockâ the iron tip instead of using it to clean the tip. Instead of wiping the tip of the iron on the sponge, wipe the old solder off of the tip with a disposable kim wipe (or small (5â x 5â or so) square of paper towel) and use the sponge to âshockâ the tip of the iron. This will extend the life of the sponge and allows you to get your iron to your work by momentarily cooling the tip before the tip starts to oxidize again. Oxidation is what causes pits in your work. The sponge should wet enough so that when you press your finger on the sponge the water will pool around your finger (not the sponge).
The difference in the percentage of lead to tin in solder is what controls the plastic state of solder. Solder is in one of 3 states: liquid, plastic and solid. The 63/37 mixture is a mixture that has no plastic state and is therefore the best one to use for soldering. If another mixture is used (ie: 60/40) and the component being soldered is moved, even slightly, while cooling, the finished product will have cracks in the solder and cause intermittent connections and those are the worst to troubleshoot! Also purchase solder that has a rosin flux core.
When using desoldering braid, twist the braid between two fingers to get a tight twist, then wet the twisted braid with some liquid flux. This improves the wicking capability of the braid. There are also different sizes and types of desoldering braid. I recommend using the plain copper braid (vice tinned copper braid). Select the size that fits the work that you are doing: It should be wide enough to lay across the conductor that you are working on (before you twist the braid).
Flux is used in soldering to flow contaminates away from your work and helps to prevent pits from appearing. Rosin/resin flux is the best flux to use for soldering. It wonât corrode your circuitry if left on the board like acid flux will (which is used for soldering pipes) and it is easily cleaned off with alcohol. If you canât find rosin/resin flux then rosin flux is the next best thing. I recommend that you have both liquid and paste flux on hand to use for different types of jobs. Paste is best when you want to control the amount of flux on the work you are doing and liquid is best when you want to wet the desoldering braid…
For solder suckers, be care with the bulb type: They can induce static electricity and damage the more ESD sensitive components. Solder braid is better or the plunger type of solder sucker that is designed for ESD sensitive components (it usually has a black tip) is preferred over solder sucker bulbs.
When preparing your project for soldering, cleanliness is next to godliness: prepare all soldering surfaces by cleaning, tinning, and recleaning prior to soldering: 1) Use kim wipes (or cut up paper towels) moistened with alcohol to wipe down the conductor and the solder. 2) Apply a thin coat of rosin/resin flux to the conductor and tin the conductor with a) the previously cleaned solder and b) an iron tip that has been cleaned by flowing solder over the iron tip, solder wiped off with kim wipe and shocked with sponge. 3) Wick up the solder from the conductor and clean flux from tinned conductor with either a Q-tip or kim wipe moistened with alcohol (I prefer the Q-tip). 4) Apply some fresh flux on the conductor, clean the iron tip again, and then solder. These steps also apply to component leads as well as wire ends…Following the above steps will help to prevent pits caused by oxidation from the conductor, the solder and the iron tip…
[…] few knots to overcome, but it seems more difficult moreover, with l0rdnic0 managing a tiny little soldering PSP using a cable and remote control software Open keyboard project. There is still enough time for […]
totally great and super helpful! i solder every day for my job and totally learned some good stuff here. like others, i love my hakko936- a sturdy little workhorse with lots of tips available.
i use a soldapult solder sucker for big glops and the braid for smaller bits. i also use a soldering tip cleaner in addition to a wet sponge. it is a metal cup with something that looks like a brillo pad in it- curls and curls of brass and just stabbing it gets bits of solder, flux and broken components off.
and i always use a flux pen. it is super simple, handy and readily available. the best one for my purposes is kester 959T, which is no-clean and fumes up less than other fluxes i have used. for cleaning i often use cotton swabs soaked in IPA solvent or contact cleaner. tweezers, hemostats and a small pick are the tools i use most often for gripping, guiding and such.
most of the items i have mentioned here are all ordered from techni-tool.