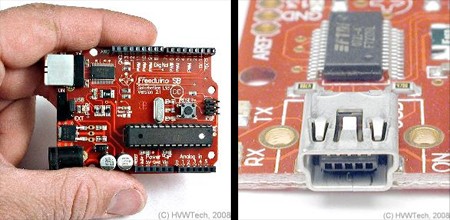
Solarbotics recently released its own version of the Arduino microcontroller development board. They based their board on the Freeduino design. We thought this would be a good opportunity to review the new board as well as present a How-To about building a simple binary clock. Along the way we’ll cover some basics on attaching LEDs and switches to a microcontroller.
If you haven’t heard about Arduino, you must be trying really hard to avoid it. Arduino is a package of hardware and software that allows easy programming and fast prototyping, lowering barrier to entry for microcontroller development both in terms of cost and learning curve.
There are two types of Arduino compatible boards. The “software” compatible boards do not have the exact same physical layout, but they can run the programs generated by the Arduino IDE. They also have a compatible bootloader on the AVR chip. Examples of this type of board are the Boarduino and the Arduino Mini.
The 100% compatible boards have the header pins in exactly the same position and order as the Arduino reference design. The reason that this is important is that there are Arduino “shields” which plug on top of an Arduino. Popular ones are the ProtoShield and the XBee shield. The Freeduino SB is the latter type, a 100% hardware and software compatible board.
So if it’s 100% compatible, why is it a Freeduino and not an Arduino? It’s a matter of licensing. While the Arduino software and designs are free (as in beer), the actual Arduino name is trademarked and requires permission to use. For some people that wasn’t free enough, so they created Freeduino under the Creative Commons license, which has zero intellectual property encumbrances – no copyright, trademarks, or restrictive licenses. That allowed Solarbotics to build a Freeduino and be sure that they weren’t infringing on anything.
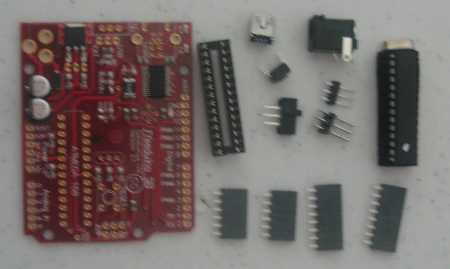
The Freeduino comes as a “mini-kit”, which means that all the surface mount components are done, leaving just over a dozen through-hole parts to solder on. The instructions are humorous and well written, just right for someone who knows how to solder. The Freeduino was at least as easy to assemble as a Boarduino, and took less time. It’s possible to assemble the board in under an hour, even for someone out of practice with soldering skills. While the instructions and ads say that you can use either a regular USB jack or a mini-jack, the kit does not come with both. Instead there are two versions of the kit, so you have to decide before you buy which USB connector you want. Our kit came with a USB mini connector.

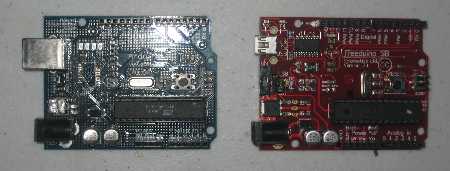
Here’s the assembled Freeduino (in red on the right) next to a (slightly damaged) Arduino NG. The PCBs are the same size and shape. Note the difference that the USB connector makes.
It turns out that the choice of USB connector can effect the compatibility of the Freeduino board. Because they shifted things around, the regular sized USB socket casing bumps into some Arduino shields, so they might not fit. As the manual says, “Our design pushes the USB-B connector up to make room for the switch, and it will interfere with some Shield boards.” The USB mini connector doesn’t have this issue, so if the right cable is handy, it’s a no-brainer which one to get. Many common cellphones and digital cameras to use this kind of connector.

Here are three USB cables: regular, mini, and micro. The middle one fits the USB mini connector on the Freeduino.
A nice feature of the Freeduino is that the ATmega chip comes pre-loaded with the “blinky” program (this is the “hello world” of the Arduino universe). Once assembled, powering up the board immediately runs the blinky program, showing right away that the board is operational.
While all Free/Arduino boards are compatible, it is possible to add features, as Solarbotics proves with this board. Generally, the Freeduino they put together is an improvement over the current generation Arduino Diecimila. Most users won’t really notice the better use of capacitors for circuit protection. They will notice the better placement of the indicator LEDs, which are closer to the edge of the board. The power switch is slightly misleading. It seems to sit between the voltage regulator and the ATmega chip. Even with the switch in the “off” position, a little power is still being used.
Those who use the Freeduino for real-time applications will appreciate the much more accurate 16 MHz crystal, which has about 1000x less error than some other designs. The PCB also has some room for customization, which will be useful for those trying to build compact projects. There is room to add a potentiometer (trim pot) that can set the analog reference voltage for the AD converter. Note that the kit does not come with this part. When working with non-TTL sensors the trimpot could save a few external parts. Solarbotics also left room to add a second, heftier voltage regulator, if needed. However, it’s not clear what the limits of the one on the board are.
The feature that they seem proudest of is the blue LED on pin 13.
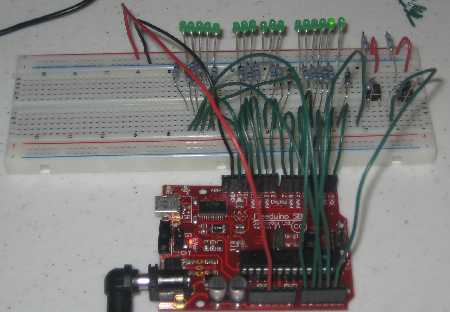
Since the Freeduino has a more accurate crystal, we decided to see how it would perform as a clock. A binary clock is the easiest to implement because the display is just a row of identical LEDs. Each LED is wired to a pin through a resistor and hooked to common ground. The digital output of the controller can then turn the LED on and off. This calculator helps choose just the right resistor value, but there’s enough leeway for a resistor that’s pretty close. Note that the polarity of the LED is important.
A clock isn’t much use if you can’t set it, so this clock includes two switches. One switch selects which number to set, and the other switch is used to set the value. The switches are wired using a pull-down resistor. [Ladyada] has a long but thorough tutorial on using switches. The switches need to be debounced, but we took care of that in software. That’s about all there is to the hardware setup. Note that we used some of the analog pins as digital I/O. The chip supports this and the latest version of Arduino software does too. Be sure to use at least version 11 of the Arduino package or the buttons will not work.
The Arduino software environment runs as one big loop. Each time through the loop, our program does the following:
- See how many milliseconds have passed since the last time, and adjust the internal time accordingly.
- If a set of LEDs needs to be blinked, toggle their state.
- Check the state of the buttons; adjust time accordingly.
- Display the time in binary.
The count of milliseconds is kept for us by the Arduino library using a timer interrupt. It’s not quite as simple as it seems at first, because the Arduino milliseconds counter can roll over. So there’s extra code to detect and handle that condition. Then all we have to do is break it down into hours, minutes and seconds.
Handling the buttons turns out to be the trickiest part. First of all, we only want to act when the button is just released; not when it is up, held down, or just pressed. Second, the buttons have to be debounced. Debouncing is a whole separate subject which deserves an article of it’s own. We used a software debouncing trick that waits for an input to stabilize. For those who want to learn more, the definitive paper on the subject is here(PDF).
Displaying the time is actually the easiest part, since all we have to do is set the various pins according to the bits in the time variables. The entire program is available here(PDE). The Arduino IDE compiles and downloads it to the board with just a couple of clicks.
After downloading program, or resetting the board, the clock starts up right away and begins counting seconds. The display is three sets of LEDs showing binary numbers. The leftmost 5 show the hours in 24-hour (military) format. The middle six display the minutes, and the last set is for seconds. The clock can be set with the two buttons. Button 1 selects which part of the time to set: hours, minutes, or seconds. Pressing button 1 rotates through each part. The set of LEDs that are being set will flash briefly. Button 2 is used to actually change the value. For hours and minutes, button 2 will increment the value each time it is pressed. That does mean that it may have to be pushed up to 59 times to set the minutes. When setting the seconds, button 2 just resets them to 0. We thought this was easier to synchronize than trying to catch a moving number.
In order to prevent accidentally changing the time, the software implements a “safety.” If no button is pressed for about 3 seconds, then button 2 is disabled until button 1 is pressed again. Pressing button 1 when the safety is on will flash the set of LEDs currently selected and turn button 2 on again.
Just to see if the more accurate crystal makes a difference, we ran the exact same program on the Freeduino SB and then a Boarduino. The boards were set and compared using a radio controlled “atomic” clock as the reference time. Here’s a picture of the Boarduino running the binary clock:
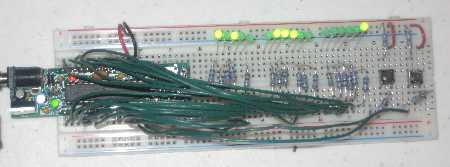
The Boarduino did surprisingly poor job at keeping time. Without correction it gained over a minute per hour. The Boarduino uses a resonator that can have up to 0.5% drift. We had to apply a “fudge” factor of 0.85% to keep it from drifting noticably. Even then it tends to gain a few seconds over the course of a few hours. The Freeduino did much better; drifting only a couple of seconds during a five hour run. So the more accurate crystal does make a difference.
There’s lots of room for enhancements to this project. We used a prototyping breadboard with lots of jumper wires, but there are plenty of better ways to wire it up. It could even be implemented as a shield.
We hope that this how-to was useful as both a review of the Freeduino SB board and as an example of simple micro-controller input and output. Happy hacking.


great write up, inspiring and to the point.
informative!
thank you
Your ‘radio controlled “atomic” clock’ probably only synchronizes itself once a day, so for your purposes it’s just a quartz clock; not that there’s anything wrong with that.
-Jonathan
you are probably having timekeeping problems because the code uses the arduino millis() which (last i checked) is 1.024 ms not 1.000ms thus you will always be fast by about 3% :)
you may also want to use a watch crystal – they’re designed just for this. i linked to an article on using one a boarduino (although you could do it with any sort of *duino) here: http://www.ladyada.net/rant/2008/04/add-a-watch-crystal-to-a-boarduino/
also, if you want to know how accurate a crystal is, its easy to calculate. most crystals in inexpensive projects have 50parts-per-million accuracy (although it can be as high as 100ppm) 30/1000000 = 0.003% accurate which is 166 x more accurate than a ceramic oscillator
The arduino clock tick is at 1.024ms, but the “millis()” function has some math that is supposed to correct for this, modulo round-off errors…
BTW, as one of the people involved with the Freedunio project. I’d like to commend you on your exceptionally concise and accurate summary of the issues involved there!
Nice article! I’m inspired!
Hi, just today found this blog but I have to say that it looks great. I totally agree with your post. Have a nice day, keep up the nice work and I’ll definitely keep reading.
Hello Everyone,
I know it’s an old post but I’l ask anyway: the link to the code is broken. Can someone re-post it or send me the code by e-mail?
Does anyone have the complete wiring diagram of this project?
Thanks for any help.
(I’ll post my e-mail if needed)
I want the code too. Still broken.