This guide will show you how to bind books by hand. The process from start to finish isn’t very difficult as long as you follow each step along the way. The final product looks great, and we can’t think of a better gift… as long as you have something meaningful on the pages.
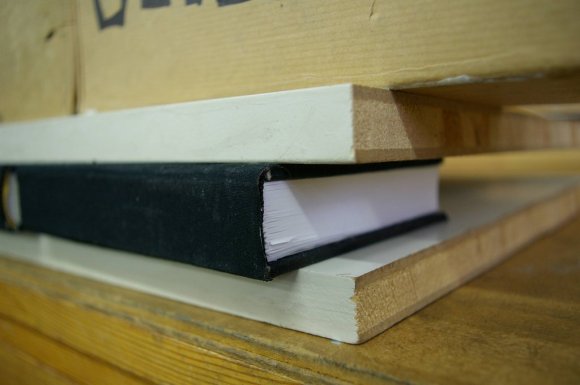
We never really thought about the direction of the fibers in a sheet of paper, but that’s the first thing you’ll have to take into consideration here. You want the fibers running up and down when the book is in a bookcase. Next the sheets are organized into stacks of four, then folded in half forming eight pages. After stacking these packets together a series of lines are marked on the folded side. Holes are then punched from the inside at each mark using a sturdy needle. This is where the stitching for the binding will happen. Bands are added using coarse linen thread. After stitching these in place and knotting, glue is added and finally a piece of cloth is adhered to the binding and a portion of each inside cover. From there it’s onto fabricating the cover before pressing the finished project as seen above. What a piece of work!
[via Reddit]


I personally prefer this one: http://hackaday.com/2012/07/16/dealing-with-the-horrors-of-pdfs-by-binding-your-own-books/
Recently, I needed to sit and wait while a relative underwent surgery.
they had given me a copy of
“The Absolutely True Diary of a Part-Time Indian” Enjoyed reading the story
but also was struck by the , tactile-ly, excellent choice of paper and binding.
The book had this wonderful feel to the pages as you turned them, always lay open to your page
no wrestling to hold it in your hands
no stirring up of the carpol tunnel
…print size worked pretty well for my monocular diplopia…
just sat and read the whole book in that waiting room.
was a nice old feeling.
Does it matter what sort of paper you are using?
Does it matter about the type of paper used? I assume that normal printer paper isn’t really up to the job.
You probably want something a bit heavier weight, and definitely acid-free. Make sure your glue is likewise acid-free.
If you have the cash for it, getting some of that cotton-blend resume/business paper and using that would have very nice results, I’d imagine.
No Actually you can pretty much make/bind a book out of anything. For a general notes book i use really thin basic printer paper like 80gsm. But if i want something more sketchbook like then a 120gsm recycled paper or 180gsm bright white. I’ve made a couple of sketch books out of sheets of canvas so i could make a mini painted book project.
Whats most important is the bind itself that holds the pages together and a attaching the cover properly. as this will take the brunt of most of the daily wear and tear on your book.
I’ve bound a number of books that were only available in electronic format. Copy paper serves well enough and I used wheaten cornflour glue for cloth covers and PVA for most of the binding. Medical tape from the first aide kit instead of thick string in the stitching. Also don’t forget the wonder binding powers of gaffa tape for a quike cloth spine.
The tute presented isn’t the best, there’s a far superior series by Peter Baumgartner
on Youtube. http://tinyurl.com/aa2xmzd
The hardest thing is printing the pages in the correct order. Word has got some minimal bookfold settings but from memory I ended setting the page order to print manually. I then printed to PDF so I didn’t have to go through that again if I wanted another copy.
The hardest part is actually setting your printer so that when you flip the page over and print the other side, it aligns with the first.
I have a template file in Photoshop that I use to make small leaflets. It’s slightly smaller than the size of the page, so that when you center it you can adjust the margins one axis at a time, shining a light through the paper to see if the alignment lines cross. When they do, I arrange the contents on separate layers and then finally print with the alignment layers invisible. I just leave small folding marks at the far corners, so I can do a four page fold with perfect alignment.
One could possibly do a script that arranges eight numbered image files into the correct order and orientation to help things out.
Think I may make one myself :)
A little while ago Hack a Day returned to the 18th century with a wooden trike, now they go back to the 8th century with DIY book binding, in a month we should be back to fire. Really though this is good, if only it were cheaper to print I would be doing this alot.
You’re looking at this the wrong way.
This hack shows you how to build a highly advanced e-reader. It is Rohs compliant, highly shock resistant, impervious to EMP, has a 5-century operating life, and an interesting 0-volt high contrast display that is easy to read, even in bright sunlight. Best of all, no surface mounted parts!
This is all great, I’m sure. But let me offer a piece of advice, and let you in on a secret:
Librarians are trained on how to bind books.
Given the general demographics of hackaday readers, they would be much better off getting some hands-on “tutoring” and collaboration with a helpful librarian of the opposite sex.
Wink wink, nudge nudge..
It boggles my mind that there are single librarians in the world.
I think it would look even better if you fold in the corners of the cloth instead of cutting them off. It would prevent the cover cardboard from peeking out at those points.
I love this! Only trick now is to get the pages printed in the right order for your 4 sheet – 8 leaf – 16 page Folds.
Fire? Oh, that’s so easy, you’ll never believe it. You can’t do it the way the kid in “The Black Stallion” did it, but the way “Alabama Moon” did it is almost as easy as in the movie, with or without the bow. The trick is to carve a dent in your thin “hearth” board for the stick to spin in, and then carve a notch in that. If you’re using a bow, lubricate the top bearing with a couple grubs from under a rock or log. Your “ember,” the smoldering black stuff, will collect in the notch. Apply the ember to dry grass or something similar, blow softly and you’ll have fire. (Easiest if it’s not raining.) Chakote in Star Trek Voyager wimped out. “You’ve probably got the only Indian the the galaxy who can’t make fire.”
Ok. Let’s make a book about how to solder surface mount parts starting with 2 sticks and a nail and bind it into a book. Probably need a rock to give the nail a good chisel point.
Sounds like you consume too much media and don’t try out the techniques enough.
Making fire without modern materials is HARD. It still blows my mind whenever I think about one extended backpacking trip when my crazy fool of a friend brought along a couple outdoor skills/survival books. We had off time and systematically tried everything in the two books. Almost nothing worked.
All those snares? Nope, heavily dependent on local tree species and humidity. Various cooking setups? Most are near impossible to not do without injury, except some methods taught by the UK military which they learned from their Indian colony. The survival shelters were worse than staying under a tree and getting a fire going. Oh and so comes to fire. It isn’t easy, it takes practice, and expect to spend an hour or two doing it. Should there be any moisture or humidity at all you are going to have to get creative. Learn what trees in your area have fibrous inner bark or ‘oilwood’ as it is called. After a soaking, often that is all that will burn in old growth forests.
When camping for extended lengths, I prefer to bring along a pyromaniac.
Wind proof, easy to start, and lights faster when wet and cold.
not a hack, this technology has been around for several hundreds of years XD
The collections of folded pages are called signatures, not flaps. If you want neat edges on the pages, get a guillotine shear. If you’re doing a softcover with glue binding, build yourself a vibrating jogger. That’s simply a flat board with two other boards attached in a right angle, making a shape like one corner of a box, point down and tilted so that a stack of paper will stay in it. Attach some springs to the bottom with screws and flat washers then mount a small motor with an offset weight to shake it. Put a stack of pages in, flip the switch and in a couple of seconds the pages are aligned.
Fire? I’ve been a geek all my life! You think I’ve never done that? I know how to do all sorts of useless things. Maybe if I’d paid more attention to what I was supposed to be paying attention to, I’d know how to convince people to PAY me for making them computer programs.
Whatever paper you use, make sure that the grain of the paper is parallel to the spine after folding. That’s bookbinding 101. If you don’t do this, the entire project will be for naught. The strain of the opposing grain direction will wreak havoc. Also apply this rule to the cover boards.
@Galene: In this case, because the pages are blank, the correct terms would be sections or quires. Signature only applies to printed work.
Unfortunately this guide on binding is all wrong. The thread gauge used is entirely incorrect for the weight of the paper, the sewing style is inappropriate for a flat-back, the sewing supports are incorrect, the hinges are improperly installed… this book is a ticking time bomb. Sewing on supports (linen cord, tape, etc.) should always result in those supports being laced or adhered to the covers. Because this is a case binding, there shouldn’t be any supports. A lockstitch method should’ve been employed. NEVER wax thread that is sewn around raised supports. Never. Any conservator will agree to this – that is, one that knows that he/she is doing.
To the binder: If you want to bind books, and become known for it, don’t publish such guides until you have a better handle. There are resources available to you. Keep binding, but more importantly, decide what it is you want to be proud of.