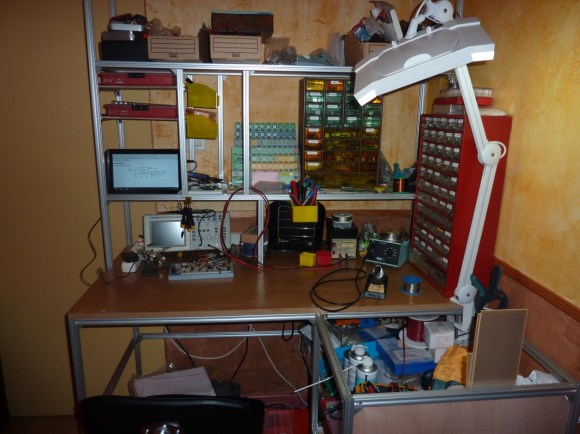
Apartment dwellers who are living the nomadic lifestyle take note. You don’t need to live your tinkering lifestyle out of a toolbox. Here is a great example of a respectable electronics bench which breaks down when it’s time to move (translated). We’re sure you already belong to your local hackerspace for the big projects, but this corner office will let you take some of your creations home for continued tweaking.
The bench uses slotted aluminum rails as the support structure. The slots accept small nuts, which have a spring-loaded ball bearing to keep them from sliding freely ([Nerick] mentions this is especially nice for working with the vertical runs). These fasteners ended up being the most costly component. The desktop itself is the largest solid piece. It was machined using a CNC mill (we already mentioned having a hackerspace membership) so that the mounting screws are countersunk to leave a perfectly flat surface. It’s clean, has a small footprint, and gives you a place to dump all of your gear. What else could you ask for?


What more could I ask for?
ESD surface
You could get a roll-up esd surface, cut it to size, then put it away when not needed. That way you don’t munge it up when you’ve got to do some “pound-to-fit” work. Not that i ever have to do that, of course . . .
Respectable, but some of us have a different philosophy.
http://jtl3.com/legendary_stack.jpg
Nice pile. What’s top right, a VME rack?
“HP” logo on it, I vote for a backplane+casing for a modular spectrum analyzer, VNA, etc.
*squint* ah right, yeah modular instrumentation of some ilk.
VXI, which is essentially snazzed up form C VME.
I’ve got that same Frequency Generator!
http://imgur.com/W8sNhdn
An oldie but a goodie. One of HP’s first commercial products from Bill’s masters thesis work in Wein Bridge oscillators. So high powered, it can typically power a wall-voltage clock!
That must be fun, powering a a wall voltage clock at 1khz or so :-D
I went modular when I was in dorms, just bought some cheap rack shelving that was reconfigurable according to whim though.
Just as an aside,
How would the OSHW rails work for such a bench (besides being expensive)?
Well that would be like using an arduino to flash a lightbulb or a CNC machine to drill a bench top, but take some nice photos and you should get a HAD piece. :-D
Fer serious, it looks a little lightweight to trust as SERIOUS bench legs to me.
How do people keep such a clean bench, damn!
They take some time to clean it?
I have to admit that it’s not always an easy task :)
I’m mostly a networking guy…so yeah. It’s both flawlessly clean and well documented lest I have nightmares. Many many nightmares.
Of course everyone cleans up when they know company is coming after they post the photos to the web. :)
It would be wonderful, but on my variant I actually have a half dozen “in progress” works on the bench. If you never do anything with all the components, then you don’t need a bench. If you do a lot then the problem isn’t organizing the stuff, it is finding space for each project and keeping it/them in such a way that they work (breadboards, circuit assembly, testing, etc.).
Plus it’s easier to crossbreed stuff if it’s already fraternizing.
Same here. I have found that my brain can store the exact locations of screws for seven projects-no more lol. I usually just scoot them under the first shelf until they end up in the small projects or large projects box to be rediscovered three months later lol. I always admire folks that can just plow thru a project. I like variety and often one problem will yield a fix for another project. I honestly use a Korg Monotron for shooting from the hip on my audio stuff as a sort of base station. Cheap and flexible little booger.
As per the build in the article- I like it. I almost went the same direction for my current set up as I started pricing gear. As a tinkerer, it is always a tough call of build it or buy it. In the end the barter system won out when my neighbor needed some computer work and had some extra lumber from a recent garage :) Everybody was happy.
I am excited about the next house and the possibility of a little workshop. I am very conscious of noise levels and will abstain from projects if the wife is sleeping or studying. One more year…
“What else could you ask for?”
Space to put such a workspace IN. :p
Inset it into a window, disguise the outside as a large air conditioner….
I have always just used shelving and reconfigured it to fit the area, it is cheap and gets the job done and when you want to move, it simply comes apart for easy storage and moving. http://retrogamegirl.files.wordpress.com/2013/02/myshop.jpg
i am a previous Electronics engineer turned Helicopter pilot..
but there is no way for me to shed my love for Silicon, Resistors etc.
My whole Electronics lab fits in a standard “US” closest
doors do close when i have dates over…
https://dl.dropbox.com/u/1644351/pano/tinker-space/index.html
Way to cool picture.
From where did you get the aluminium extrusions?
McMaster-Carr is where I’ve bought some a couple of times.
http://www.mcmaster.com/#structural-framing/=lnkfxl
Yeah, in US it is easy.
If you are on a budget just look for someone throwing away a kitchen table or a desk.
Not faulting this because it is very cool, but you could get a great workspace for next to nothing by using a little resourcefulness.
Wait a moment… CNC’d a square surface with a few holes? Sure… I guess.. why not :)
Okok! Rectangular.
IKR, if you can’t drill holes in wood accurate enough to put legs or brackets on….
Kinda makes you wonder about hackerspaces promoting the development of maker skills.
Say three holes at/near each corner..
Measure, place bracket, square up, mark, mark, mark.
Measure, place bracket, square up, mark, mark, mark.
Measure, place bracket, square up, mark, mark, mark.
Measure, place bracket, square up, mark, mark, mark.
Put bit in drill, wrap tape around it for depth.
bzzzzzzzt bzzzzzzzt bzzzzzzzt
bzzzzzzzt bzzzzzzzt bzzzzzzzt
bzzzzzzzt bzzzzzzzt bzzzzzzzt
bzzzzzzzt bzzzzzzzt bzzzzzzzt
Done in about the time it took to read/type this, and how long did it take to set the CNC up? Though to be fair, it does learn you about the CNC for more complex/deserving stuff.
Ugh, I just realised they were bolted through from the top, and if the channel was pre-drilled, it was a perfect drill jig when clamped into place.