For all the hubbub about 3D printers leading a way into a new era of manufacturing, a third industrial revolution, and the beginnings of Star Trek replicators, we really haven’t seen many open source advances in the production of textiles and clothing. You know, the stuff that started the industrial revolution. [Gerard Rubio] is bucking that trend with OpenKnit, an open-source knitting machine that’s able to knit anything from a hat to a sweater using open source hardware and software.
We’ve seen a few builds involving knitting machines, but with few exceptions they’re modifications of extremely vintage Brother machines hacked for automation. OpenKnit is built from the ground up from aluminum extrusion, 3D printed parts, a single servo and stepper motor, and a ton of knitting needles.
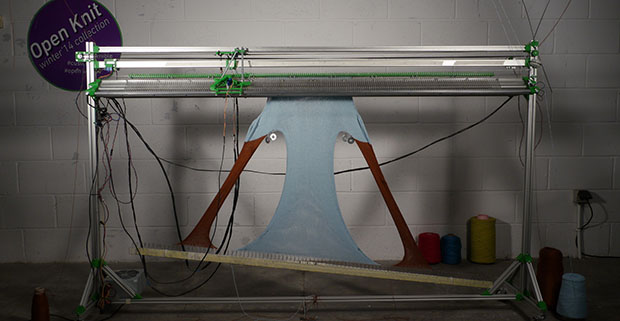
The software is based on Knitic, an Arduino-based brain for the old Brother machines. This, combined with an automatic shuttle, allows OpenKnit to knit the sweater seen in the pic above in about an hour.
Since OpenKnit is inspired by the RepRap project, all the files, software, and assembly instructions will be up on Github shortly. there’s also a video available below, and a Flickr gallery right here.


From the picture it looks as though it’s making a weird blue and maroon pair of panties.
Everyone’s favorite, knit wool panties. Scratchy much?
Not really panties. In fact it’s printing this: http://m1.behance.net/rendition/modules/100955859/disp/015474c267ee9be01d969840da53c4e5.JPG
Exactly. I was thinking “knitted thong” – for the adventurous granny.
Integrate a “Randomize colors” feature and the problem of “What to wear today?” will for ever be in the past!
Seriously, great device!
Once upon a time if you fell into an industrial textiles machine, you’d come out as tomato sauce. I bet if you fell into this you’d come out wearing a tailored suit. Good old child labor and thousands of whirring steel spikes.
I don’t know if I get it right.
Basically you knit the front and the back of the pullover, then sew it together?
Or is the machine able to knit circular form? (like the arm of the pullover)
Or a socks?
I did watch all the two videos, read the assembly tutorial (in github), also looked at the .png files (btw, here is the pullover: http://doknityourself.com/2014/01/15/helloworld-sweater-ssm-size/ ), but for me it seems it can only knit 2D shapes.
I’m not into knittin at all, so merely curious here. Anyone experienced?
Also if I get it right, all the color change is manual, constant watching is required, and it can only knit in the regular simple pattern. (so no end of the arm, or beginning of the pullover). So basically all the ends are curling backward.
Btw, this musical performance is …awe.. strange .. .. to say the least:
http://vimeo.com/68231027
The impossible sweater (piece of clothing) is definietly a usecase for such machine.
Laszlo
Look that machine is a double bed means it is doing front and back at the same time. Also in the way is done this machine reductions of needles are automatic made too.
If you look at the shirt you are currently wearing, odds are you’ll see seams. Knit seams appear to be invisible when you use the same thread, mostly because the seam has the same density as the fabric.
Hi Lazlo, the machine creates tubular sections so it produces 3d shapes, merging 3 tubular sections (L arm, body, R arm) when the garment gets to the armpit and decreasing needles up to the neck, creating an entire seamless sweater ready-to-wear.
Right now the system is not very reliable so you better stay close, next step is working on improving that reliability.
There are 3 tasks that are not automated, placing the weights (twice, check video below) and closing the garment at the end when it gets to the neck, any ideas??
This project is at an early stage of development so it has a basic performance, waiting for more people to get involved, the possibilities though, are huge.
+info https://vimeo.com/86889648
thanks for the beautiful comments everybody!
The way that the double bed passap machines handle knitting without weights is to use spring bound wheels that runs between the beds at the front and rear of the yarn feeder. This pushes the knitting downward. This could solve your issues of needing manual weight placement and the reliability.
I’m very excited about your project as I love knitting and have owned or own several. It’s been disheartening to see the major manufacturers dwindle down to where there’s only one place to really get them new anymore.
I can reach out to you through the site if you’d be interested in getting pictures or a better description of the “pusher” system. With that in place, you could create a toe-up sock very easily.
That sound interesting Bert! I thought about that method but I have never seen it from close, some pictures would be appreciated :)
I guess that would also reduce the machine’s volume since you wouldn’t need that much space below for the garment to come out…
thanks!
Before color addition, I think knitting pattern, like ribbing for the sweater hems are much more needed. To be able to create truly useful clothes.
Right now all your clothes curls up, most notably the sleeve of the sweater.
Also the end of the sleeves they are usually using *smaller* needles. I have no idea how to replicate that with your machine. Basically your machine has fixed sized needles, and a load (330) of them. So no easy way to switch them out temporary for finishing the cloth (neck, end of sleeves, ie. all the hems).
It seems pretty unsolvable problem. Have you given any thought to the problem?
Laszlo
ps: thank you for your detailed reply, and also the video. It was educational.
hi Lazlo! as you mention, It would be very difficult to switch the needles for smaller ones. an easy solution for the curling up is steaming the garment with the iron, this technique is widely used in my school and works pretty well.
maybe this could be automated one day, we will see! :)
kind regards,
gerard
The coolest project I must say…I got my daughter a Singer VIVO but now I need to build one of these as soon as I finish my current CNC project…
Very very cool stuff. You can make your own nice woolly socks.
This is a dream cone true for me. I often watch How It’s Made and I long to build an automated production system like those seen on the show. This is it…. Amazing.
Also, I’d rather not go clothes shopping so there’s that.
This is dangerously close to being a useful machine. Someone should alert the authorities…
Indeed.
Patent the idea ASAP and get the lawyers to work!
Needs to get to the bottom of this in court, before it gets out of hand!:)
Such an awesome project, clothing really needs to be produced in an open source fashion. I would really love to build one of these – or to modify one of the Brother machines. Aside from sheer physical size, what’s the main difference in functionality between this and the Brother computer knitters? Do you plan to keep software compatibility with them over time?
actual Brother hacks allow you to produce flat garments (they only have one needle bed), not tubular like OpenKnit (two needle beds). Having the ability to create tubular sections let’s you output a complete ready-to-wear sweater, while with a Brother you have to divide the sweater pattern (in case you want to do one) into different parts, knit them and after sew them together.
one great feature about Brother machines is that they allow you to create two colour patterns, hope OpenKnit gets to that point before this year ends, anybody in?? ;)
Thanks for the clarification – that is a big deal because much/any manual assembly of the clothing really makes the whole thing a lot less fun.
I’m very interested in building one of these things and helping out. Have CNC, 3D printer, and laser ready to go.
great! subscribe if you haven’t if you want to be updated when the manual assembly is out there http://openknit.org/newsletter/
thanks!
Brother machines have the capacity to add a ribber, thereby knitting in the round
Beautiful project and good videos, keep that way :)
but, can it knit itself?
haha, nope sorry, it can only dress itself
But can it knit itself a dress?
No, you’re thinking of the RepKnit.
Gerard, your next project should be this 3D loom http://www.youtube.com/watch?v=j19na8LMBnE Put me down for two!
Maybe it could be fed an old jumper to knit a new? That’s recycling.
One hour per jumper ain’t too bad, but my gran used to do it in 35min. Mind you, she also had to pop to the shops for a tin of cat food, so it probably evens out.
I saw their work on TV!
They are the official sweater supplier of the US Olympic team :-)
Not too knit-pick but those are crochet hooks not knitting needles (pun fully intended)
Christopher do you mean the needles from the machine? those are knitting needles http://www.bsk.co.uk/knitmastersilver-reed-sk120–sr120-xkn8-763-p.asp
Yup, knitting machines use special wierd hooked needles, not the type your granny would knit with.
Using one is pretty much a matter of sliding the “shuttle” (whatever it’s called) back and forth, it’s amazing how fast they can knit stuff. I’m sure there’s plenty of potential in this one to produce cardigans at miles per hour.
Gerard I saw this on engadet yesterday and thought it was awesome and I have a bunch of questions. Does the software pause and tell you when you need to add the extra weights? How long does it take to knit a whole sweater? Do the garments need any finishing after they come off the loom? Do you need to do any sewing of edges or seams? The sweater at 2:11 looks like the shoulder part needed some stitching. Your videos are great but I would love to see a whole tutorial and close up pics of the finished garments.
Hi James thanks for your interest. The machine is at an early stage of development, every task has been tested separated and works well but when you put them together reliability is not ideal, since there are some tasks that are repeated many many times along the process. The software will stop the carriage and will wait for you to put the weights, once you’ve done it you press a button to resume. This feature have not been coded although it’s pretty simple. The sweater wasn’t knitted from the very beginning till the very end automatically, some actions were handmade as you can see at the end of the timelapse so I don’t have an exact timing, but I can estimate around an hour, I want to try faster motors to go under an hour. Once the garment comes off the machine doesn’t require any sewing or any other finishing. The hole in the shoulder you mention was produced because I tried to put the sweater on and I broke some threads from the neck and opened a bit to the shoulder, I know, very smart. I did some bad/quick stitching after and that’s why there’s a hole. If everything goes correct during the process the garment comes off finished ready-to-wear.
I’m not sure if you are familiar with V-slot but you might want to check it out.
Will your software work with a ramps board + arduino? I would think a ramps board would make it a bit easier for someone to build their own version.
If you are trying to get faster you may want to use part of the marlin firmware. It has been designed so that you have a lot of control over speed and acceleration.
I will be following your project. My wife does design work for too fast and we are working on releasing a line of accessories on our own. Her sister is in school for fashion as well so I am sure that one of them is going to make me build one at some point.
Hi James, thanks for the tips. I checked different ways to get the linear motion and I ended up using the cheapest and the one I had access to, aluminium T profile with Vbearings, metal with aluminium, bad idea actually. I checked the V-slot and it’s definitely better since it doesn’t wear with the contact but very expensive also, maybe I’ll try it with next versions.
It might be a good idea using Ramps+Marlin if you have them, but electronics for OpenKnit are cheaper, so it wouldn’t make much sense to get the Ramps+Arduino Mega, although would be awesome if somebody could adapt the project to the RepRap electronics :)
OpenKnit shield in the works.
Gerard if you are interested in V-slot, email me. Shipping might not make it worthwhile but I’d be willing to help you out if I can.
I’m a knitter and I LOVE this project!
I can already identify one problem, though. When yarn is fed onto cones like the ones you’re using, the cone spins and the yarn is fed straight on from a swift (or whatever the large factory version is called). This keeps the yarn at the correct amount of twist.
But when you pull the yarn off from the top like you’re doing in the video, it twists on itself which will either add more twist to the yarn or subtract it. The end result is a fabric that will skew to one side.
What you need to do is put the cones on rollers, like toilet tissue holders. It will allow the cone to spin instead of the yarn, and you will avoid overtwist or undertwist issues.
Hope that helps! :)
hey Corey, great tip! I didn’t think about it but now you mention it makes a lot of sense, simple and effective for sure :)
on the list of things to do. thanks!
Great machine. I’m really looking forward to the plans being released. Can it knit and purl? For the non-knitters, this would allow you to produce ribbed stitch for the ends of the sleeves. It stops them rolling up.
hi John, it can only do the basic stockinette stitch by know, if the technology evolves it will definitely be possible to do more tasks, we will see what happens :) thanks!
Hi Gerard, I’m very interest building such a machine. Planning to build it half size (better handling during developing). What about the OpenKnit shield? Would it be possible for you to make a small series and offer shields for buying?
regards
Gerd
hi Gerd, thanks for your interest! It’s a great idea to build one half size for developing. Producing some shields is in my list of things to do but first I wanted to work on some other aspects.
when would you be interested in building one?
please let me know.
thanks a lot!
gerard
Hi Gerard, will start building as soon as possible.
Wait for STLs to start printing. At weekend I’ll order missing parts and try to make plans for half sized machine. Hope it will be possible to convert sketchup file, so I can load into Autodesk Inventor.
Gerd
hi Gerd, thanks a lot for your interest.
working on the STLs, they will be ready next week, I’ll let you know!
Hi,
I am a machine knitter from way back in the brother heyday. Very interesting, what you have done here.
In regards to knit and purl, brother had a device called a garter carriage. This motorized unit kerplunked its way across the bed knitting and purling to a pattern. This could be adapted to your circular bed.
Big problem was that these things needed babysitting, as you already figured out.
Good luck with your venture. Very exciting way to bring back a versatile machine. No limits, except to your imagination.
thanks Callen! I didn’t know this knit and purl gadget, I’d love to see inside of it.
something like this could probably be adapted, it’s already written down in a long list about new features to be developed :)
kind regards,
gerard
The device has one needle on it. As it moves across the bed it either knits normally by pulling the bed needle back to catch the yarn or purls by using the needle on the device to purl the stitch. Quite clever. It is slow though. I no longer have one, but have been available on eBay in the past.
thanks for the explanation Callen.
I searched online to get one but they are pretty expensive, hopefully someday I’ll meet somebody that has one.
best!
gerard
Thought on how to switch to smaller needles, how bout the large needles are hollow and have the smaller needles inside. Stop the machine and remove the large hollow needle covers revealing the inner smaller needles?
Stitch size in knitting machines is controlled mostly by increasing or relaxing tension, not needle size. Add a screw like device for the yarn to pass through and you can make stitches bigger or smaller. You can make faux ribbing by leaving every third needle empty and eliminate end curl or if you can do circular knitting you can do real ribbing by alternating casting on two on front two on back bed and then sewing ends shifting to circular knitting after ribbing is done.
My friend found out about what you are all doing with the old knitting machines and I was just looking at all the comments. Bought the arduino due board and knitic board but still having issues getting it working. Keeps saying usb disconnected and also it’s not seeing the machine. Working on figuring it out. I have several machines so I’m taking my time.
Did you ever get the garter carriage.
Very nice Gerard, I don’t know why manufacturers stopped making knitting machines.
Does your machine knit only in stockinet stich or what kind of stiches does make?
Will it have different carriages? Intarsia, lace, ribber.
Keep up the good work