When building a one-off DIY project, appearances tend to be the least of our priorities. We just want to get the device working, and crammed into some project case. For those that like to build nicer looking prototypes [JumperOne] came up with a slick method of building a custom front panel for your DIY project.
The first step is to get the dimensions correct. You CAD tool will generate these from your design. [JumperOne] took these measurements into Inkscape, an open source vector graphics tool. Once it’s in Inkscape, the panel can be designed around the controls. This gets printed out and aligned on a plastic enclosure, which allows the holes to be marked and drilled.
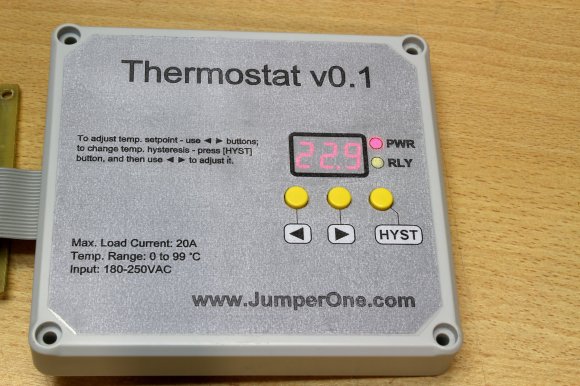
With the electronics in place, the front panel gets printed again on a general purpose adhesive sheet. Next up is a piece of cold laminating film, which protects the label. Finally, holes are cut for the controls. Note that the display and LEDs are left covered, which allows the film to diffuse the light. The final result looks good, and can provide all the needed instructions directly on the panel.
[Thanks to Ryan for the tip]


+1 for the ORLY light :)
Came for the ORLY, left satisfied…
when describing the difference between on and off in a temperature control loop, the term used is not hysteresis, it’s deadband. Still, the panel looks great.
STC-1000 uses the term hysteresis. You might use a different term, but the most common hobbyist temperature controller uses a different one.
Hysteresis is the generic term used to apply to future control based on past response. Deadband is a form of hysteresis. The term hysteresis is the one most commonly used for cyclical control.
Panel would look better without the hysteresis button. It would work better too, if it implemented a PI(D) controller.
Repeat post? Think I’ve seen this here before..or something like it…
And here I thought I was clever for using a laser printer and some clear packing tape…
I used toner transfer from transparency onto Plexiglas. The same trick also works well as silk screen for component designators/values like in “Serial Monitor Without a PC” just above this article.
Looks professional! But then it says v0.1 really big on top, which somehow tells me it’s going to be replaced some time soon, which is sad after putting in all that effort!
So am I to understand that the LED and 7segment areas are not cutout?
You get the best looking panels by engraving them with a laser cutter and then using a paint-pen to fill the engravings. The paint that spills on the front itself can easily be wiped away so it only stays in the engraving.